

Learn how to edit Shopify theme code safely with simple steps to customize your store, improve performance, and avoid common beginner mistakes.
Ever wanted to make a few changes to your Shopify store but felt nervous about touching the code? You’re definitely not alone. Shopify now powers over 4.6 million stores worldwide (as of early 2024), and many store owners feel the same way, worried that they might accidentally mess something up. But here’s the good news: editing your Shopify theme code isn’t as complicated as it seems.
Once you understand the basics, it becomes much easier. With the right approach, even beginners can make confident edits that enhance both design and performance.
In this blog, you'll explore the essentials of editing your Shopify theme safely, so you can take charge of your store’s design without the stress.
Key Takeaways:
- Learn Shopify’s theme code, Liquid, HTML, CSS, and JavaScript. Begin with visual edits before moving to deeper customizations.
- Always duplicate your theme, work on a staging copy, and test on multiple devices before going live to prevent display or performance issues.
- Keep your edits organized. Use external CSS instead of inline styles, and rely on Liquid filters and snippets for clean, reusable code.
- Don’t overwrite Shopify defaults, skip SEO basics, or add too much custom code at once, as it can slow down or break your store.
- Regularly review your code after updates or app installs to keep your store fast, compatible, and optimized for customers.
What is Shopify Theme Code?
Shopify theme code is basically the set of instructions that decides how your online store looks and works. You can think of it as the blueprint of your website. It shapes everything —from the layout of your homepage and product pages to the appearance of buttons, menus, and images.
A Shopify theme is made up of different types of code, each with its own role:
- Liquid: This is Shopify’s own templating language. Liquid is like the engine of your store, ensuring that products, collections, prices, and even customer-specific information appear exactly where they should.
- HTML: This is the structure of your web pages. Think of it as the skeleton holding everything together.
- CSS: This controls the style of a page, such as fonts, colors, spacing, and layout. In other words, it’s the outfit and makeup that make your store look good.
- JavaScript: This enables interactive elements, such as sliders, pop-ups, and dynamic product filters.
When these codes work together, they create a smooth shopping experience for your customers. By tweaking your Shopify theme code, you can make your store truly yours, matching your brand, improving navigation, and adding cool features.
Knowing the Shopify theme code makes it easier to identify where and how to make changes that fit your store’s needs. Once you’re familiar with that, the next step is learning how to access it safely.
How to Access Your Shopify Theme Code?
Getting into your Shopify theme code is easier than it sounds. Here’s how to do it:
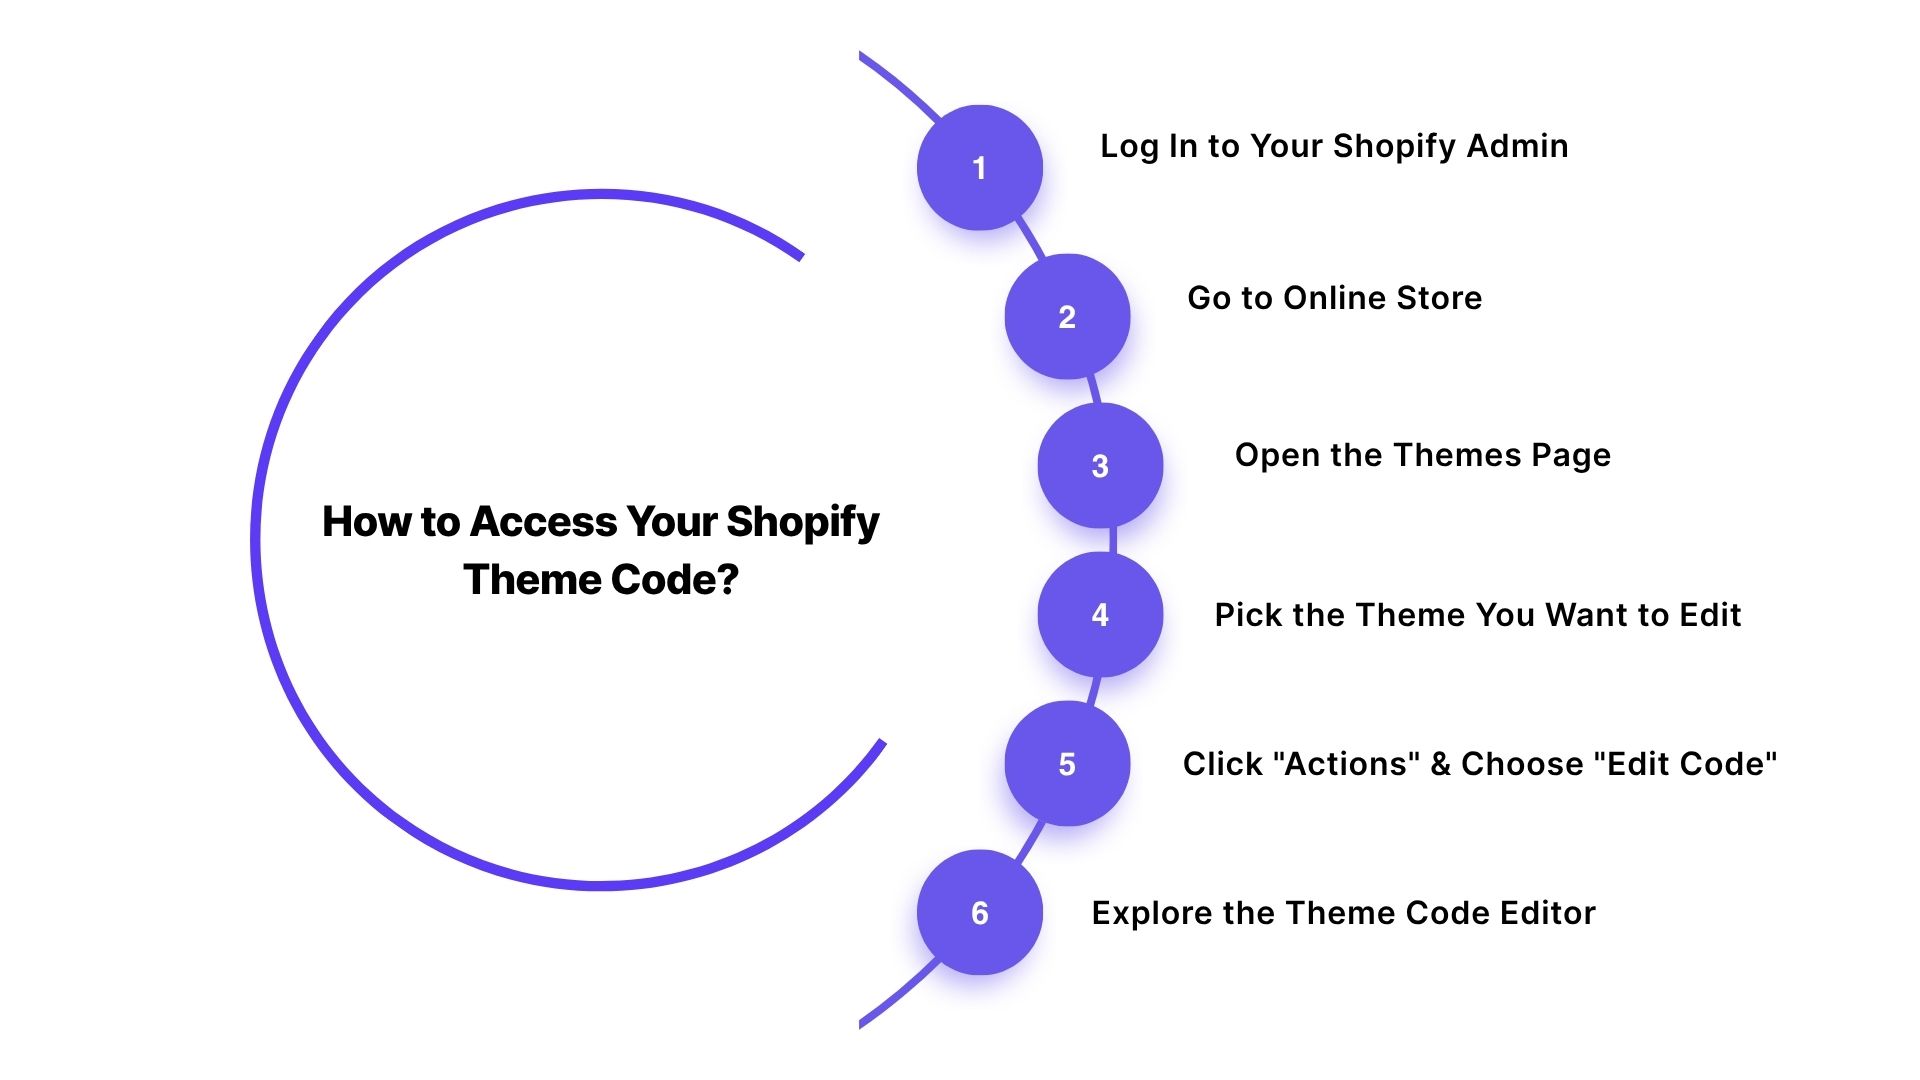
1. Log In to Your Shopify Admin
Head over to Shopify’s login page and enter your credentials. This will take you to your store’s admin dashboard.
2. Go to Online Store
In the left-hand sidebar of your dashboard, find and click on "Online Store". This will open the section where all your themes live.
3. Open the Themes Page
Under Online Store, you’ll see the Themes section. Here, you can view all the themes installed on your Shopify store.
4. Pick the Theme You Want to Edit
Find the theme you want to customize. If it’s your live theme, it will show as "Current theme". To avoid affecting your live store, click "Actions" and select "Duplicate" to create a backup first.
5. Click "Actions" and Choose "Edit Code"
Next, click the "Actions" dropdown beside your theme. From the list, choose "Edit Code". This opens Shopify’s code editor, where all the magic happens.
6. Explore the Theme Code Editor
Inside the editor, you’ll see a bunch of files and folders. Here’s a quick guide:
- Templates: Files like theme.liquid and product.liquid controls the layout of your store pages.
- Assets: This is where stylesheets, images, and JavaScript files live.
- Config: These files handle settings that adjust your store’s features.
- Locales: If your store uses multiple languages, translation files are stored here.
After accessing your Shopify theme code, it's helpful to familiarize yourself with the file and folder structure so you know where to find and edit the right elements.
Suggested Read: Why Variant Images Won't Change in the Shopify Boundless Theme
A Quick Tour of Shopify Theme Files and Folders
Shopify theme files are neatly organized into folders, and each folder plays a role in shaping your store’s look, feel, and functionality. Let’s break down what’s inside each folder and why it matters.
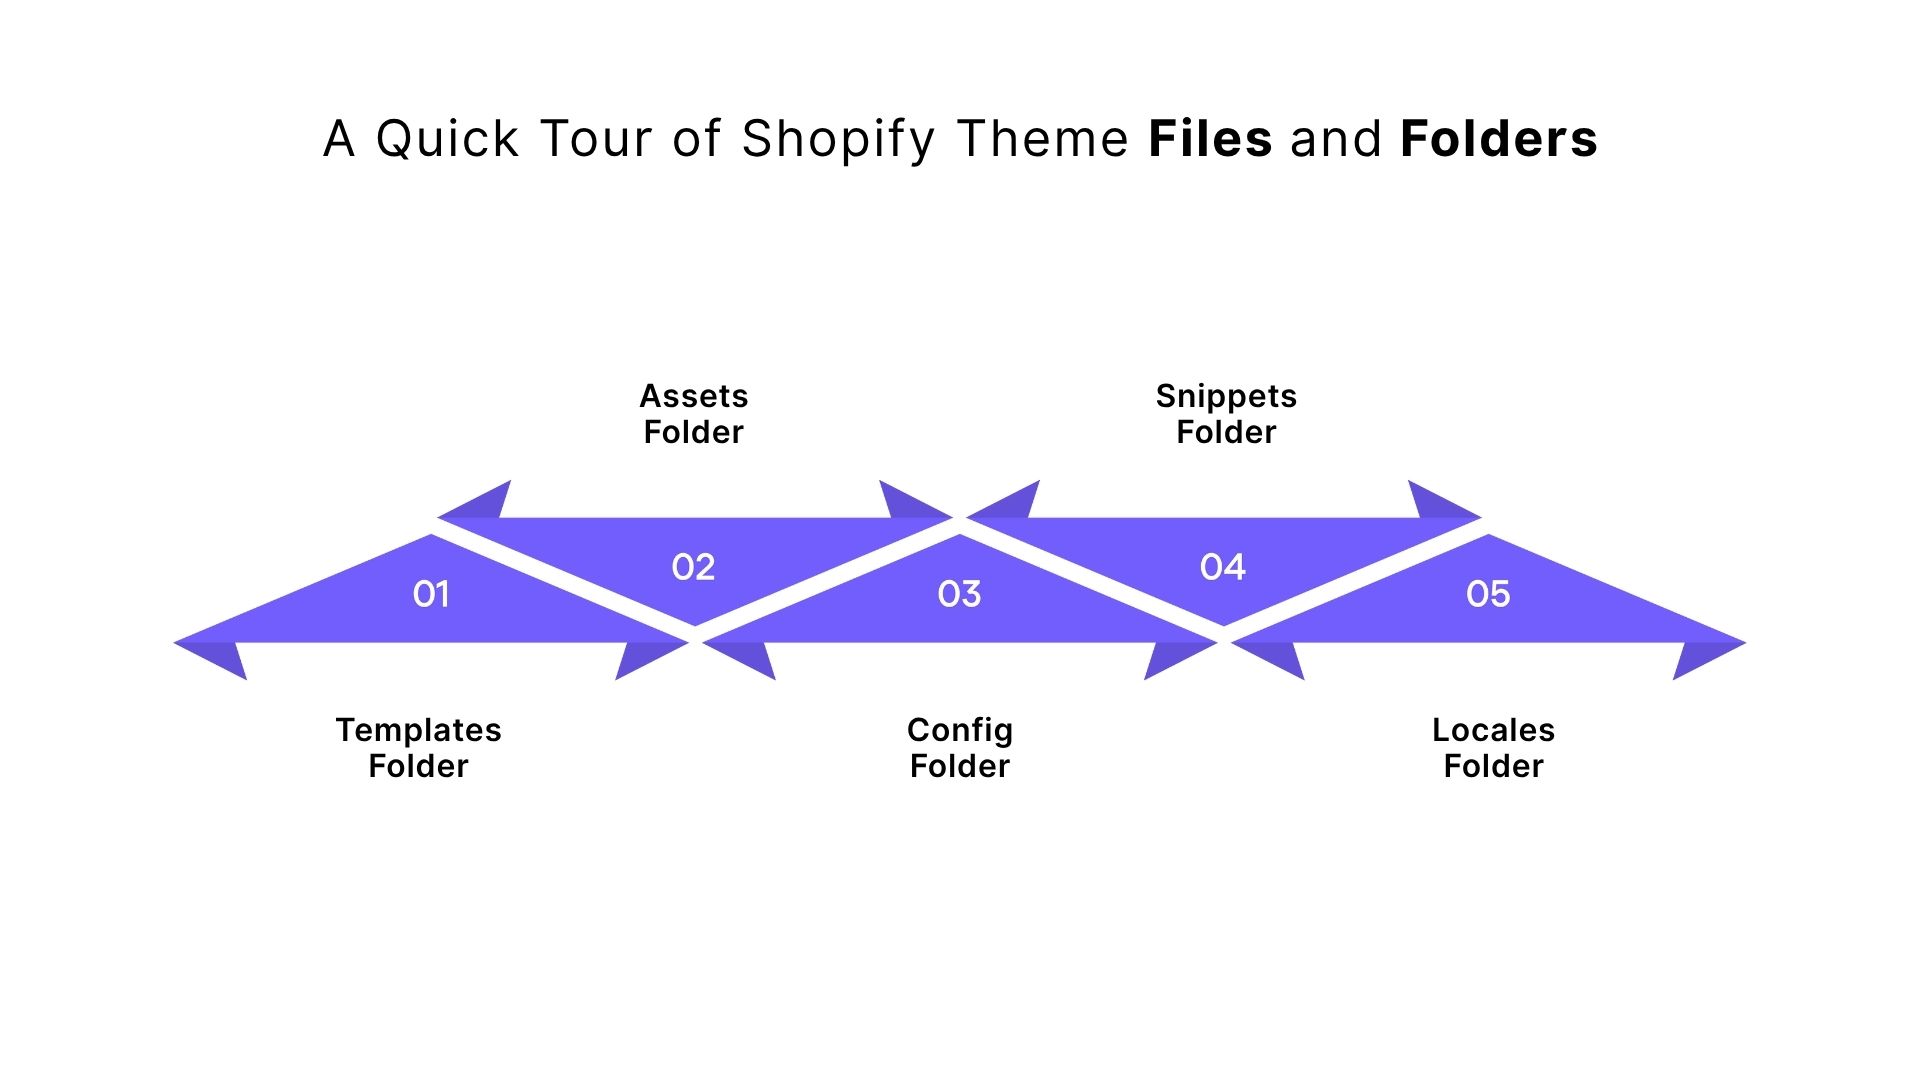
1. Templates Folder
This is where the main structure of your store lives. Templates control the layout of different pages. Some key files include:
- theme.liquid: The backbone of your store, setting up the overall structure like the header, footer, and main layout.
- product.liquid: Controls how your product pages look.
- collection.liquid: Defines how your collection pages appear.
2. Assets Folder
Think of this folder as the design hub. It holds all the files that make your store look and feel the way it does:
- CSS files (like style.scss.liquid): These set colors, fonts, spacing, and layout, basically the style of your store.
- JavaScript files: Add functionality and interactivity, like sliders, pop-ups, or dynamic product features.
3. Config Folder
This folder manages your theme settings. It makes it easier to tweak your store without touching the core code:
- settings_schema.json: Defines what options you can change in the Shopify admin panel, like colors, fonts, and layout features.
4. Snippets Folder
Snippets are small, reusable chunks of code you can use across your theme. They save time and keep things organized. Common examples include:
- header.liquid: Controls site-wide navigation elements.
- footer.liquid: Manages footer elements, like contact info and legal links.
5. Locales Folder
If your store speaks multiple languages, this folder is essential. Each language gets its own file:
- en.default.json: Stores all the English text used on your store.
By understanding Shopify’s theme files and folders, you can take control of your store’s design and functionality, making customizations easier and more effective.
Once you understand the layout of your Shopify theme files and folders, you can start making simple code edits to customize your store effectively.
5 Simple Shopify Code Edits You Can Try Yourself
You don’t need to be a coding expert to make your Shopify store look and work better. Even small code tweaks can give your store a fresh feel and make shopping easier for your customers. Here are some simple Shopify code edits you can try on your own:
1. Changing Theme Colors
Updating your store’s colors helps show off your brand and creates a smooth, cohesive look for shoppers. To change the theme colors:
- Step 1: Go to Online Store > Themes in your Shopify admin.
- Step 2: Click Actions and select Edit Code.
- Step 3: Open the Assets folder and find your CSS file (usually theme.scss.liquid or style.css).
- Step 4: Look for color codes (like #000000 for black) and swap them with the colors you want for your background, text, or buttons.
Example: Change your main button color:
.btn {
background-color: #FF5733; /* Change this to your desired color */
}
2. Adjusting Font Style and Size
Fonts affect readability and style. Picking the right font makes your store look polished and on-brand. To adjust font style and size:
- Step 1: Open your CSS file in the Assets folder.
- Step 2: Search for font-family to find the current font and replace it with a new one (Google Fonts works great).
- Step 3: Change the font-size property to adjust text size.
Example: Update product titles:
.product-title {
font-family: 'Roboto', sans-serif; /* Change this to your preferred font */
font-size: 24px; /* Adjust the font size */
}
3. Hiding Out-of-Stock Products
Keeping out-of-stock items hidden avoids confusion and keeps your store looking fresh. To do it:
- Step 1: Go to Online Store > Themes > Actions > Edit Code.
- Step 2: In the Snippets folder, find product-grid-item.liquid or product-card.liquid.
- Step 3: Add a condition to show products only if they’re available:
{% if product.available %}
<!-- Display product code here -->
{% else %}
<!-- Hide or display a custom out-of-stock message -->
{% endif %}
Example: Replace the product image with a “Sold Out” banner if the product is unavailable.
4. Adding a Custom "Back to Top" Button
A “Back to Top” button makes navigation easier, especially on long pages, helping customers scroll back up quickly. To do it:
- Step 1: In the Assets folder, open your CSS file and style the button to stay fixed on the screen.
- Step 2: In the Snippets folder, create back-to-top.liquid and add:
<button class="back-to-top">Back to Top</button>
- Step 3: Add JavaScript to make it appear on scroll and scroll smoothly to the top when clicked:
document.querySelector('.back-to-top').addEventListener('click', function() {
window.scrollTo({ top: 0, behavior: 'smooth' });
});
5. Changing Button Text or Style
Buttons are your call-to-action. Updating their text or look can make them more eye-catching and encourage clicks. To do it:
- Step 1: Open your theme’s CSS file.
- Step 2: Find the button class (often .btn or .button) and tweak background color, font size, alignment, or other styles.
- Step 3: To change the text, edit the Liquid file (usually product-template.liquid):
<button class="btn">{{ 'Buy Now' | t }}</button>
You can also update the text in your theme’s Language Settings to change CTA text across the store.
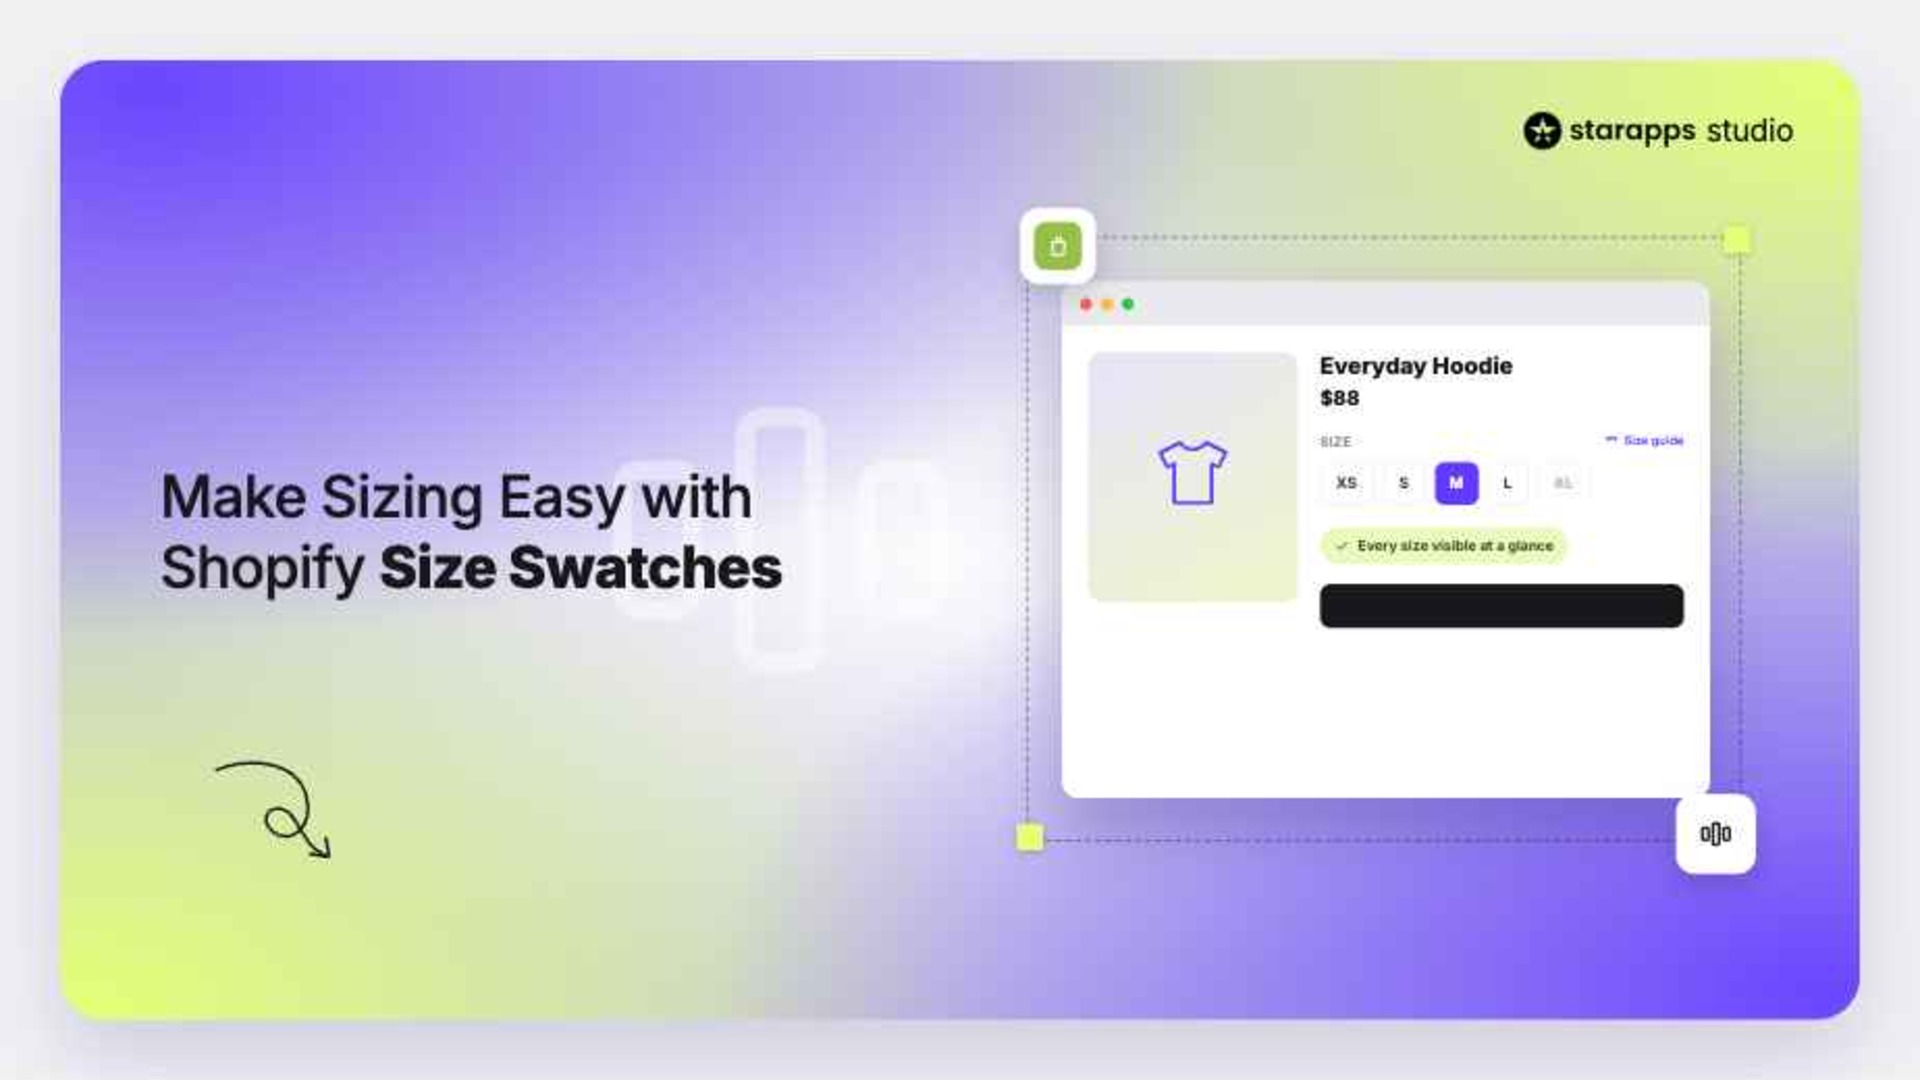
With StarApps Studio’s Variant Descriptions King, you can easily organize and display unique product descriptions for each variant using tabs or accordions, making your pages clearer and more engaging, all without the need to manually edit Liquid or CSS files.
Also Read: How to Add Color Swatches for the Shopify Prestige Theme
7 Smart Tips for Editing Shopify Code Safely
Editing your Shopify code gives you plenty of creative freedom to customize your store, but it’s essential to do it carefully. A small mistake can affect how your store looks or works. Here are a few smart tips to help you make code edits safely and smoothly:
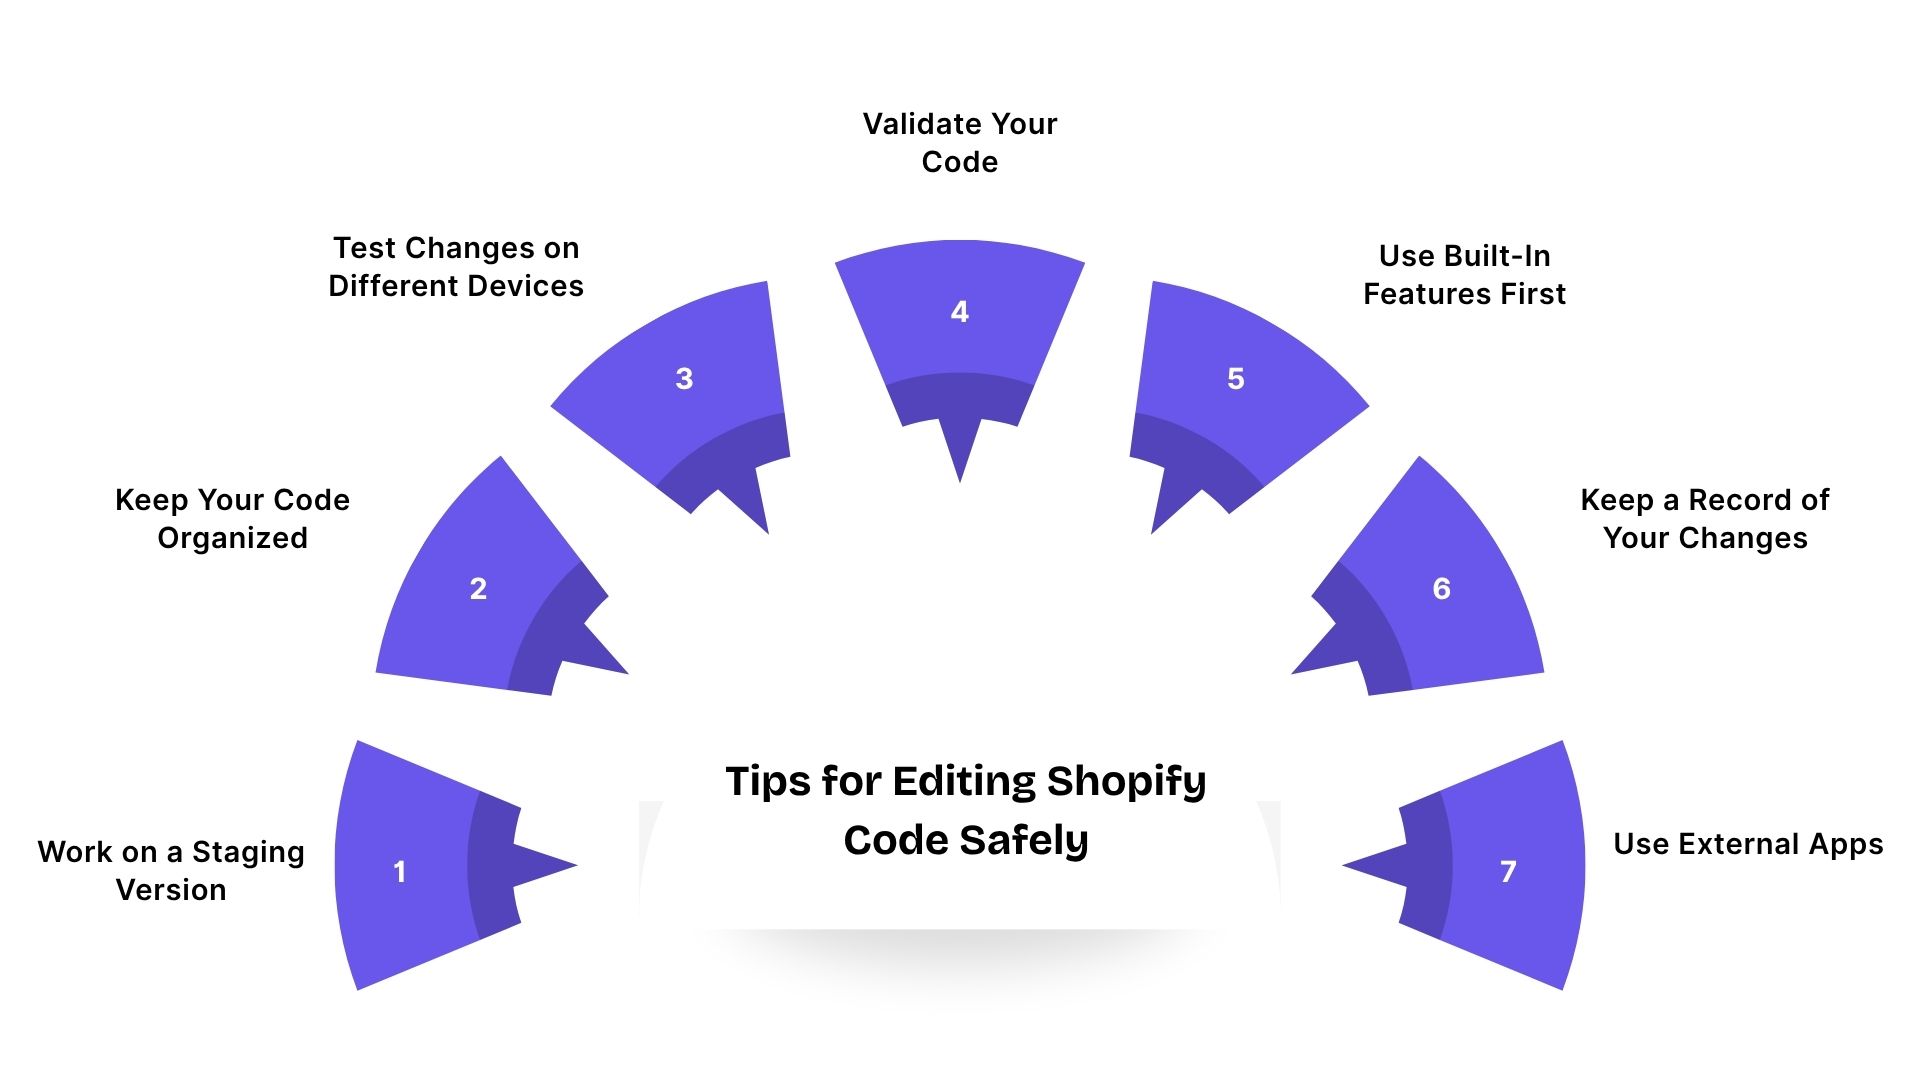
1. Work on a Staging Version of Your Theme
Making changes directly to your live store can sometimes cause unexpected errors or design issues. It’s always safer to work on a backup version (also called a staging theme) so you can test everything before publishing. To do it:
- Step 1: Go to Online Store > Themes in your Shopify admin.
- Step 2: Click Actions next to your live theme and select Duplicate. This creates an exact copy of your current theme.
- Step 3: Make all your edits on this duplicate version, such as add custom code, test features, or tweak layouts.
- Step 4: Once everything looks good, go back to your Themes page, click Actions next to the duplicate, and select Publish to make it live.
2. Keep Your Code Organized and Consistent
Clean and consistent code is easier to manage and troubleshoot, especially as your store grows. It also helps prevent mistakes and keeps everything readable. To do it:
- Step 1: Maintain consistent indentation (tabs or spaces) to keep your code neat and structured.
- Step 2: Use clear naming conventions for your classes and IDs, for example, use product-title instead of random names like title123.
- Step 3: Add short comments in your code to explain complex parts. This makes it easier for you or anyone else to understand later.
3. Test Changes on Different Devices and Browsers
Your customers use a wide range of devices and browsers, so your edits need to look great across them all. Testing helps you spot design issues before your customers do. To do it:
- Step 1: After editing, preview your store on different devices and browsers.
- Step 2: Use browser developer tools (in Chrome, Firefox, etc.) to simulate mobile and tablet views.
- Step 3: Try tools like BrowserStack to test your store on multiple browsers and devices.
- Step 4: Double-check visuals, such as buttons, fonts, and images, to ensure they display correctly across all platforms.
4. Validate Your Code
Keeping your code error-free ensures smooth performance and prevents unexpected issues. To do it:
- Step 1: Use CSS Lint and JS Lint to check your CSS and JavaScript for mistakes like missing semicolons or syntax errors.
- Step 2: Run your Liquid files through Shopify’s Liquid Validator to catch template errors.
- Step 3: Use the W3C Markup Validation Service to make sure your HTML follows web standards.
5. Use Shopify’s Built-In Customization Features First
Before jumping into coding, explore what Shopify’s built-in tools can do. The Theme Customizer offers plenty of safe, visual ways to personalize your store. To do it:
- Step 1: Go to Online Store > Themes in your Shopify admin.
- Step 2: Click Customize next to your active theme.
- Step 3: Use the Customizer to adjust colors, fonts, layouts, and sections. Shopify will automatically update your theme—no coding needed.
6. Keep a Record of Your Changes
Tracking your edits helps you stay organized and makes it easy to undo or review changes later. To do it:
- Step 1: Create a simple text file or Google Sheet to log changes; note the file name, what you changed, and why.
- Step 2: For more advanced work, use Git for version control. It lets you track edits and roll back to earlier versions if something goes wrong.
7. Use External Apps for Complex Features
You don’t always need to code everything yourself. Many Shopify apps can add advanced features safely and quickly. To do it:
- Step 1: Visit the Shopify App Store and browse for apps that meet your needs, like product filters, wishlists, or email pop-ups.
- Step 2: Check app ratings, reviews, and support details before installing.
- Step 3: Install the app and integrate it with your theme. Most apps blend in smoothly without affecting your code.
Following smart coding practices can help prevent problems, but it’s equally important to be aware of common mistakes made by many Shopify users.
Must Read: Shopify Color Swatches Guide for Themes
Avoid These Common Shopify Code Mistakes
When you start editing your Shopify theme code, it’s easy to slip up and make small mistakes that can mess with your store’s look, performance, or functionality. Don’t worry; it happens to almost everyone. Here are some of the most common Shopify code mistakes to watch out for:
Edit Shopify Theme Code with Confidence Using StarApps Studio
Customizing your Shopify theme code is one of the most effective ways to shape your store’s design and user experience. Still, it can feel intimidating, especially if you’re new to code and worried about breaking your layout or losing important functionality. That’s where StarApps Studio comes in.
Our suite of tools lets you make precise design and content updates without digging into Liquid, HTML, or CSS. Each app is designed to simplify customization, enhance product presentation, and keep your store running smoothly.
Here’s how our tools can make editing Shopify theme code easier, safer, and more efficient for every store owner.
Variant Descriptions King
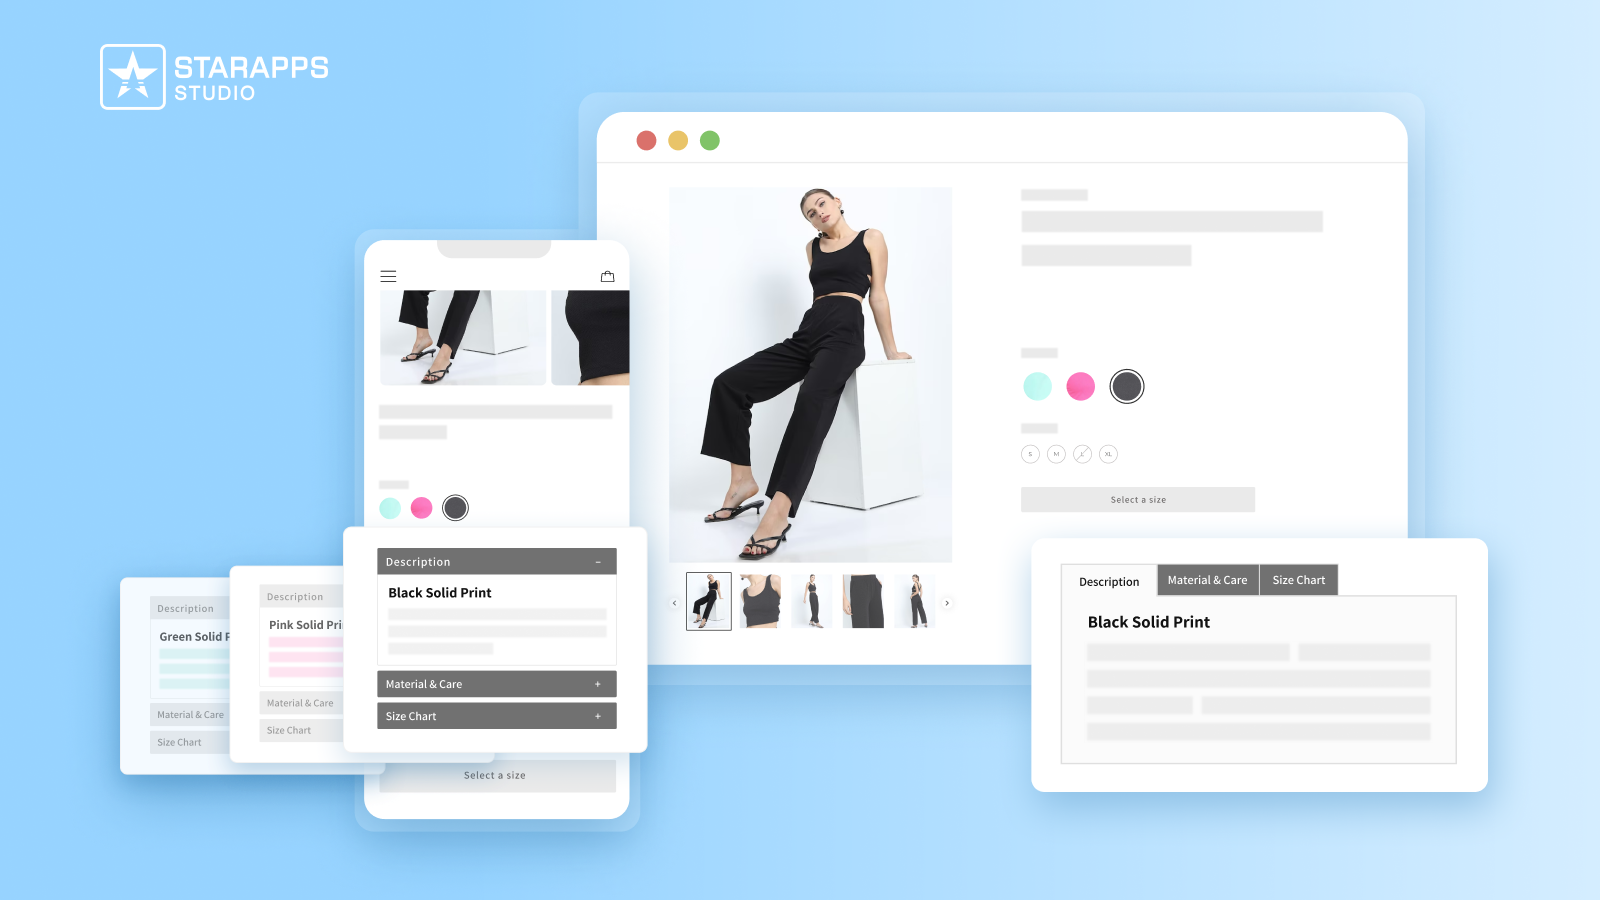
Variant Descriptions King helps you manage and optimize variant-specific descriptions, enhancing both the customer experience and your Shopify meta description strategy. With detailed and well-organized information, customers can make informed decisions quickly.
- Unique Descriptions for Each Variant: Tailor descriptions for each variant to provide accurate details.
- Tabs and Accordions: Use collapsible sections for easy navigation of long descriptions.
- Mobile-Friendly: Automatically switch to an accordion view on mobile for easier browsing.
Variant Alt Text King: SEO
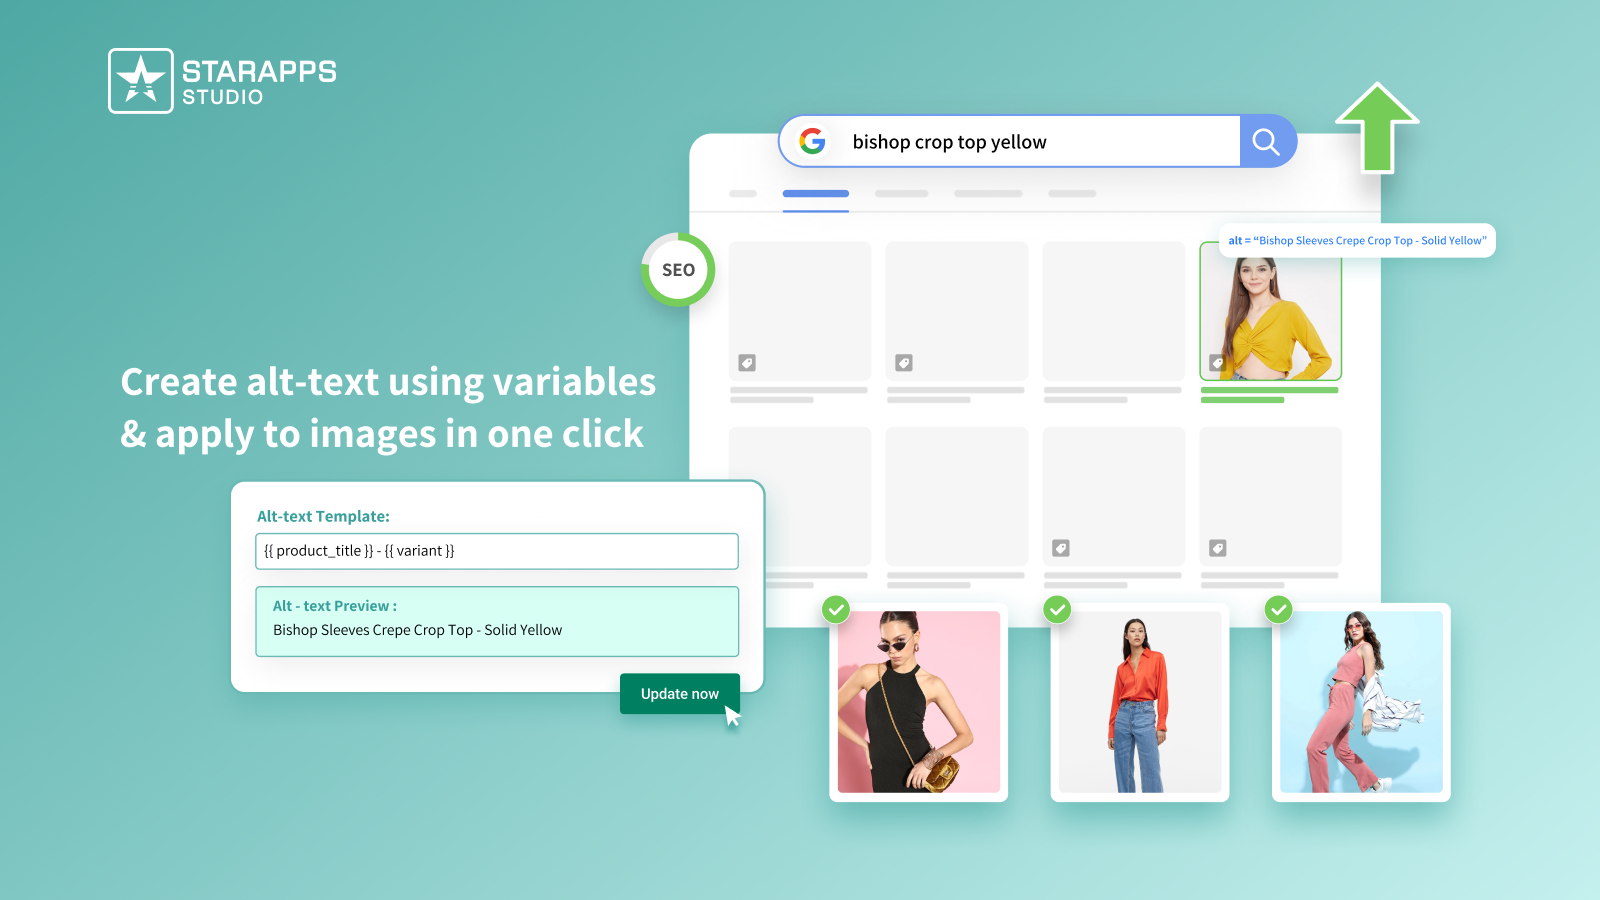
Variant Alt Text King: SEO simplifies image optimization for search engines, ensuring your Shopify meta description and image tags are optimized for maximum discoverability. This tool is an easy way to improve your SEO rankings and make your store more accessible to all users.
- Easy ALT Text Optimization: Automatically optimize ALT text for all variant images.
- Improved Accessibility: Enhance store accessibility for users with disabilities.
- Improve SEO Rankings: Optimized ALT text helps search engines index images correctly.
Variant Image Automator
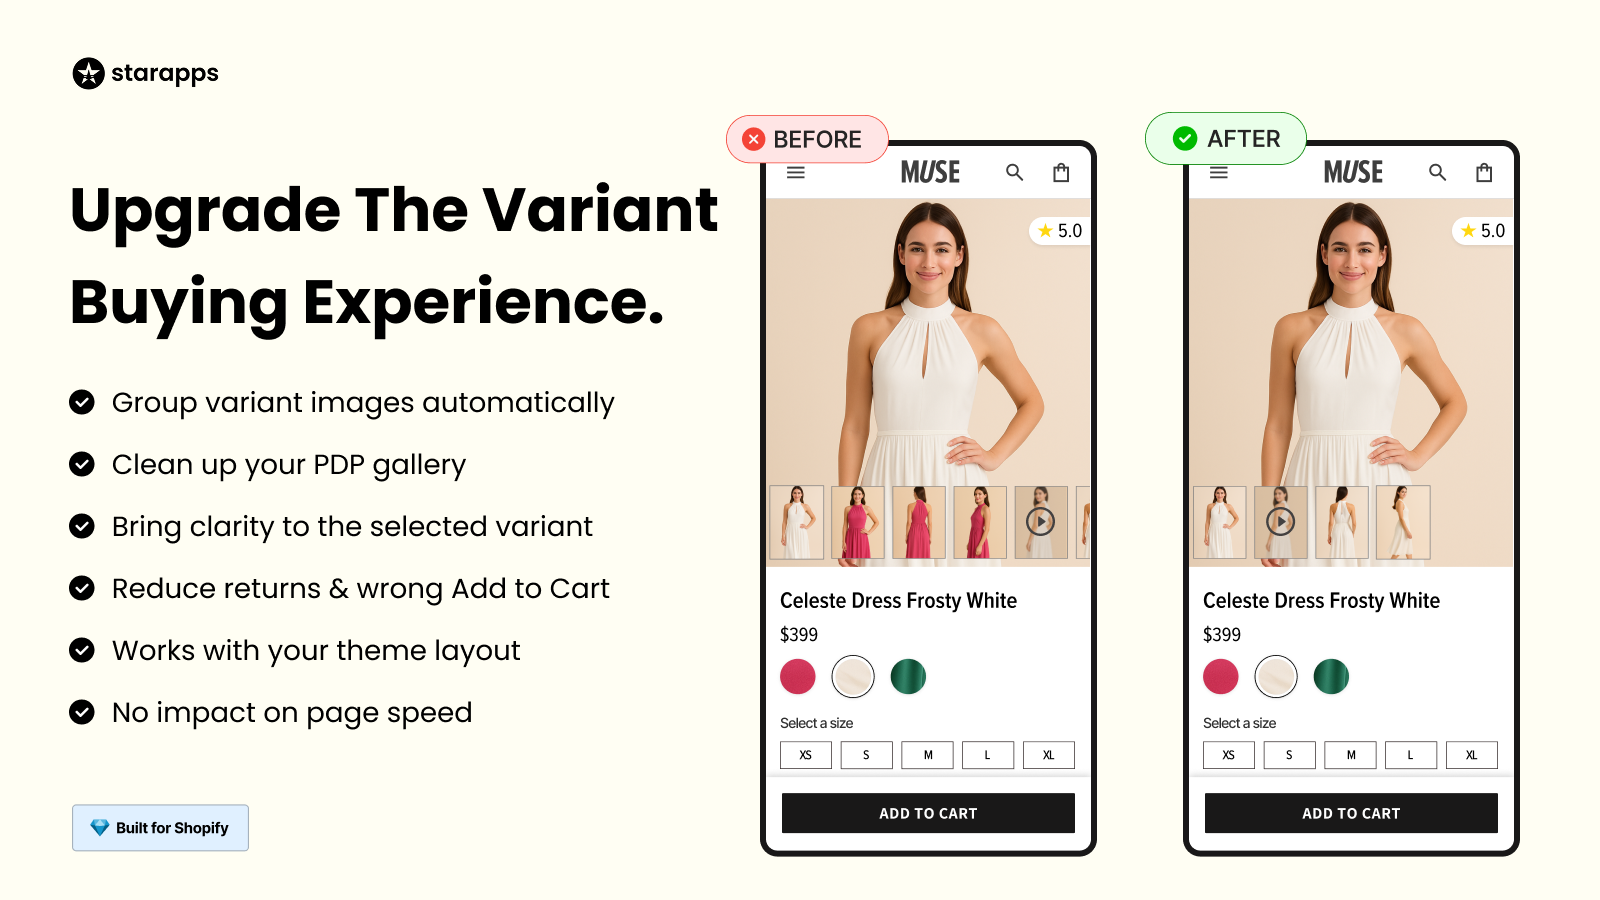
While Variant Image Automator optimizes your images, it can also play a crucial role in your meta descriptions by ensuring that variant-specific content is included. This tool creates an organized, professional-looking storefront that enhances both your SEO and user experience.
- Auto-Assign Variant Images: Automatically link images to variants for accurate visual representation.
- Enhanced User Experience: Show only relevant images to improve navigation.
- Improve Conversions: Display multiple images to help customers make purchase decisions.
Variants: Combined Listings

Variants: Combined Listings takes variant management a step further by helping you organize your products and optimize them for better search results. By listing each variant separately and clearly describing them, your Shopify meta description will attract more clicks and improve your store’s SEO.
- Display All Variants on Collection Pages: Show all product variants on the collection page for easy selection.
- Improved Search & Filter Results: Unique URLs for each variant improve search and filtering.
- Rich Product Listings: Each variant gets a dedicated listing with a title, images, and description.
By using these apps, you can easily optimize your store, saving time and improving your click-through rates.
Final Thoughts
Editing your Shopify theme code doesn’t have to be stressful. Once you get the hang of how it works and follow a few safe editing steps, you can shape your store exactly the way you want. Whether it’s tweaking layouts or improving SEO, even small changes can have a big effect on your store’s look and performance.
By integrating StarApps Studio, you can simplify code edits, manage product variants visually, and maintain a consistent, professional storefront, all without advanced technical skills.
Reach out to us today to edit your Shopify theme code more easily, safely, and efficiently.
FAQs
Q1. What should I do if my Shopify store breaks after editing the code?
A1. If your store layout or features stop working after a code edit, don’t panic. Simply switch back to your theme backup; it’s your safety net. Once everything’s stable again, compare your files to find what went wrong. You can also use Shopify’s version history to roll back specific files to their earlier versions.
Q2. Is it safe to use third-party code snippets found online?
A2. Not always. Some snippets might be outdated or may not work well with your current theme. Before using them, check where they come from, test them on a duplicate theme (not your live store), and read through the code comments to make sure they won’t break anything.
Q3. Can I undo specific changes in Shopify’s code editor?
A3. Yes, you can. Shopify’s code editor keeps a handy file history. Just open the file you changed, click the “Older versions” dropdown, and pick the version you want to restore. It’s a simple way to undo mistakes without starting from scratch.
Q4. How can I identify which file to edit for specific elements (like buttons or product titles)?
A4. Your browser’s Inspect Element tool is your best friend here. Right-click the part of your page you want to tweak, like a button or title, and select “Inspect.” It’ll show you the exact file, class, or ID that controls that section, making edits much easier.
Q5. Are code edits preserved when updating my Shopify theme?
A5. Not always. Theme updates can sometimes overwrite manual changes. To avoid losing your edits, keep a record of what you’ve modified so you can reapply them later. If possible, work with a child theme or duplicate your theme before updating to stay safe.
Heading

End-to-end traceability
To ensure regulatory compliance, you must have a complete overview of your products from production to shipping. Book a demo to see how Katana can give you full visibility of your operations.
.png)
.png)