
Add custom fonts to your Shopify theme easily and give your online store a professional, branded, and eye-catching design.
Typography shapes how your Shopify store is perceived before a customer reads a single word. Academic research shows that readability and typographic layout can predict conversion performance because easier-to-read content reduces user effort and enhances engagement.
Fonts directly impact readability, brand recognition, and user trust. Shopify highlights typography as a key part of brand identity, helping stores feel more professional and memorable. Yet many merchants rely on default theme fonts, which are safe but generic.
Custom fonts allow you to align your storefront with your brand voice and improve how easily customers scan product information. When paired with clear product displays and intuitive variant presentation, strong typography contributes to a more polished experience, one that builds confidence and supports conversions.
Key Highlights
- Typography directly influences user experience and conversions. Clear, readable fonts reduce effort, increase engagement, and make product information easier to scan.
- Default Shopify theme fonts are safe but limited; they lack personality and hierarchy control, making it harder for growing brands to stand out and reinforce identity.
- Shopify supports multiple ways to add custom fonts, from the Theme Editor (no code) to self-hosting fonts, CSS-based loading, or using Shopify Files/CDN to balance flexibility and performance.
- Corr
- ect implementation is crucial: Use WOFF2, confirm web-embedding rights, load fonts globally, and use CSS variables to avoid conflicts and performance issues.
- Typography boosts conversions when paired with strong UX, and tools from StarApps Studio enhance variant clarity, visual selection, and product understanding.
Why Custom Fonts Matter in Shopify?
Typography in a Shopify store is not just a design choice; it directly impacts how customers read, perceive, and interact with your storefront.
Fonts Directly Affect Core UX Factors
Custom fonts influence several critical areas of the shopping experience:
- Readability: Clear typography makes product information easier to consume across devices.
- Brand credibility: Consistent, intentional fonts signal professionalism and trust.
- Scanning speed on product pages: Shoppers scan headings, prices, and variant details quickly; good typography supports this behavior.
Why Default Theme Fonts Fall Short
Shopify’s default theme fonts are designed to be safe and widely compatible. While they work for new stores, they often fail to support growing brands because:
- They look generic and reduce brand distinction
- They don’t reflect a brand’s personality or positioning
- They offer limited control over hierarchy and emphasis
As competition increases, these limitations become more noticeable.
Fonts Must Support UX and Not Compete With It
The real value of custom fonts isn’t visual novelty. Fonts should:
- Guide attention to important elements
- Reinforce content hierarchy
- Reduce cognitive effort during browsing and decision-making
Decorative or poorly implemented fonts do the opposite; they distract users and create friction.
When chosen and implemented correctly, custom fonts improve clarity, trust, and the overall shopping experience, especially on product pages.
Ways to Add Custom Fonts in Shopify
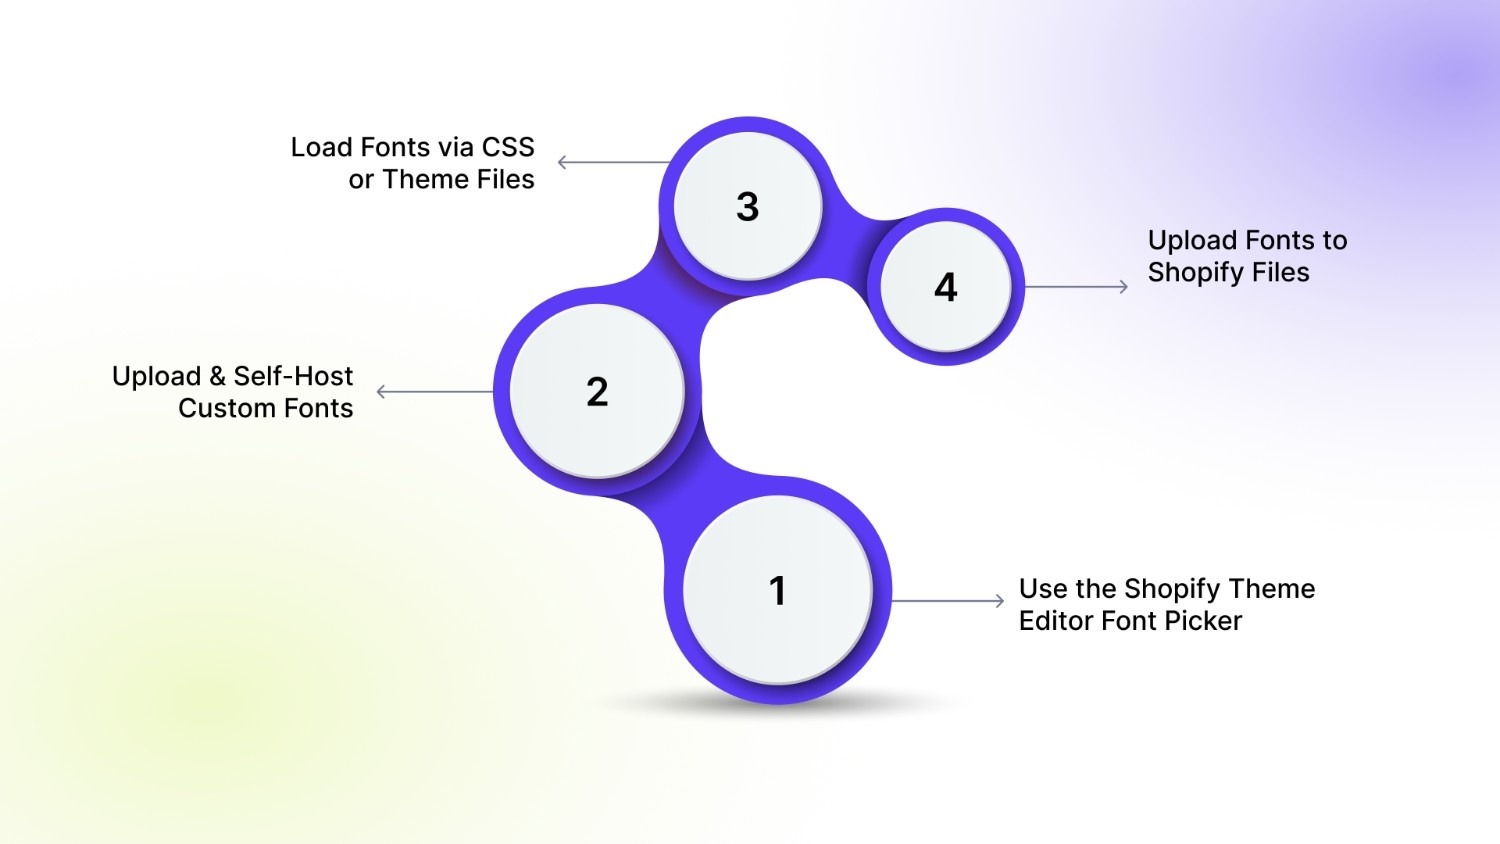
Shopify offers multiple ways to work with fonts, depending on your theme, technical comfort, and branding needs. Each method comes with trade-offs in flexibility, compatibility, and ease of implementation.
A. Use the Shopify Theme Editor Font Picker (No Code)
This is the simplest option and works entirely within the Shopify admin.
- Fonts are selected via Theme Editor → Theme Settings → Typography.
- Uses Shopify’s built-in font library
- No coding required and fully supported across themes.
Best for: Beginners and stores that don’t require brand-specific fonts
Limitation: You can’t upload or use truly custom font files unless the theme explicitly supports it.
Note: The Theme Editor picker works only for fonts available in Shopify’s library or provided by your theme.
B. Upload & Self-Host Custom Fonts (Best Control and Performance)
This method gives you full control over branding and optimization.
- Upload web font files (WOFF2/WOFF)
- Define fonts using @font-face
- Apply them globally via CSS
Best for: Growing or brand-led stores
Trade-off: Requires basic CSS and theme file access.
C. Load Fonts via CSS or Theme Files
Fonts can be loaded by editing the theme CSS files directly.
- Ideal for overriding default theme typography
- Works well with OS 2.0 theme using CSS variables
- Allows centralized font management
Best for: Developers or merchants comfortable editing theme code
Risk: Incorrect placement can cause overrides or conflicts.
D. Upload Fonts to Shopify Files and Reference by URL
Fonts are uploaded through Shopify Admin → Content → Files and loaded using their CDN URLs.
- Reliable hosting
- Useful when asset uploads are restricted
- Keeps fonts separate from theme code
Best for: Stores that want stability without modifying theme assets
Consideration: Requires manual URL management in CSS.
Also Read: 7 Strategies to Boost BFCM Email Sales with Personalization
Before You Add Any Font: Critical Checks
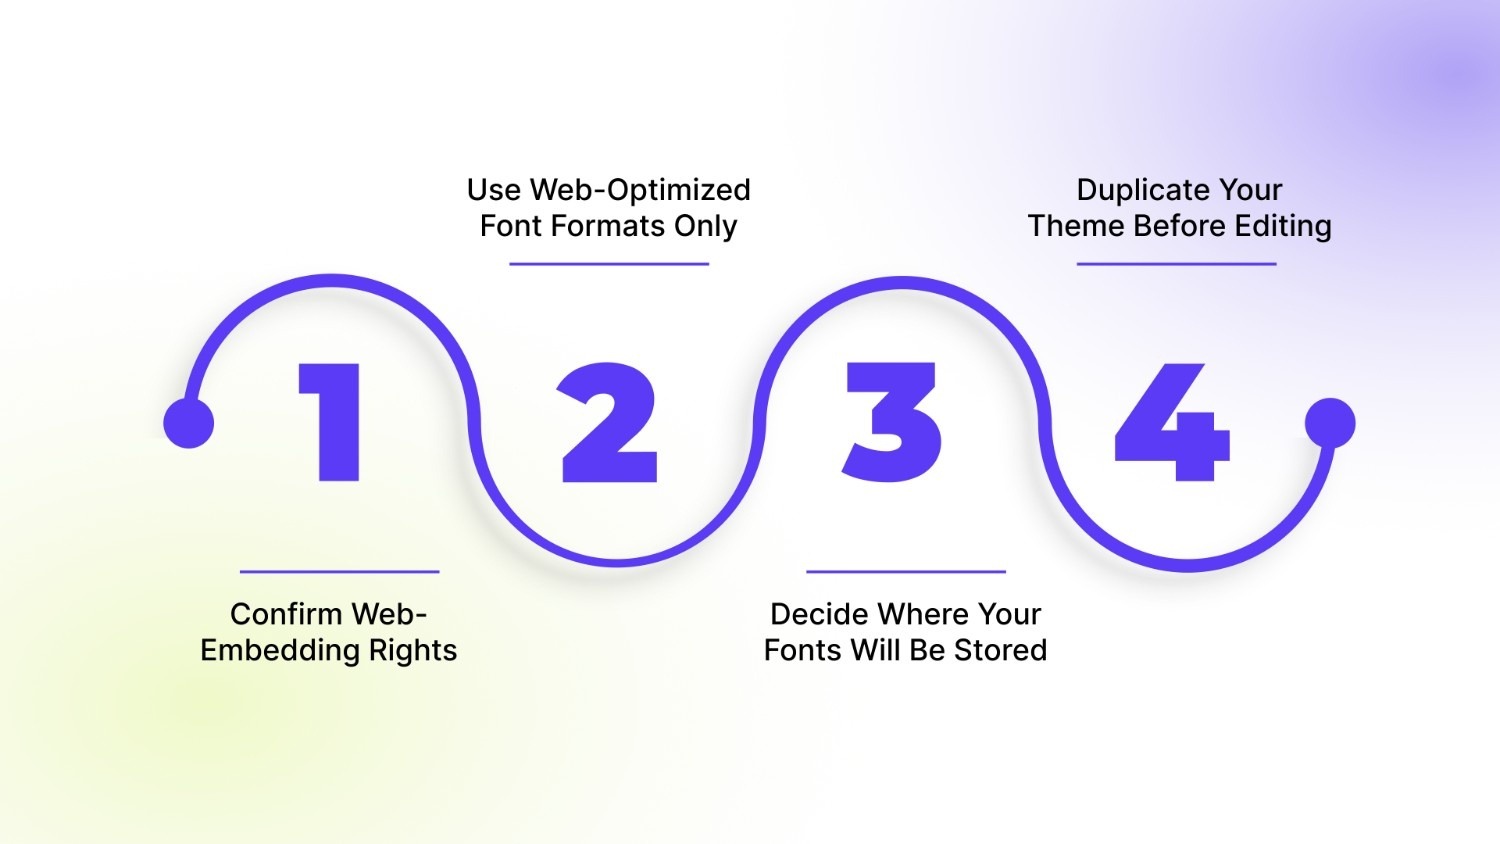
Before adding custom fonts to your Shopify theme, it’s important to cover a few non-negotiables. Skipping these steps is the most common reason fonts “randomly break” later, after a theme update, browser change, or performance optimization.
1. Confirm Web-Embedding Rights: Not all fonts are licensed for web use, so it’s important to verify that the font license explicitly permits web embedding or self-hosting. Desktop-only licenses are not sufficient for Shopify stores, and using an unlicensed font can result in legal and compliance issues.
2. Use Web-Optimized Font Formats Only: Shopify stores should always use fonts that are optimized for web performance to ensure fast load times and a smooth user experience. WOFF2 is the preferred format due to its smaller file size and superior compression, while WOFF can be used as a fallback for older browsers. TTF and OTF files should be avoided on live storefronts, as they are larger, slower to load, and not optimized for modern web delivery.
3. Decide Where Your Fonts Will Be Stored: Choose one location and stay consistent.
- Option A: Theme Assets: Fonts are packaged directly within the theme, making them easy to manage through the theme’s code. However, they may be impacted when the theme is switched or duplicated.
- Option B: Shopify Files: Fonts are hosted on Shopify’s CDN, ensuring better stability across theme changes. However, they require managing direct file URLs within the CSS.
4. Duplicate Your Theme Before Editing: Always work on a duplicate of your live theme to avoid any risk of downtime if something goes wrong. This approach makes testing and rollback straightforward while allowing safe experimentation with font loading, overrides, and performance tweaks.
Method 1: Adding Fonts Using Shopify Theme Settings (No Code)
This is the simplest way to change fonts in Shopify and works entirely through the Theme Editor. It’s designed for ease and safety rather than deep customization.
Who This Method Is For
This approach is best suited for:
- Early-stage stores that want a quick visual update
- Stores with minimal branding requirements
- Merchants who prioritize speed and simplicity over flexibility
If you want a fast, low-risk way to adjust typography, this is the safest starting point.
How It Works
Shopify allows you to select fonts directly from its built-in font library.
Steps:
- Go to Online Store → Theme
- Click Customize on your active theme
- Navigate to Theme Settings → Typography
- Assign fonts to:
- Body text
- Headings
- Buttons (where supported by the theme)
These fonts are hosted and optimized by Shopify, so no additional setup is required.
Limitations to Be Aware Of
While convenient, this method has important constraints:
- You cannot upload or use custom font files unless your theme explicitly supports it
- Font choices are limited to Shopify’s font library
- There’s no control over contextual typography, such as per-variant, per-section, or conditional font styling.
Also Read: How to Display Color Variants in Shopify Collection Pages
Method 2: Adding Custom Fonts Manually
This method gives you full control over branding and performance. You’ll upload your font files, define them with @font-face, and apply them globally so your typography stays consistent across product, collection, and content pages.
1) Prepare your font files
Before you touch Shopify, make sure your files are web-ready:
- Use WOFF2 as your primary format (best compression and fastest loading).
- Keep WOFF as a fallback (optional, mainly for older browser coverage).
- Only include the weights you actually use (usually 400 and 600/700). More weights = more requests + slower load.
2) Host the font (choose one)
Option A — Theme Assets (bundled with your theme)
- Go to Online Store → Theme
- Click … → Edit code
- Open the Assets folder
- Upload your font files (e.g., BrandSans-Regular.woff2, BrandSans-Bold.woff2)
Best when you want everything within the theme, but note that switching themes requires re-uploading.
Option B — Shopify Files (stable CDN URL)
- Go to Shopify Admin → Content → Files
- Upload your font files
- Copy the file URL Shopify generates (you’ll paste it into CSS)
Best when you want fonts to remain stable across theme duplication or changes.
3) Add @font-face (global CSS file)
Open your main stylesheet (often base.css, theme.css, or similar) and add one @font-face rule per weight/style.
If you hosted fonts in Theme Assets
/* Brand Sans - Regular */
@font-face {
font-family: "BrandSans";
src: url("{{ 'BrandSans-Regular.woff2' | asset_url }}") format("woff2");
font-weight: 400;
font-style: normal;
font-display: swap;
}
/* Brand Sans - Bold */
@font-face {
font-family: "BrandSans";
src: url("{{ 'BrandSans-Bold.woff2' | asset_url }}") format("woff2");
font-weight: 700;
font-style: normal;
font-display: swap;
}
If you hosted fonts in Shopify Files
Replace the URLs below with your actual Shopify CDN links.
/* Brand Sans - Regular */
@font-face {
font-family: "BrandSans";
src: url("https://cdn.shopify.com/s/files/....../BrandSans-Regular.woff2") format("woff2");
font-weight: 400;
font-style: normal;
font-display: swap;
}
/* Brand Sans - Bold */
@font-face {
font-family: "BrandSans";
src: url("https://cdn.shopify.com/s/files/....../BrandSans-Bold.woff2") format("woff2");
font-weight: 700;
font-style: normal;
font-display: swap;
}
4) Apply the font cleanly (variables first, selectors second)
Use CSS variables to keep the implementation theme-friendly and easy to maintain.
:root {
--font-body: "BrandSans", -apple-system, BlinkMacSystemFont, "Segoe UI", Roboto, Arial, sans-serif;
--font-heading: "BrandSans", -apple-system, BlinkMacSystemFont, "Segoe UI", Roboto, Arial, sans-serif;
}
body { font-family: var(--font-body); }
h1, h2, h3, h4, h5, h6 {
font-family: var(--font-heading);
}
If your OS 2.0 theme already uses font variables (common in Dawn-like themes), override those theme variables instead of creating new ones. This keeps typography consistent across all built-in components.
5) Optional performance boost: Preload the primary weight (in theme.liquid)
Preloading helps the browser fetch your main font earlier (use only for your primary “regular” weight).
If using Theme Assets
<link rel="preload"
href="{{ 'BrandSans-Regular.woff2' | asset_url }}"
as="font" type="font/woff2" crossorigin>
If using Shopify Files
<link rel="preload"
href="https://cdn.shopify.com/s/files/....../BrandSans-Regular.woff2"
as="font" type="font/woff2" crossorigin>
Why this matters: font-display: swap avoids invisible text during loading and improves perceived speed and stability, especially on mobile connections.
Loading Fonts Globally Without Fighting the Theme
Once your custom fonts are defined, the next step is loading and applying them in a way that works with your Shopify theme, not against it. Poor placement and scattered overrides are the main reasons font implementations become fragile over time.
Where to Load Fonts (And Why It Matters)
Custom fonts should be loaded once and made available across the entire storefront. Loading fonts in multiple places is a common mistake that leads to inconsistent rendering and maintenance issues.
- theme.liquid (Global Entry Point)
Loading a font stylesheet here ensures fonts are available on every page and template. This is the most reliable option when adding fonts manually. - Base CSS File (OS 2.0 Theme)
Modern Shopify themes (e.g., Dawn and similar OS 2.0 themes) rely on a central stylesheet such as base.css. Loading fonts here aligns your typography with the theme’s architecture and reduces conflicts.
Choose one global location. Avoid loading fonts inside section files or page-specific templates.
How to Apply Fonts Cleanly and Safely
Once fonts are globally available, application matters just as much as loading.
- Prefer CSS Variables When Available: Many OS 2.0 themes define typography using CSS variables (for body, headings, buttons, etc.). Overriding these variables:
- Applies fonts consistently across all components
- Preserves theme logic and responsiveness
- Reduces the need for repetitive selectors
- Apply Fonts at the Root Level: Whenever possible, define font variables at the :root or body level rather than deeply nested selectors. This ensures global coverage and prevents conflicts with section-level or app-injected styles.
- Avoid Hard-Coding Fonts on Individual Elements: Applying fonts directly to headings, buttons, or sections can create inconsistencies and override theme logic. It also increases the risk of fonts breaking when layouts or templates change.
- Test Across Templates and Devices: After applying fonts, review key templates such as product pages, collection pages, checkout-related areas, and mobile views. This helps catch spacing, line-height, or fallback issues early.
This is the cleanest way to integrate custom fonts into a modern theme.
Also Read: How to Bulk Edit Variants on Shopify: A Complete Step-by-Step Guide
Applying Fonts Where They Actually Impact Sales
Custom fonts only add value when applied with intent. Overusing or misapplying fonts, especially on product pages, can reduce clarity, slow scanning, and negatively affect conversions.
- Body Text: Use highly readable fonts that prioritize comfort, spacing, and mobile readability to keep users engaged with product descriptions and supporting content.
- Headings: Choose fonts that create a clear visual hierarchy, helping shoppers quickly understand sections and find key information without effort.
- Product Titles & Prices: Ensure maximum scanability by using clear, legible fonts that make titles and prices instantly recognizable and easy to process.
- Buttons & CTAs: Apply simple, bold fonts with strong contrast so actions are immediately clear and encourage confident clicks.
- Navigation: Keep navigation typography clean and consistent to support fast decision-making and smooth movement across the store.
Poor typography adds friction at every stage, slower scanning, unclear actions, and higher cognitive load. On high-intent areas like product pages, these issues directly impact user confidence and conversion rates.
Common Font Issues (And How to Fix Them Fast)
Typography problems in Shopify usually appear after theme edits, app installs, or font overrides. Below are the most common font-related issues and how to fix them efficiently.
Also Read: A Complete Guide to Becoming a Profitable Shopify Partner: 5 Easy Steps for Success
How Typography Fits Into a High-Conversion Shopify UX
Typography plays a supporting role in conversion; it doesn’t sell on its own, but it makes everything else work better. When implemented correctly, good typography reduces friction and helps shoppers move through product pages with confidence.
What Good Typography Supports
Effective typography improves key usability outcomes:
- Faster product scanning: Clear fonts help users quickly identify product names, prices, and key details.
- Clearer variant selection: Legible labels and option text reduce confusion when choosing sizes, colors, or styles.
- Better visual hierarchy: Headings, prices, and calls-to-action stand out naturally without competing for attention.
- Reduced cognitive load: Shoppers process information more easily, especially on mobile.
These improvements create smoother, more intuitive browsing, especially on high-intent product pages.
Why Fonts Alone Don’t Convert
Typography improves clarity, but clarity alone doesn’t drive sales. Many Shopify stores look visually polished yet still underperform because they struggle with:
- Confusing or crowded variant layouts
- Poorly structured product descriptions
- Weak visual feedback during selection and checkout
A modern font can enhance readability, but it won’t fix unclear choices, missing context, or friction in the purchase flow.
What High-Performing Shopify Stores Get Right
Stores that consistently convert well align multiple UX elements:
- Typography that supports readability and hierarchy
- Variant visuals that clearly represent choices
- Product clarity through structured content and labeling
- Interaction feedback that confirms user actions
When these elements work together, the store feels intuitive and trustworthy, setting the stage for conversion-focused enhancements.
StarApps in Action: Turning Typography Into a Conversion-Ready Shopify UX
Typography sets the visual tone of your Shopify store, but conversions come from how well that typography works with UX tools. High-performing stores don’t treat fonts as isolated design choices. Instead, they pair clean typography with StarApps Studio UX enhancements that remove confusion, guide decisions, and reinforce trust at key moments in the buying journey.
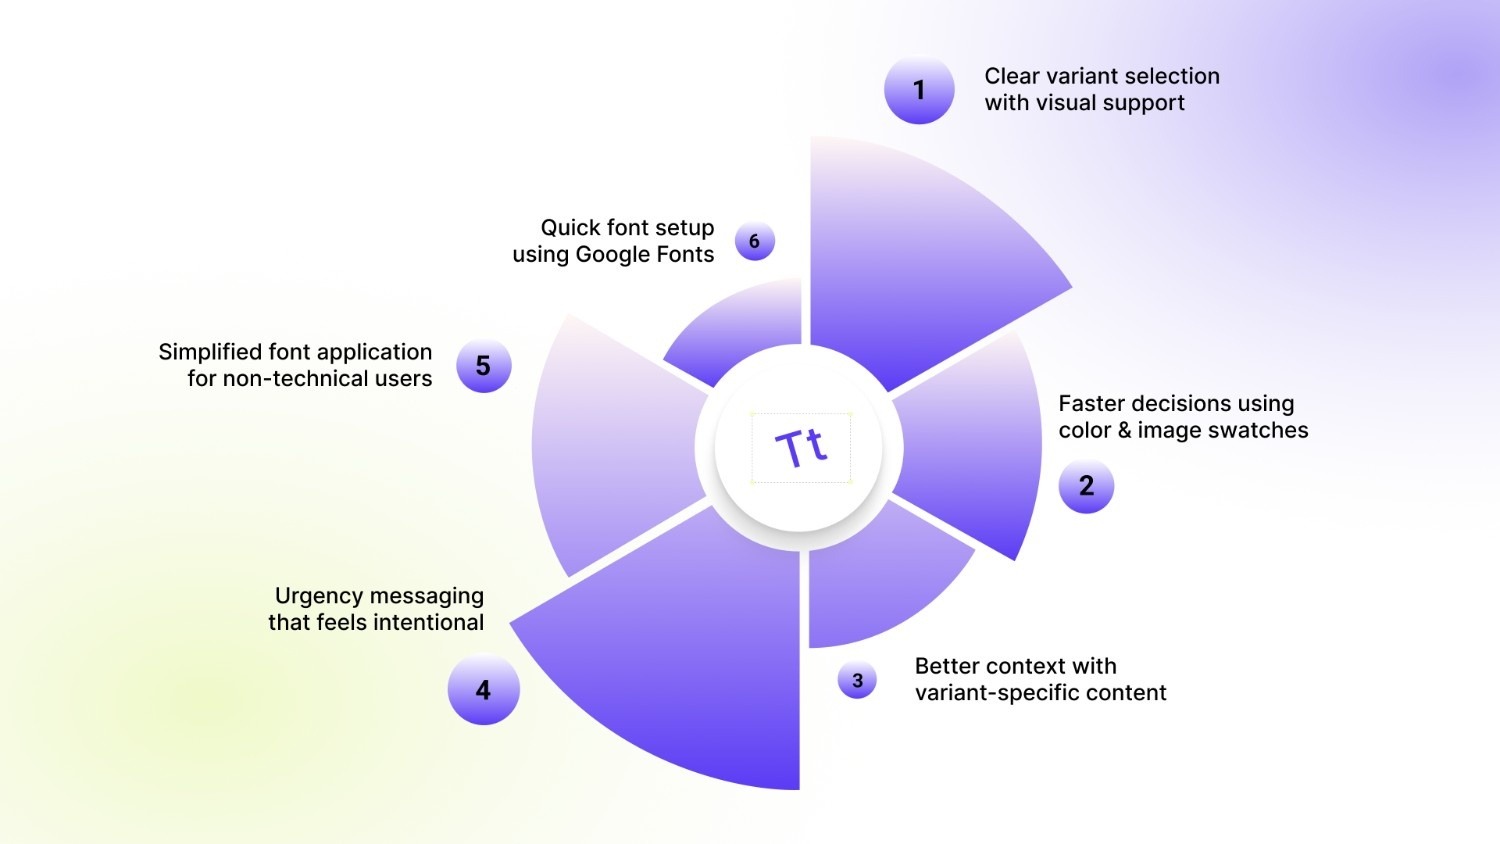
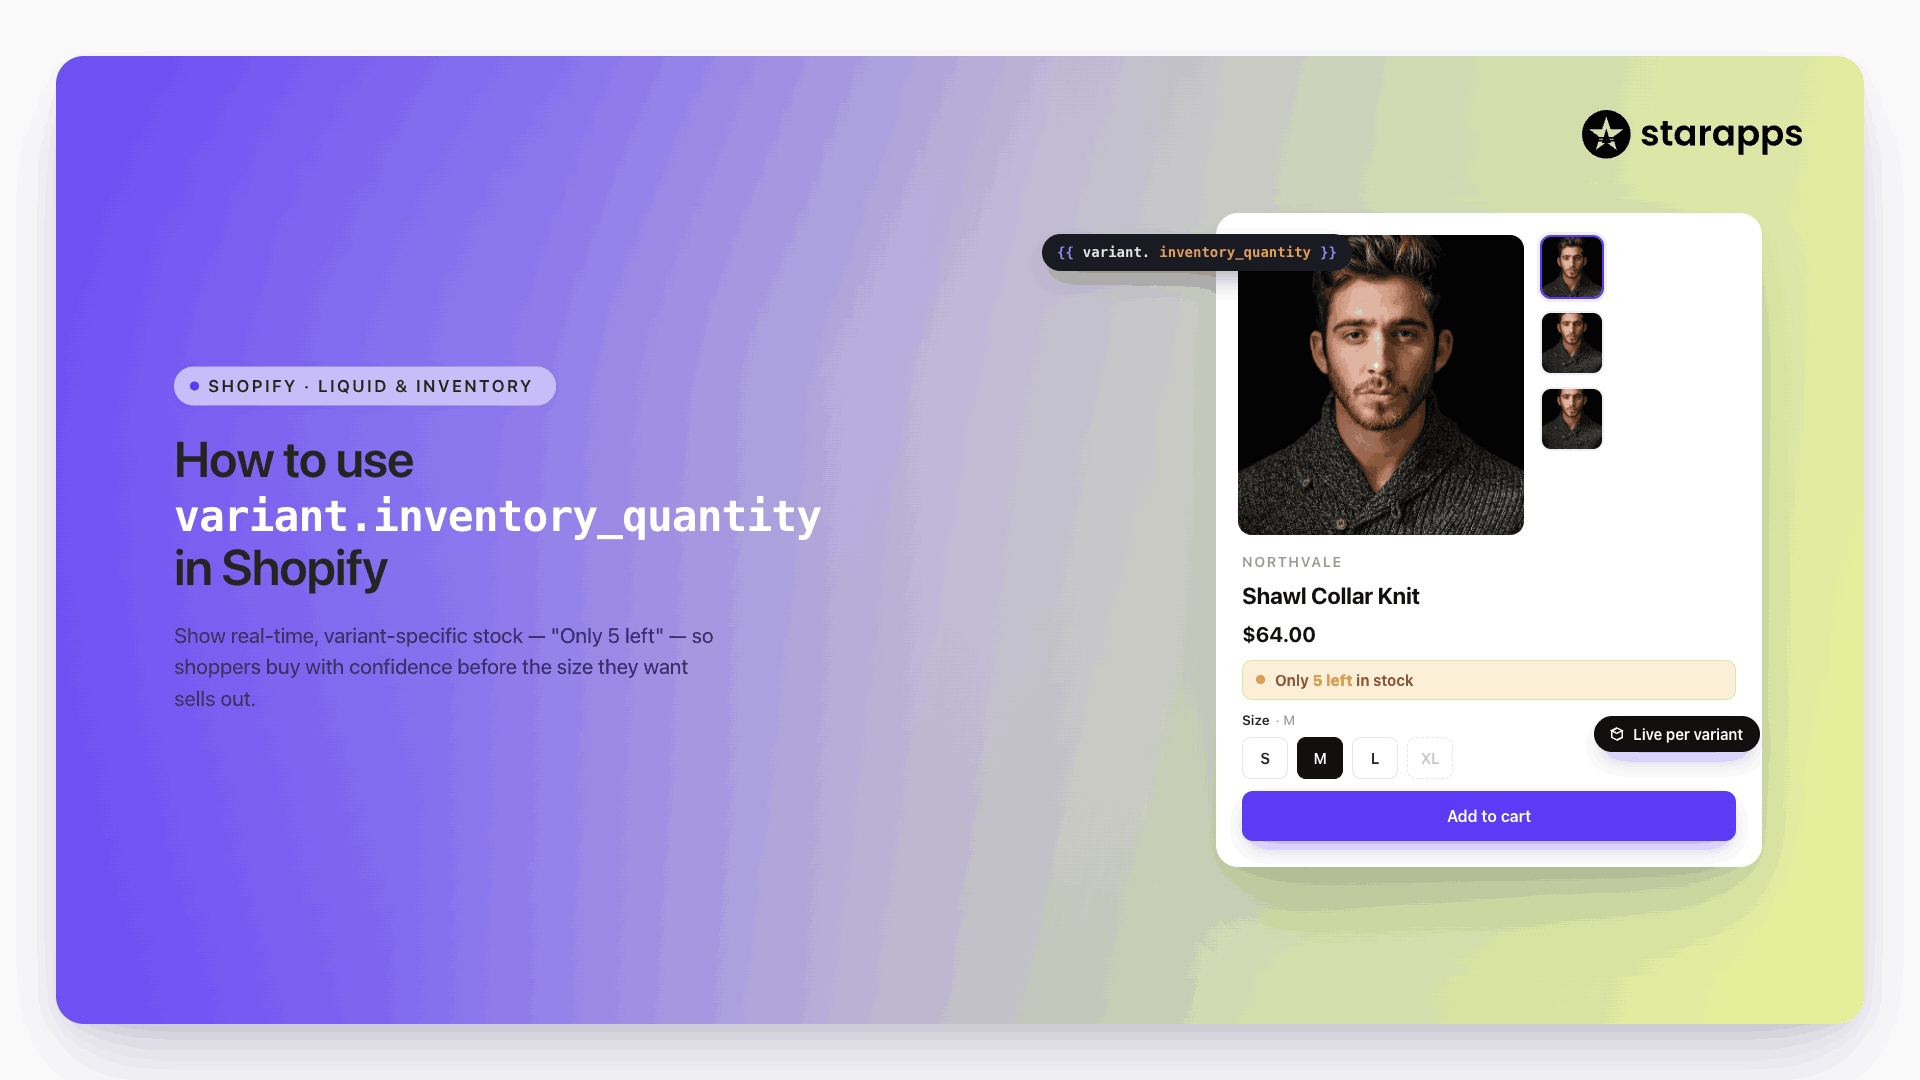
- Crystal-clear variant selection with visual confirmation: Typography improves label readability, but Variant Image Automator ensures shoppers see exactly what they’re selecting, reducing wrong choices and return risk.
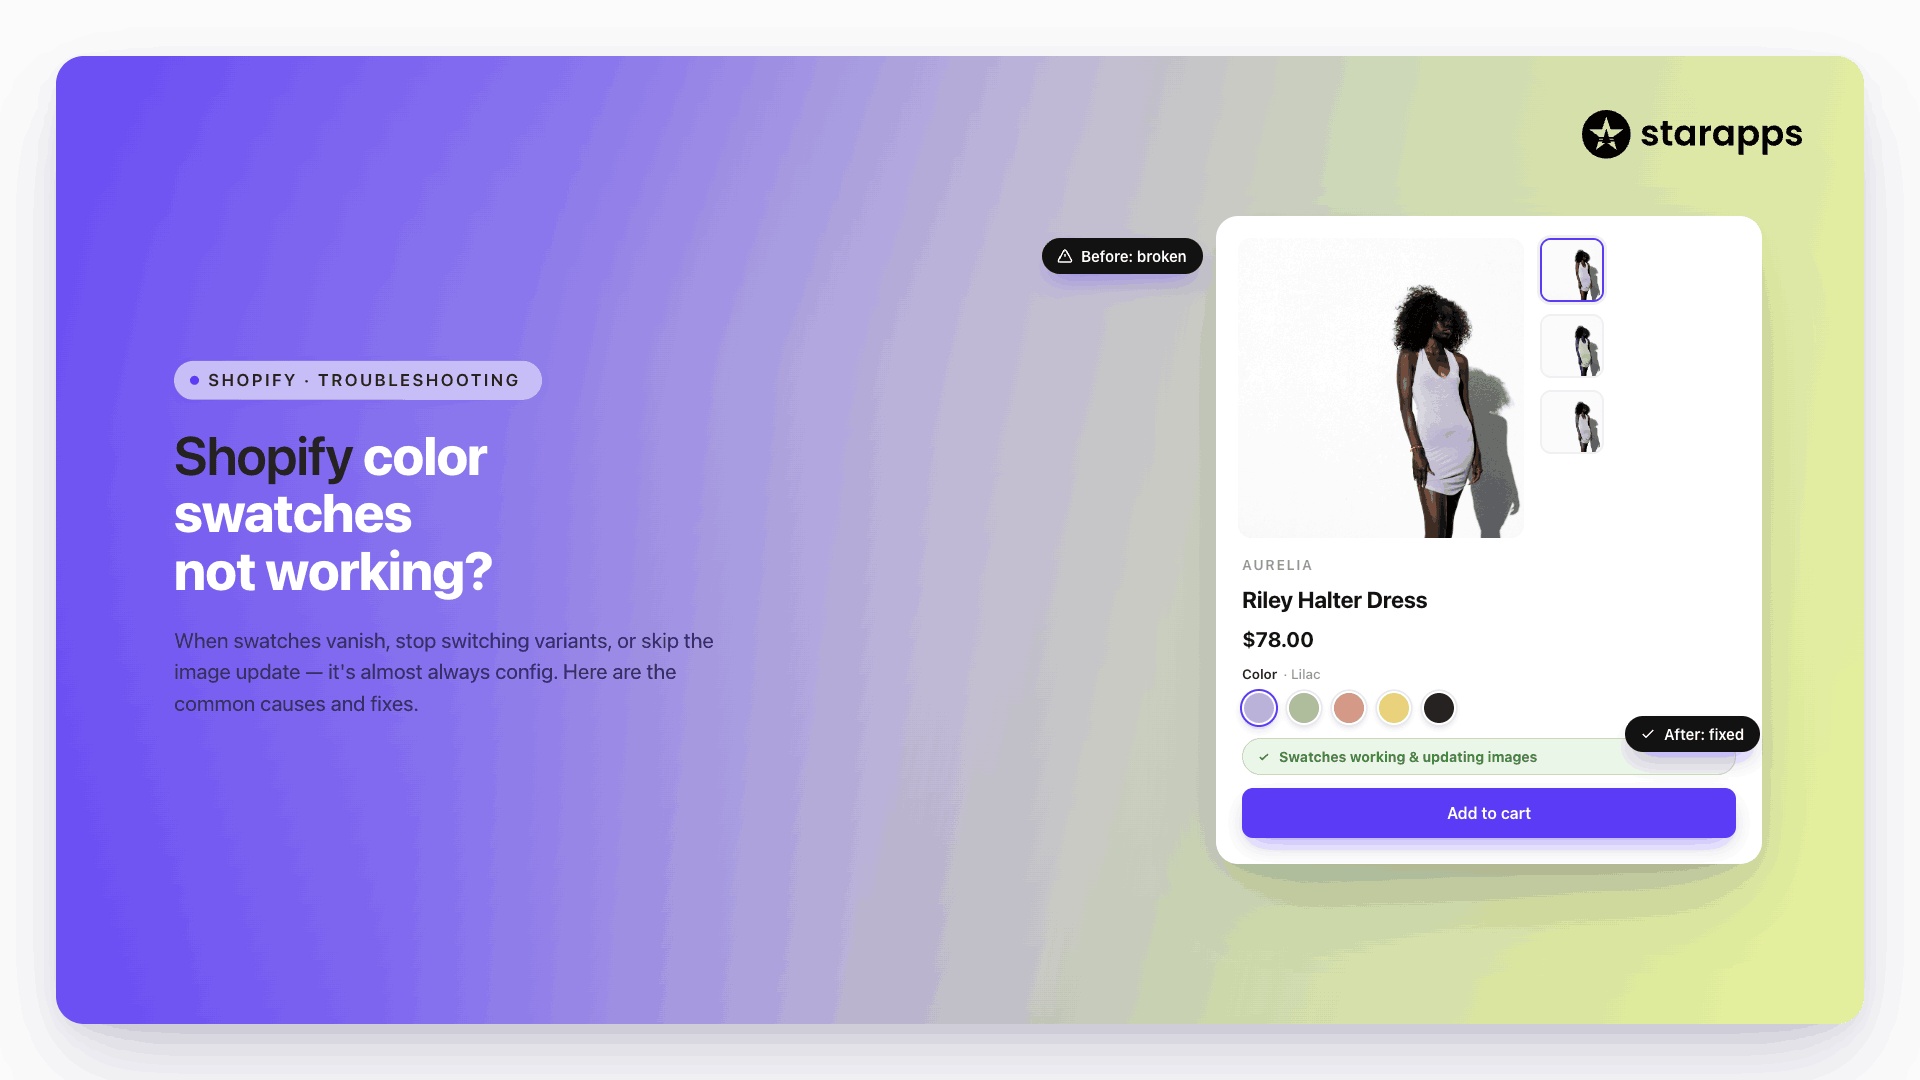
- Faster decisions with intuitive swatches instead of text: Clean fonts combined with Color Swatch King replace dropdown friction with visual clarity, making color and style selection instant and confidence-driven.
- Variant-specific clarity at the moment of choice: Fonts establish hierarchy, while Variant Descriptions King delivers relevant details only when a specific option is selected, preventing information overload while improving understanding.
- Dedicated variant listings for clearer scannability: Typography helps structure content, but SA Variants: Combined Listings takes it further by giving each variant its own title, images, and URL on collection pages. This makes browsing and filtering feel more intuitive, and helps shoppers find what they want without reading dense lists.
- Contextual product labeling that reinforces clarity: Strong typography helps hierarchy, but Variant Title King: Color, SKU dynamically updates product titles with variant attributes (color, SKU, type), so key details are front‑loaded in headings, making variant context clear without extra exploration.
- SEO + accessibility that boosts visibility and trust: Clear typography improves readability, but search engines and assistive tools rely on structured metadata. Variant Alt Text King: SEO automates alt text for variant images, helping search discoverability, accessibility compliance, and page indexing, contributing to long‑term traffic growth.
Typography improves readability, but conversion comes from execution. When fonts, variant visuals, sizing clarity, urgency cues, and interaction elements work together, shoppers don’t have to think or second-guess. The result is a store experience that feels intuitive, credible, and effortless, exactly what high-intent buyers expect.
Conclusion
Custom fonts do more than improve how your Shopify store looks; they shape how your brand is perceived. The right typography establishes tone, builds credibility, and helps customers navigate product information with less effort.
Just as important, how fonts are implemented matters. Clean, centralized font loading protects performance, prevents layout issues, and ensures consistency as your store grows. Poor implementation can undo even the best design choices.
The real impact happens when typography works with your UX, not against it. Fonts should support clarity, reinforce hierarchy, and complement how customers interact with products, variants, and calls to action.
Take your Shopify store beyond surface-level design. Pair strong typography with conversion-focused UX tools from StarApps Studio to create a store that looks premium and sells better. Contact us Today!
FAQ
1. Why should I use custom fonts instead of Shopify’s default fonts?
Default fonts are safe but generic. Custom fonts help your store stand out, strengthen brand identity, and create a more polished and trustworthy visual experience that supports conversions.
2. Which font formats should I upload for best performance?
Always use WOFF2 as your primary format and WOFF as backup. Avoid TTF/OTF on live stores, they load slower and aren’t optimized for web delivery.
3. Do I need coding knowledge to add custom fonts on Shopify?
Not always. If you use the Theme Editor font picker, no coding is required. However, fully custom fonts and fine-tuned typography (via @font-face) require basic CSS edits.
4. What’s the safest place to load custom fonts in a Shopify theme?
Use a single global location—either theme.liquid or base.css. Loading fonts across multiple files often causes inconsistencies.
5. Can custom fonts slow down my Shopify store?
Yes, if implemented incorrectly. Using large files, too many weights, or unoptimized formats can increase load time. Optimized WOFF2 fonts and the font-display: swap property minimize performance issues.
Heading

End-to-end traceability
To ensure regulatory compliance, you must have a complete overview of your products from production to shipping. Book a demo to see how Katana can give you full visibility of your operations.

.png)
.png)