
Learn how to complete Shopify domain verification step by step, secure your store, improve email deliverability, and build customer trust.
Many online stores experience email deliverability issues because of unverified domains. When your domain lacks proper verification on Shopify, you risk losing customer trust, facing security vulnerabilities, and missing crucial business emails that could impact your sales.
Domain verification might sound technical, but it's one of the most important steps you can take to protect your Shopify store. It proves you own your domain, strengthens your store's security, and ensures your emails actually reach your customers.
This guide walks you through the entire domain verification process on Shopify. You'll learn exactly what to do before starting, how to verify your domain step by step, and how to fix common verification errors.
Key Takeaways
- Shopify verification confirms domain ownership and protects your store from unauthorized access.
- Proper preparation, including DNS access and domain checks, helps ensure a smooth verification process.
- Verified domains improve email deliverability, enhance customer trust, and support better SEO results.
- Common verification issues often relate to incorrect TXT records, DNS delays, or outdated cached data.
- After verification, focus on optimizing your store’s performance, presentation, and customer experience.
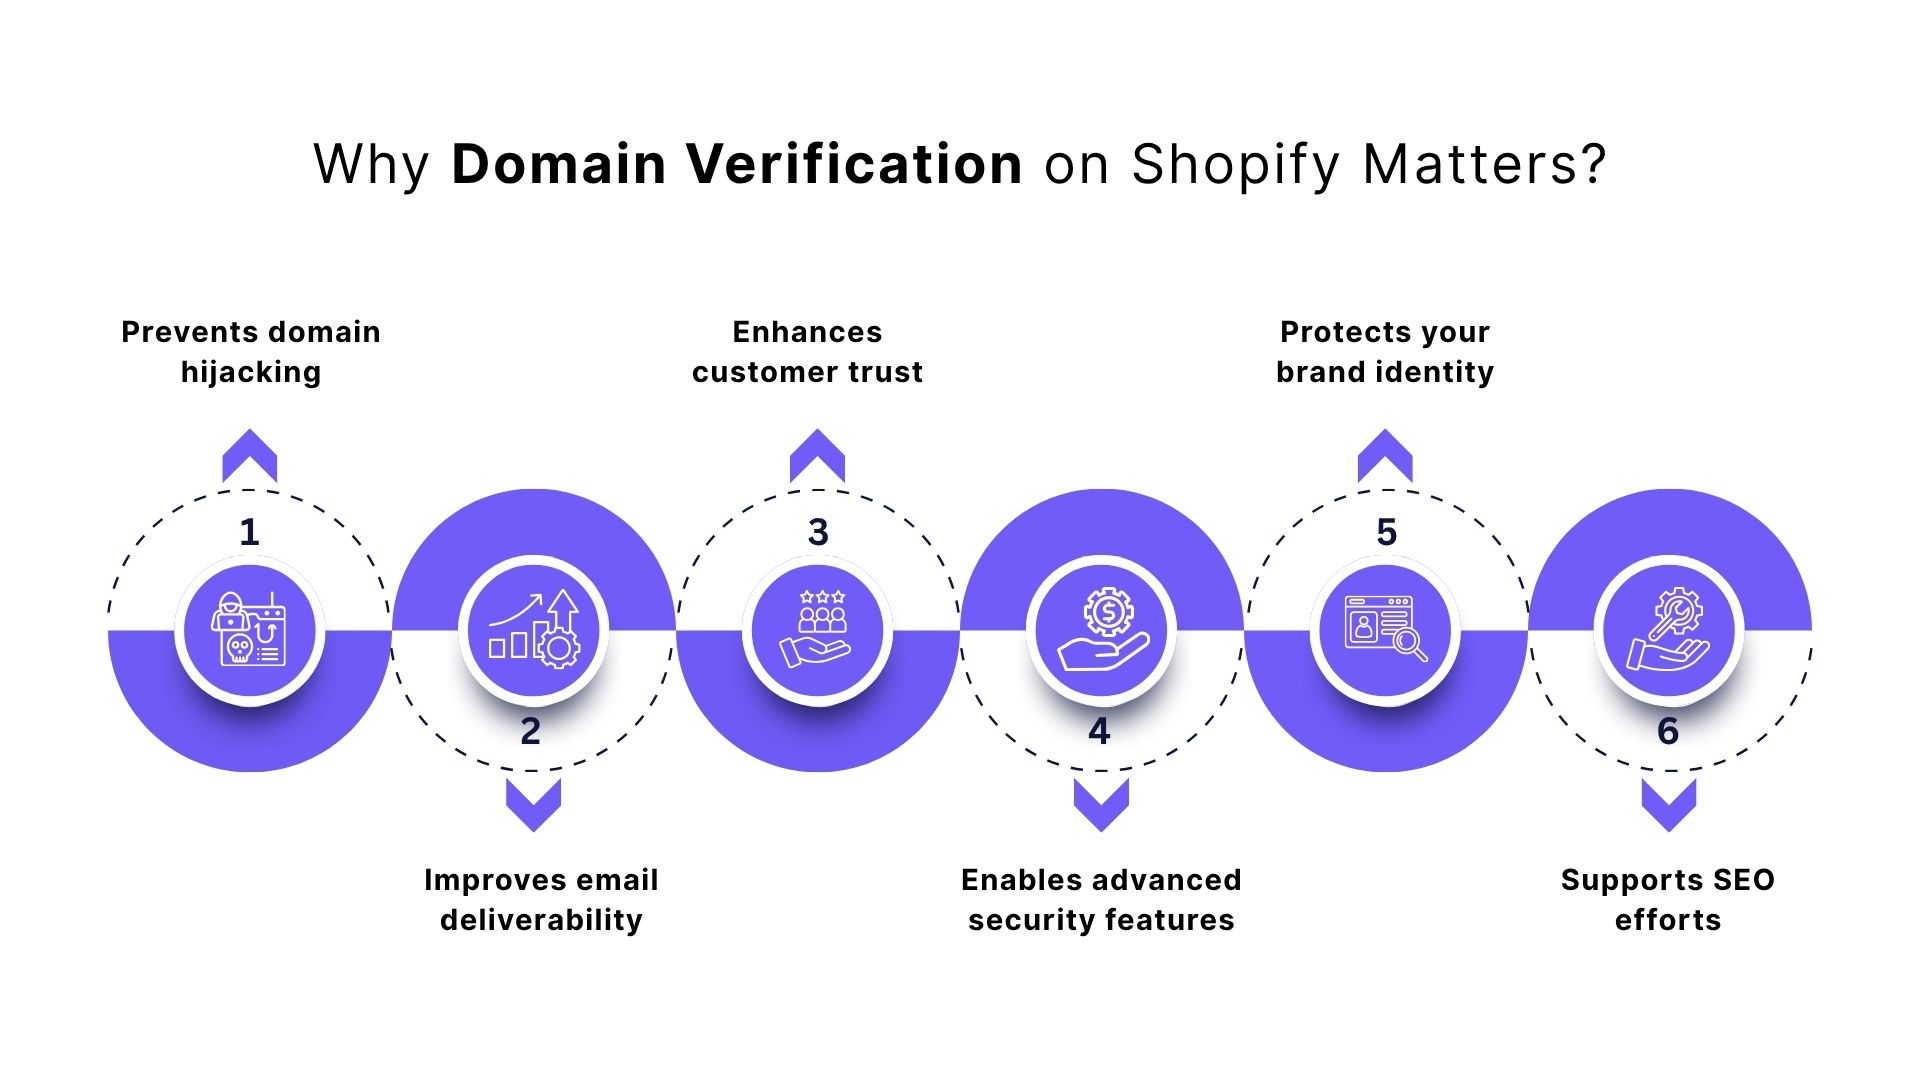
Why Domain Verification on Shopify Matters?
Domain verification on Shopify is a security measure that protects both your business and your customers from fraud and unauthorized access.
When you verify your domain, you're essentially proving to Shopify and the wider internet that you are the legitimate owner of that web address. This verification creates a digital paper trail that prevents malicious actors from hijacking your domain or impersonating your brand.
Here's why domain verification should be a priority for your store:
- Prevents domain hijacking: Verification ensures that only you can make changes to your domain settings. Without it, someone else could potentially claim ownership and redirect your traffic elsewhere.
- Improves email deliverability: Verified domains have significantly better email delivery rates. Your order confirmations, shipping notifications, and marketing emails are more likely to land in customers' inboxes than in their spam folders.
- Enhances customer trust: A verified domain with proper SSL certificates shows customers that your store is legitimate and secure. This is especially important for new stores building credibility.
- Enables advanced security features: For Shopify Plus users, domain verification unlocks features like SAML authentication and SCIM user management, which are essential for larger organizations with multiple team members.
- Protects your brand identity: Verification prevents competitors or bad actors from using similar domains that could confuse your customers or damage your reputation.
- Supports SEO efforts: Search engines prioritize websites with verified custom domains. This can positively impact your search rankings and organic traffic over time.
Think of domain verification as locking the front door of your digital storefront. You wouldn't leave a physical store unlocked overnight, and the same logic applies to your online business. The few minutes you invest in verification can save you from severe security headaches down the road.
What to Do Before You Start Domain Verification?
Proper preparation makes domain verification smoother and faster. Since the process involves editing your DNS settings, you’ll need the right access and a few checks done beforehand. Here’s what to do before you begin:
- Confirm access to your domain provider account: Make sure you can log in to the registrar where your domain is hosted (e.g., GoDaddy, Namecheap, Google Domains, Cloudflare, etc.). If you’ve lost your credentials, recover them now to avoid delays mid-process.
- Verify your domain is exclusive to your organization: Shopify only allows one organization to verify a domain at a time. If your domain is shared (e.g., with a parent company), confirm that no one else has already verified it. They’ll need to remove it before you proceed.
- Check your domain’s status and expiration date: Ensure it's active and not suspended or expired. Inactive domains will always fail verification.
- Locate your DNS settings: Find where DNS records are managed in your provider’s dashboard. You’ll need to add the TXT record Shopify provides during verification. If unsure, check your provider’s help docs or contact support.
- Enable two-factor authentication (optional but recommended): Adding 2FA to your domain registrar account boosts security and prevents unauthorized changes once your domain is live.
- For Shopify Plus users: If you plan to set up SAML authentication or SCIM user management afterward, gather those credentials now so your team can stay productive during the verification period.
Once you've completed these preparatory steps, you'll be ready to proceed with verification.
How to Verify Your Domain on Shopify (Step-by-Step Guide)
The domain verification process on Shopify is straightforward once you understand each component. Domain verification involves adding a unique TXT record to your domain's DNS settings, which acts as proof that you control the domain. Shopify generates this record specifically for your store, and once your domain provider publishes it, Shopify can confirm your ownership.
Let's walk through the complete process:
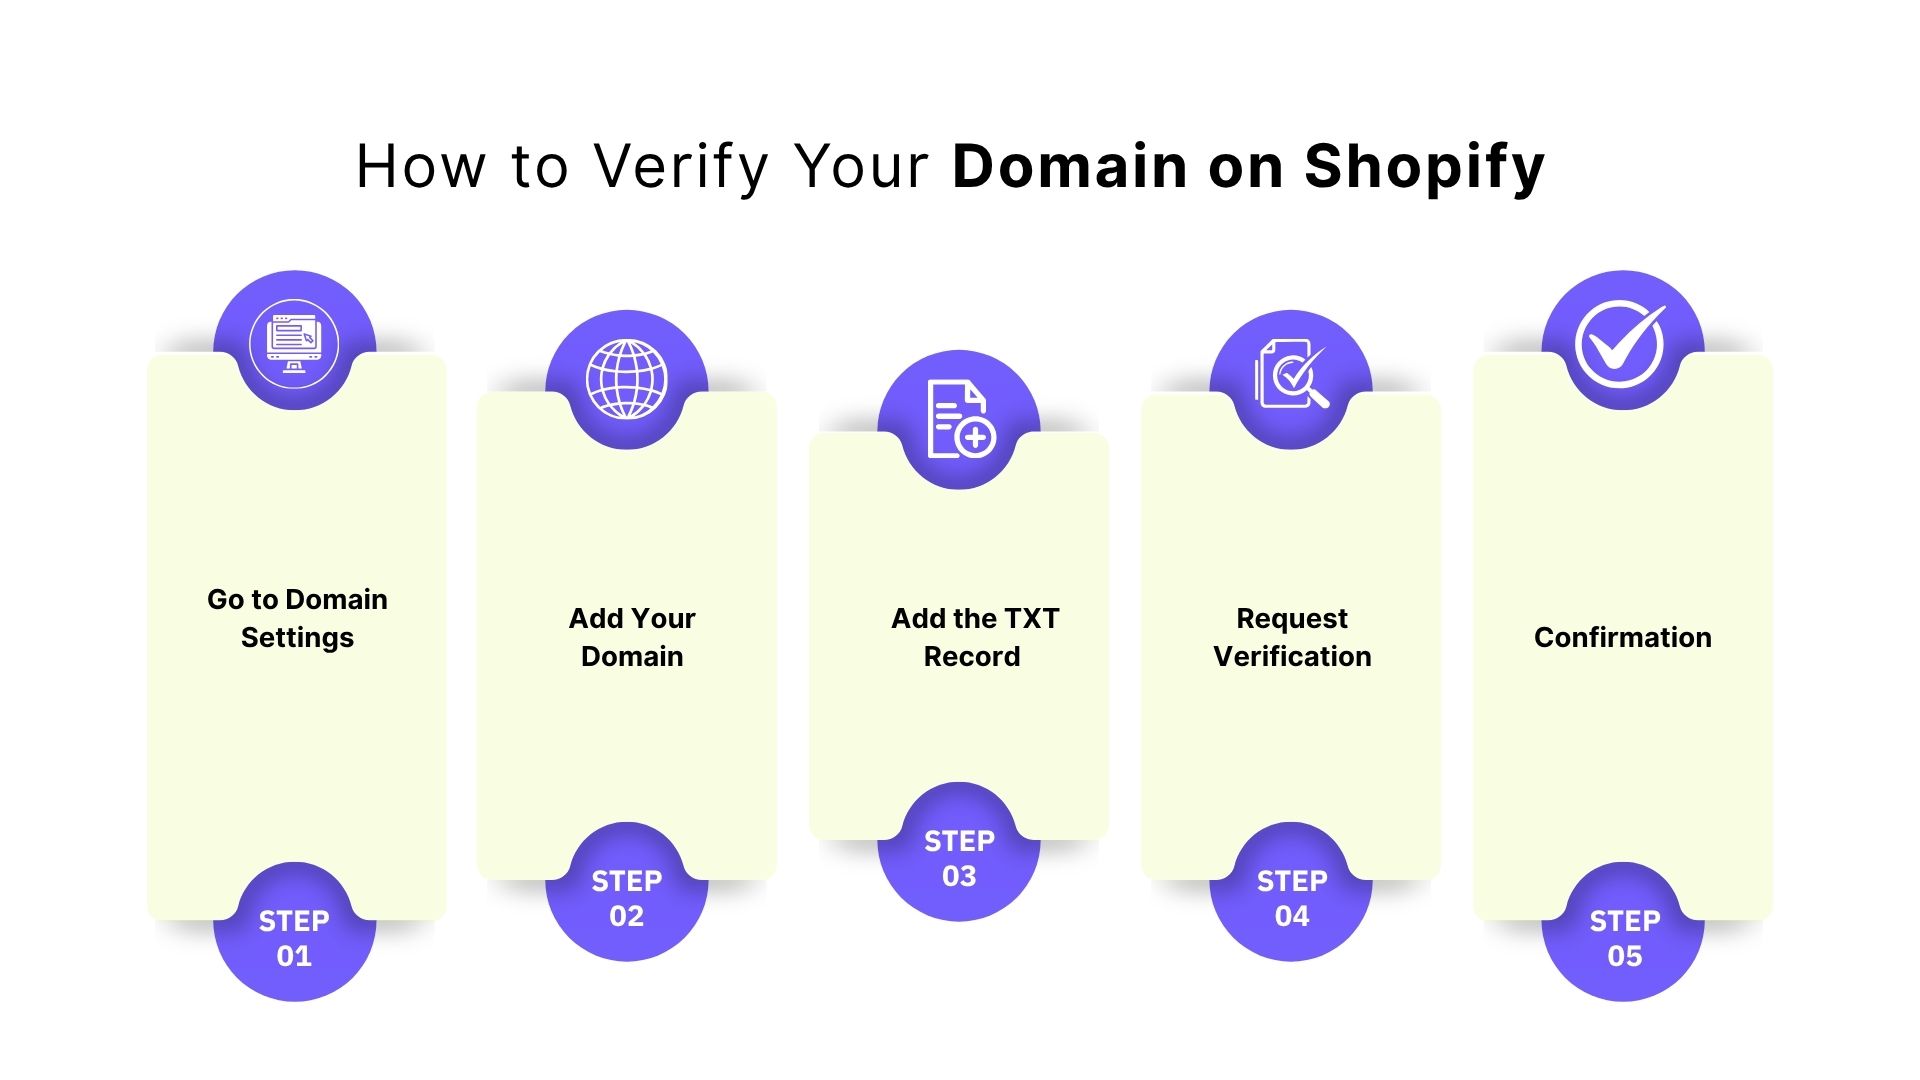
Step 1: Go to Domain Verification Settings
Start by navigating to your domain settings in Shopify.
- Log in to your Shopify admin panel.
- Click Settings in the bottom-left corner.
- Select Domains from the Settings menu.
Here, you’ll see a list of your connected domains. Click Connect existing domain if you’re adding a new one. Once added, Shopify will generate a unique verification record for you.
Step 2: Add Your Domain
- In the domain entry field, type your domain name exactly as it appears. Don't include "http://", "https://", or any forward slashes. Just enter the domain itself, such as "example.com" or "shop.example.com" if you're verifying a subdomain.
- After entering your domain, click Next. Shopify will display a unique TXT value, a string of letters and numbers that serves as your verification code. Click Copy to save this value to your clipboard.
- If you are verifying multiple subdomains, remember that each one must be verified separately with its own TXT record.
Step 3: Add the TXT Record to Your Domain Provider
This is the most critical step in the verification process. You need to add the TXT record that Shopify provided to your domain's DNS settings.
For Shopify-managed domains:
- Go to Settings > Domains in your Shopify admin.
- Select the domain you want to verify from the list.
- Click Domain settings or Manage DNS.
- Click Edit DNS records or Add custom record.
- Select TXT as the record type.
- In the Name or Host field, enter @ if you're verifying your primary domain. Depending on your DNS host, you might need to enter shopify_verification or the subdomain name instead.
- Paste the TXT value you copied from Shopify into the Value or Content field.
- Save your changes by clicking Confirm or Add Record.
For third-party domains (GoDaddy, Namecheap, Cloudflare, etc.):
- Open a new browser tab and log in to your domain provider's website.
- Navigate to your domain's DNS management area (look for sections labeled DNS Settings, DNS Management, Domain Management, or Name Server Management).
- Find the option to add a new DNS record. Select TXT as the record type.
- In the Name, Host, or Alias field, enter @ for your root domain or the subdomain name if you're verifying a subdomain. In some cases, you may need to use Shopify_verification or the specific subdomain provided by Shopify.
- Paste the TXT value from Shopify into the Value, Content, or TXT Value field. Make sure you paste the entire string without extra spaces at the beginning or end.
- Set the TTL (Time to Live) to the default value or 3600 seconds if prompted.
- Save or publish your DNS changes.
Note: Different providers have slightly different interfaces, but the core information remains the same: you're adding a TXT record with the name @ (or sometimes shopify_verification) and the verification value provided by Shopify.
Step 4: Request Verification
- Once you’ve added the TXT record, return to your Shopify admin tab. Click Verify connection (or Check verification, depending on your Shopify version).
- Shopify will now look for the TXT record in your domain’s DNS. While verification is in progress, your status will appear as Pending.
Step 5: Confirmation
- After adding the TXT record to your domain, Shopify will begin the verification process. This can take anywhere from a few minutes to 48 hours due to DNS propagation, the time it takes for changes to propagate across the internet.
- Once verification is complete, your Shopify admin will show your domain status as Verified, and you’ll receive a confirmation email.
During this period, it’s normal for your domain to show as unverified temporarily. If verification doesn’t complete within 48 hours, there may be multiple reasons for the issue, each requiring a different approach. Up next, we’ll guide you through diagnosing the problem and provide step-by-step methods to resolve it.
How to Troubleshoot Domain Verification Issues?
Even with careful setup, domain verification can sometimes fail. Understanding common errors and their solutions helps you resolve issues quickly without losing valuable time. Domain verification problems typically fall into a few categories, most of which are fixable within minutes once you identify the root cause.

Here's how to diagnose and fix the most frequent verification problems:
Wrong TXT Record Format
This is the single most common reason for verification failure. The TXT value Shopify provides is a long, specific string of characters that must be entered exactly as shown.
Check for these formatting issues:
- Extra spaces before or after the TXT value when you pasted it.
- Missing characters if the copy-paste didn't capture the full string.
- Quotation marks added by your DNS provider that shouldn't be there.
- Line breaks in the middle of the value if you copied it incorrectly.
How to fix it:
- Log in to your domain provider's DNS settings.
- Delete the existing TXT record completely.
- Return to your Shopify admin and copy the TXT value again, being careful to select the entire string.
- Paste it into a plain-text editor first to check for any formatting issues, then copy it from there into your DNS settings.
Domain Not Connected to the Right Shopify Store
If you're managing multiple Shopify stores or if your domain was previously connected to another store, verification might fail because Shopify is checking the wrong account.
This happens when a domain is already verified by another Shopify organization. Remember that domains can only be verified by one organization at a time.
How to fix it:
- Verify which Shopify store currently has a claim to your domain. If it's connected to an old or unused store, log into that store and remove the domain verification first.
- Then return to your active store and start the verification process fresh. If you don't have access to the other store, contact Shopify Support for assistance in releasing the domain.
DNS Propagation Delay
DNS changes don't happen instantly across the internet. When you add or modify a DNS record, it needs to propagate through various DNS servers worldwide, which can take anywhere from a few minutes to 48 hours.
During this propagation period, some DNS servers will show your new TXT record while others still show the old configuration (or no record at all). Shopify's verification system might be checking a server that hasn't updated yet.
How to fix it:
- The only solution here is patience. Wait at least 4-6 hours before attempting to verify again.
- After 24 hours, most DNS changes have propagated globally.
- You can use DNS checking tools like WhatsMyDNS or MXToolbox to see if your TXT record is visible across different locations.
- If the record shows up in these tools but Shopify still can't verify it, wait another 24 hours and try once more.
Cached Old Records
Your computer, browser, or local network might be caching old DNS information, which can interfere with verification even after you've correctly added the new TXT record.
DNS caching helps websites load faster by temporarily storing domain information, but it can confuse verification when you see outdated data.
How to fix it:
- Clear your browser's cache and cookies completely.
- Restart your browser and try verification again. If that doesn't work, flush your computer's DNS cache.
- On Windows, open Command Prompt and type ipconfig /flushdns.
- On Mac, open Terminal and type sudo dscacheutil -flushcache; sudo killall -HUP mDNSResponder.
- Alternatively, request verification from a completely different device or network connection that hasn't cached your domain's old DNS records.
Incorrect Host/Name Field Entry
The Host or Name field in your DNS settings must be entered correctly, depending on whether you're verifying a root domain or a subdomain. Many verification failures happen because this field contains the wrong value.
For root domains (example.com), you should enter @ in most DNS providers. However, some providers use different conventions, like leaving the field blank or entering the full domain name.
For subdomains (shop.example.com), you typically enter only the subdomain part (shop) without the main domain.
How to fix it:
- Check your domain provider's documentation to understand their specific syntax for the Host/Name field.
- Remove your existing TXT record, then create a new one in the correct format for your provider. Some providers have specific requirements that differ from standard conventions.
Multiple Conflicting Records
If you've attempted verification several times, you might have created multiple TXT records with different values. Having duplicate or conflicting records confuses Shopify's verification system.
How to fix it:
- Log in to your domain provider's DNS management panel and look at all existing TXT records.
- Remove any TXT records related to Shopify verification or any duplicates.
- Keep only the most recent TXT value generated by Shopify.
- Save your changes, wait 2-4 hours for propagation, then request verification again.
SSL Certificate Issues
While not directly part of domain verification, SSL certificate problems can sometimes prevent verification from completing successfully, especially if your domain's security settings are misconfigured.
How to fix it:
- Verify that your domain has a valid SSL certificate installed and that it hasn't expired.
- In your Shopify admin, go to Settings > Domains and check the SSL status.
- If it shows as pending or unavailable, wait for Shopify to issue the certificate, which can take up to 48 hours after connecting your domain.
DNSSEC Interference
DNSSEC (Domain Name System Security Extensions) adds an extra layer of security to DNS, but Shopify doesn't currently support it. If DNSSEC is enabled on your domain, it can prevent verification from working.
How to fix it:
- Check if DNSSEC is enabled through your domain provider's control panel. If it is, disable it before attempting verification.
- After disabling DNSSEC, allow up to 48 hours for the change to propagate before requesting verification again.
- If DNSSEC was transferred to Shopify from a previous provider and you can't disable it yourself, contact Shopify Support for assistance.
If you've systematically worked through all these troubleshooting steps and your domain still won't verify after 48-72 hours, it's time to contact Shopify Support directly. Prepare screenshots showing your DNS settings, the TXT record you've added, and any error messages you're receiving. This documentation helps agents diagnose the problem more quickly.
What to Do After Shopify Domain Verification?
Once your domain is verified, you’ve completed a crucial step in building your Shopify store’s security and credibility. But domain verification is only the foundation; the next step is to optimize your store’s experience and performance so that this technical trust translates into customer confidence and conversions.
A verified domain helps establish authenticity, and active optimization makes that authenticity visible in how your store looks, loads, and feels. Many merchants find that after verification, their next challenge is managing variants, and product images and content consistency often become bottlenecks as stores grow. This is where thoughtful optimization plays a significant role.
To make post-verification optimization easier, you can choose providers like StarApps Studio, which offers multiple Shopify-integrated apps that will help you keep your store optimized.
Here are some of the tools you can try on:
Variant Image Automator
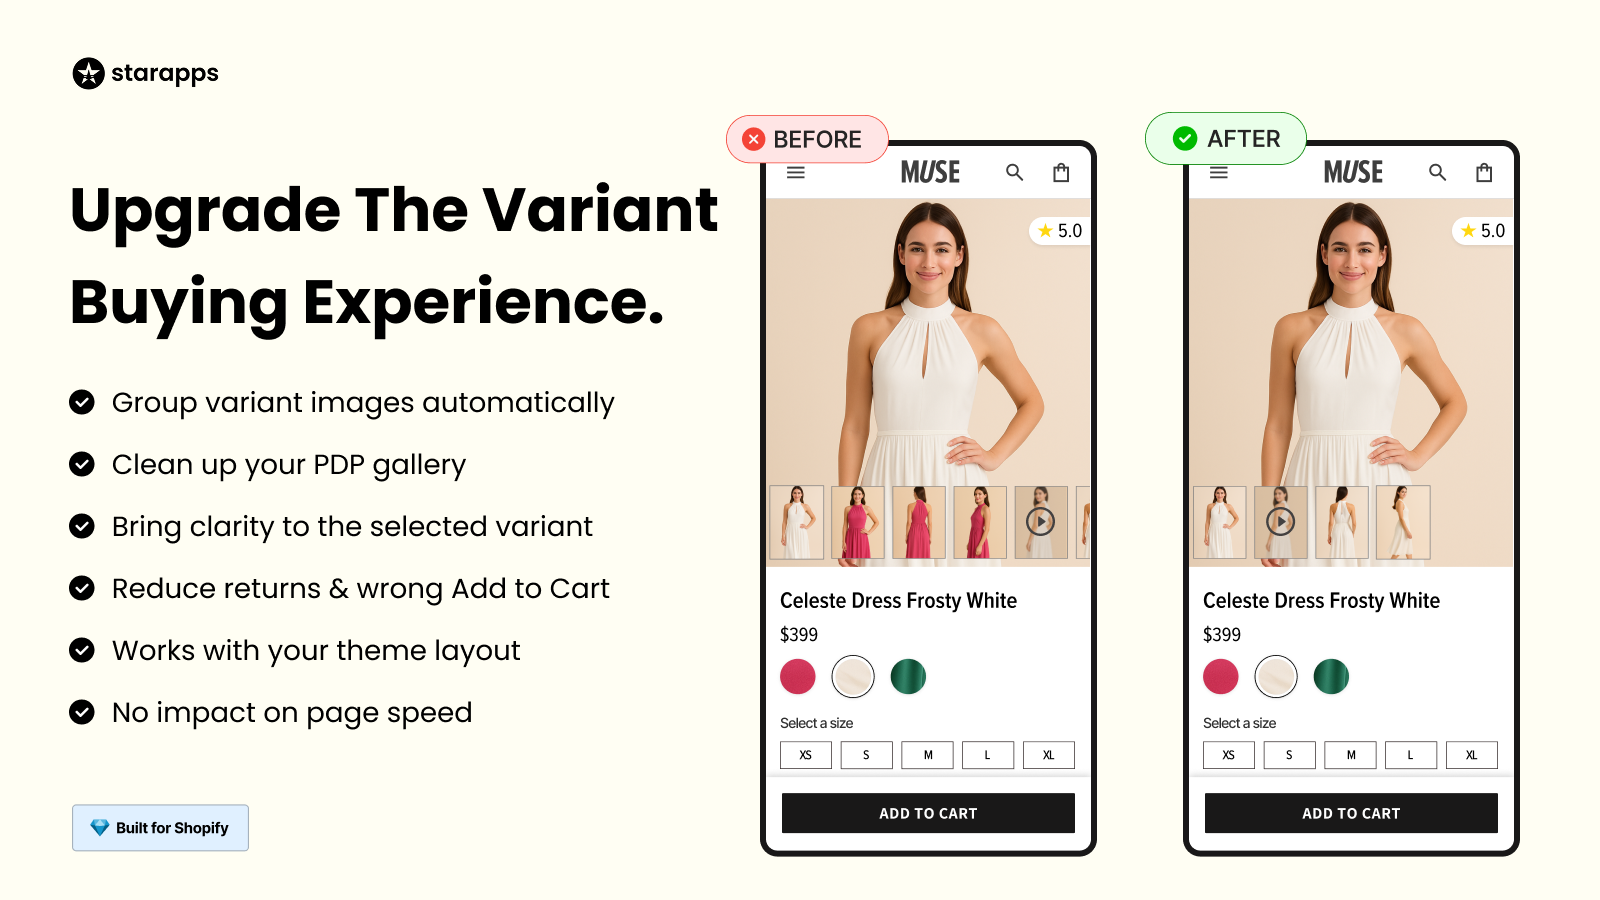
Once your domain is verified, maintaining a clean, responsive storefront becomes essential. Variant Image Automator helps achieve this by automatically linking images to their respective product variants.
How it supports optimization:
- Displays only relevant images when a customer switches between variants.
- Keeps product galleries organized and prevents unnecessary image clutter.
- Works with all Shopify themes and supports advanced media, including 3D and video.
- Improves page load times and overall browsing experience.
A verified domain builds trust; a clear, image-optimized product page reinforces it.
Variant Alt Text King (SEO)
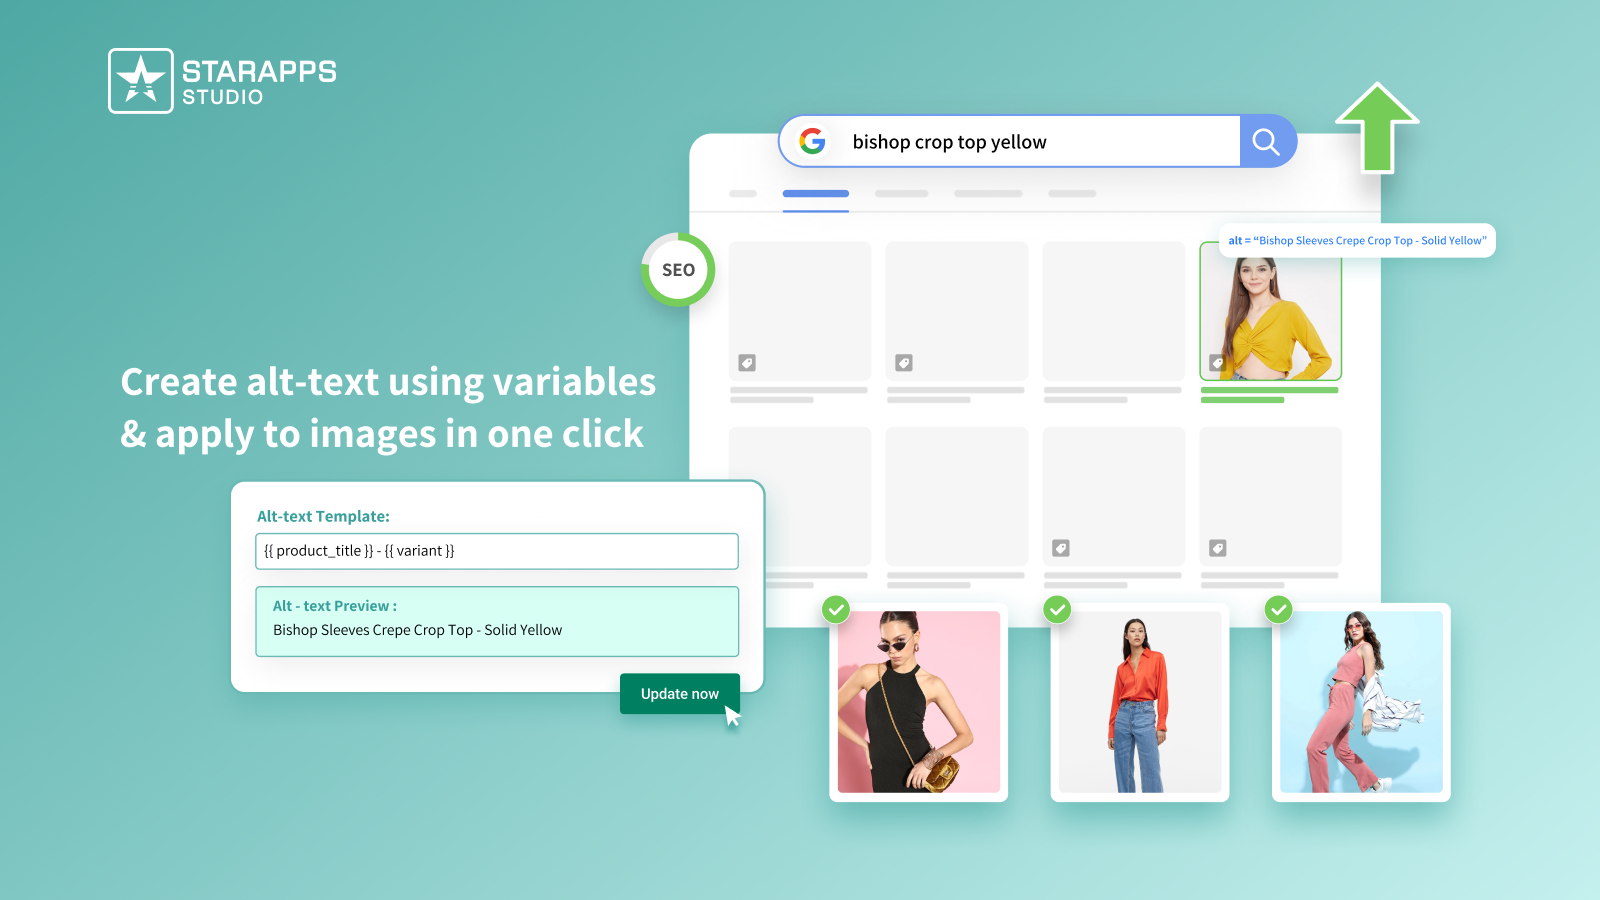
Verification strengthens your technical foundation, but ongoing SEO maintenance keeps your store visible. Variant Alt Text King automates one of the most overlooked parts of optimization: image alt text.
How it helps:
- Automatically generates descriptive alt text for product variant images.
- Enhances accessibility and image search SEO ranking.
- Keeps your site ADA- and WCAG-compliant.
- Updates new product images automatically, ensuring nothing is missed.
Good alt text not only supports accessibility but also helps verified stores gain stronger organic visibility.
Variant Title King
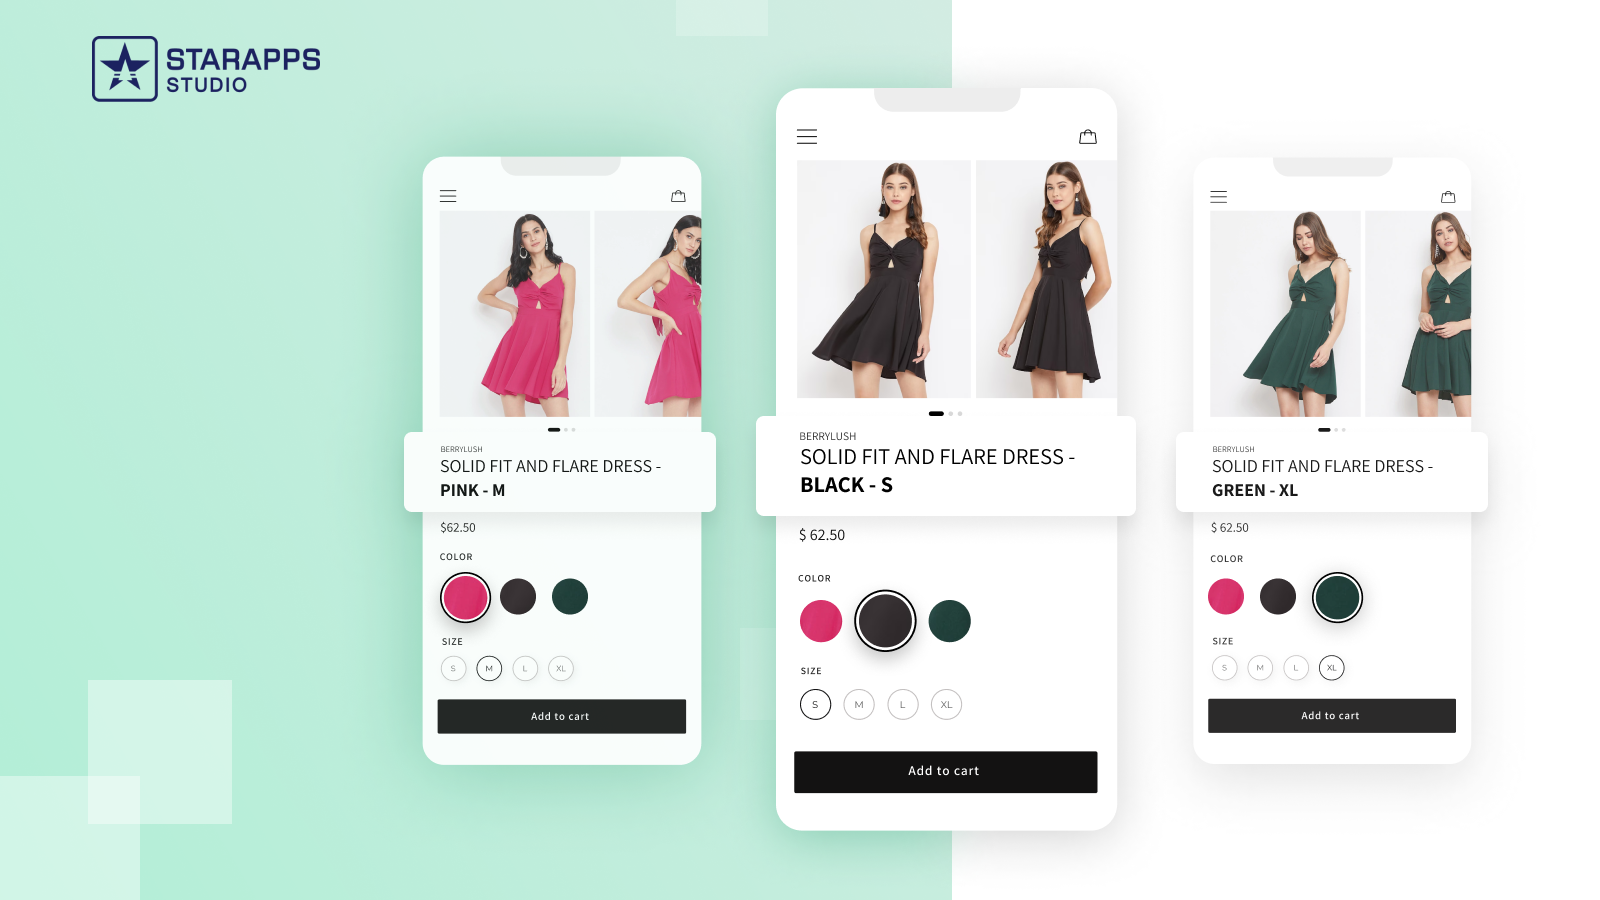
Consistency matters when it comes to verified domains and product data. Variant Title King helps maintain clarity in product listings by dynamically updating titles as customers choose different variants.
How it helps:
- Shows accurate variant names in real time to prevent confusion.
- Reduces cart errors and enhances the customer journey.
- Works smoothly with other StarApps tools for a consistent presentation.
- Keeps large catalogs organized without manual updates.
When shoppers can easily understand what they’re buying, trust turns into action, and conversions follow.
Conclusion
Shopify verification confirms that your store is legitimate and secure, ensuring customers can trust your brand and that essential emails reach their intended recipients. With your domain verified, your store now has a stable foundation to grow and perform consistently.
The next step is to keep that trust strong by improving how your store looks and functions. From better product organization to faster, clearer variant displays, thoughtful optimization can make a verified store feel polished and reliable.
Tools from StarApps Studio support this next stage with apps that simplify variant management and improve product presentation. They help you maintain the same level of credibility in how your store performs as you achieved through verification.
Explore StarApps Studio tools and see how their Shopify solutions can help you enhance your verified store and create a smoother customer experience.
FAQ’s
1. How does Shopify verify identity?
Shopify verifies identity by requesting government-issued photo ID and business information. This helps confirm ownership, prevent fraud, and comply with legal and payment processing regulations.
2. How long does Shopify verification take?
Shopify verification usually takes up to 48 hours, depending on DNS propagation and document review time. Most verifications are completed automatically once accurate information is submitted.
3. What documents are needed for Shopify verification?
You may need a government-issued ID, proof of address, and business registration documents. Requirements vary depending on your region and whether you’re verifying identity or connecting a payment method.
4. How do you check your Shopify domain?
In Shopify admin, go to Settings > Domains to view all connected domains. The status column shows whether your domain is verified, pending, or requires further action.
5. How to verify if a domain is available?
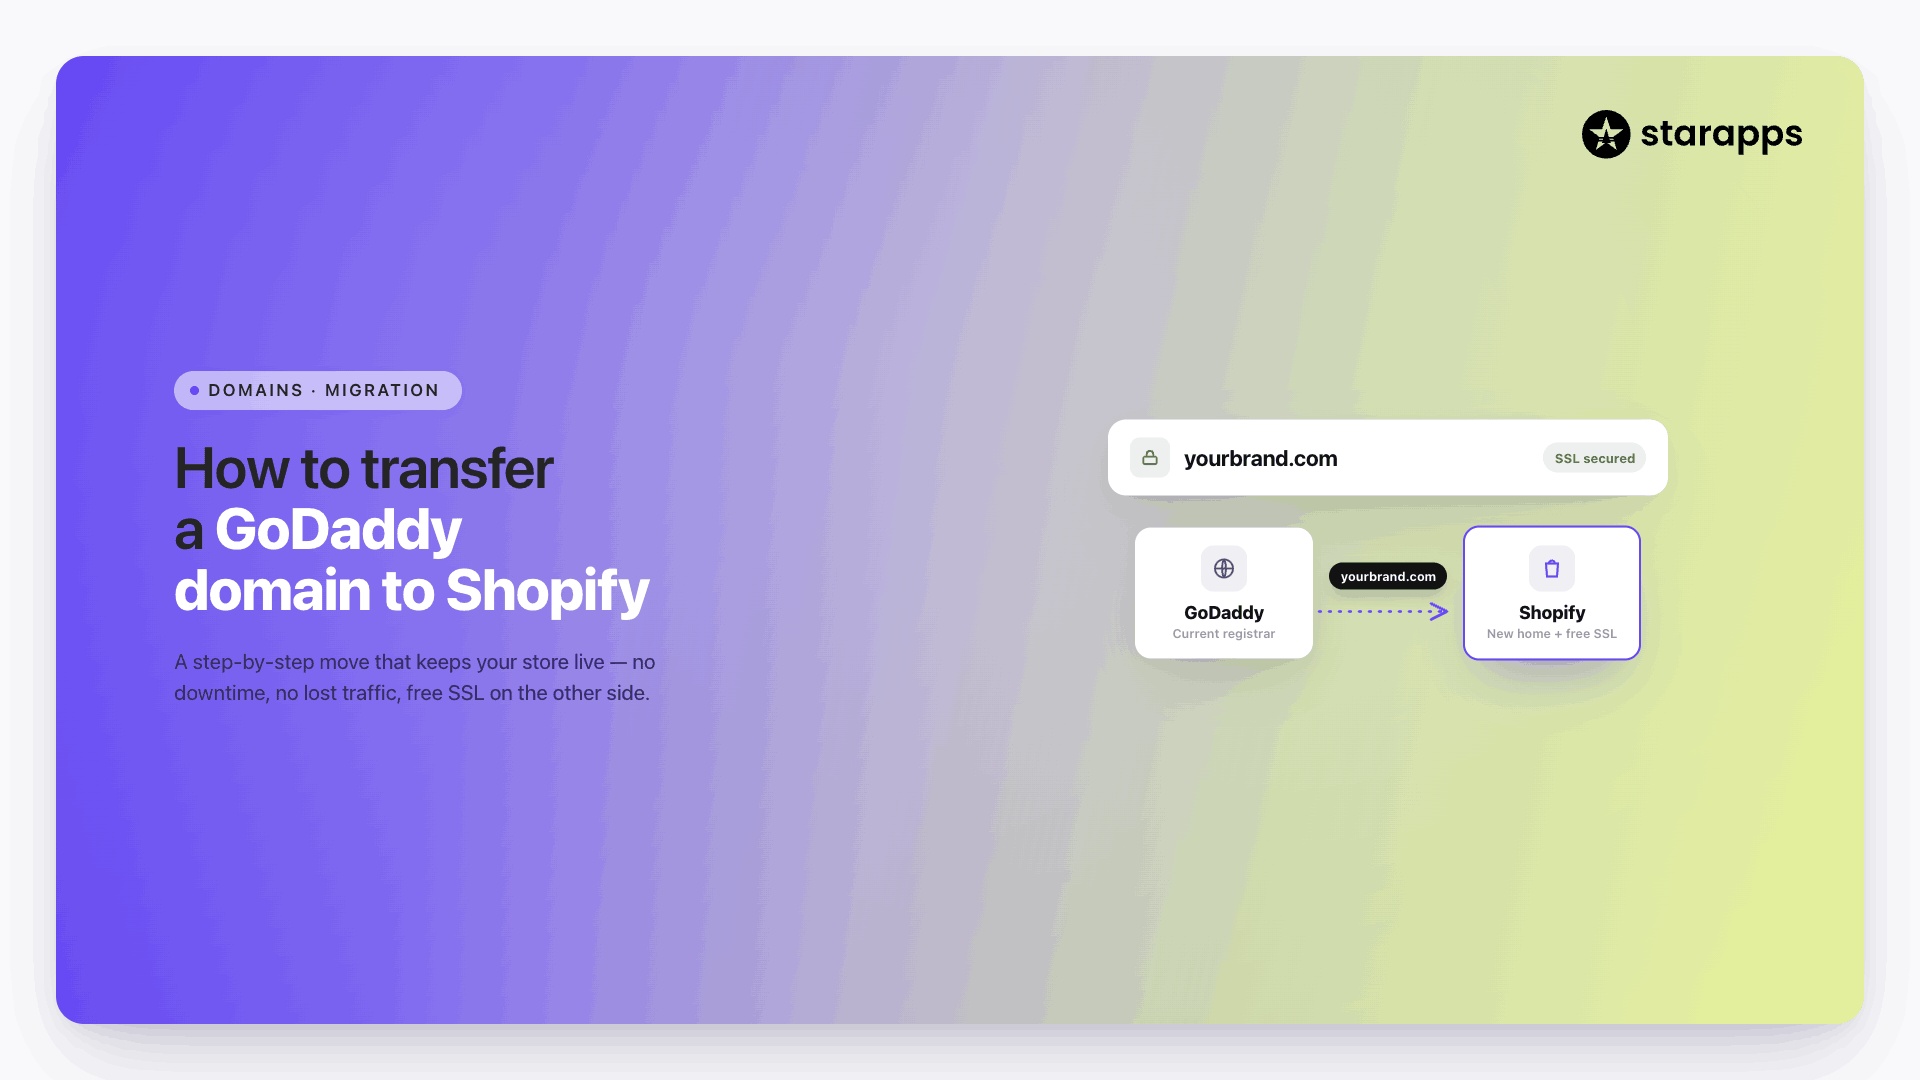
Use Shopify’s domain search tool or any registrar like GoDaddy or Namecheap. Enter your desired domain name to see if it’s available and explore alternative extensions if not.
Heading

End-to-end traceability
To ensure regulatory compliance, you must have a complete overview of your products from production to shipping. Book a demo to see how Katana can give you full visibility of your operations.
.png)
.png)