
Learn how to display variant inventory quantity on Shopify product pages with 3 methods, best practices, and conversion-boosting tips.
FOMO (Fear of Missing Out) is one of the most effective conversion triggers in e-commerce. A recent study found that 60% of online shoppers make impulse purchases during flash sales, often within 24 hours, driven by the urgency and scarcity of the sales.
One proven way Shopify stores create that urgency is by showing how many units are left for each variant (e.g., “Only 2 left in Medium”). This guide covers three ways to add inventory display to your product pages, along with best practices and complementary tactics like variant-specific descriptions that reduce hesitation and drive better conversions.
TL;DR
- Shopify’s native tools show limited or no variant-level inventory in most themes.
- You can add inventory displays using theme settings, custom Liquid code, or no-code apps.
- Use smart thresholds, neutral tones, and real-time syncing to avoid confusion and boost trust.
- Don’t stop at quantity. Variant descriptions like size, fabric, and care also drive conversions.
What Is Variant Inventory Quantity on Shopify Product Pages?
When a product on Shopify has multiple options, like size, color, or style, each of those combinations is treated as a separate variant. The variant inventory quantity refers to the real-time stock count of the specific variant a shopper selects on the product page.
Unlike basic availability tags like “In stock” or “Sold out,” displaying variant inventory quantity gives customers a clearer, more accurate view of what’s available right now for the option they care about.
Here’s how a variant-level inventory message looks on a Shopify product page:
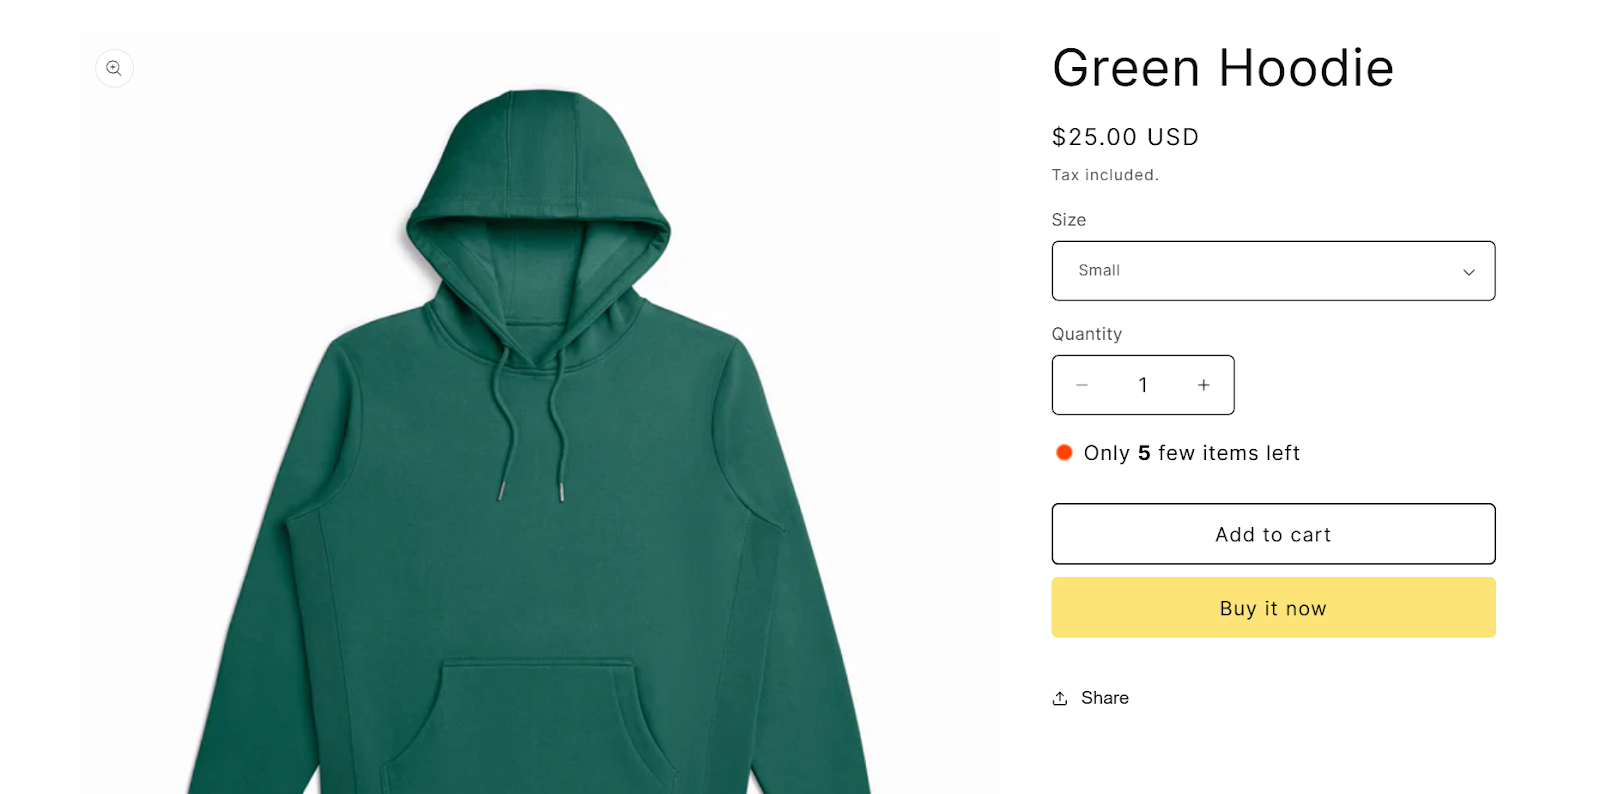
In this example, the shopper selects the Small size, and the page shows an alert: “Only 5 few items left.” This message updates based on which variant is chosen, helping create urgency and manage expectations in real-time.
Why Displaying Variant Inventory Matters
Showing exact variant-level stock quantities isn’t just a cosmetic upgrade—it directly impacts buyer confidence, urgency, and conversions.
Here’s why many Shopify merchants choose to enable it:
- Improves clarity and trust: Buyers can see the precise availability of the variant they want, reducing uncertainty.
- Drives faster decisions: Low-stock notices (e.g., “Only 2 left”) encourage immediate action for high-demand products.
- Reduces abandoned carts: Customers are less likely to leave when they understand stock levels and availability.
- Supports complex catalogs — For stores with multiple sizes, colors, or configurations, this display ensures smoother variant selection and inventory visibility.
Variant inventory visibility doesn’t happen automatically on Shopify. It has to be built into your product page. Let’s look at the three most effective ways to do it.
How to Display Inventory Quantity on Shopify Product Pages
Shopify doesn’t display variant inventory out of the box, but there are three reliable ways to add it to your product pages.
Each method has its own advantages depending on how your store is built. If you're using a Shopify 2.0 theme, some basic display options may already be available. For other themes, you may need to modify the code or install an app. What works best will depend on:
- The theme you're using (e.g., Dawn vs. a custom theme)
- Whether you're comfortable editing Liquid code
- If you prefer no-code solutions through apps
In the sections below, we’ll break down the three main ways to show real-time variant inventory:
- Using native Shopify theme settings
- Adding custom Liquid code
- Installing a Shopify app designed for variant-aware inventory display
Let’s start with the simplest option: the theme settings.
Method 1: Use Native Shopify Theme Settings (If Available)
Some Shopify 2.0 themes, like Dawn, Craft, and Impulse, include built-in blocks that let you display inventory messages for the selected variant. This is the most straightforward method if your theme supports it.
What It Supports
These themes can automatically show messages like:
- “Only 3 left in stock.”
- “Selling fast”
- “In stock” or “Out of stock” based on variant selection
These messages appear below the product title or near the Add to Cart button, depending on your theme’s layout.
How to Enable It
To check if your theme supports this:
- Go to Online Store → Themes → Customize
- Open a product page template.
- In the left panel, look for a block called Inventory status or Stock alert.
- If available, drag it into your product form section.
- Save and preview the product page with multiple variants.
If your theme supports dynamic updates, the message will change as shoppers select different variants.
What to Watch For
While this option is easy to use, it comes with limitations:
- Not all themes include this block, especially older or custom ones
- Messaging is limited: You may not be able to change the wording or trigger thresholds.
- Some themes don’t update the message dynamically as variants change, which can mislead shoppers.
If your theme lacks this feature or doesn’t update the inventory message based on variant selection, you’ll need to use code or an app, covered in the next sections.
Method 2: Add Custom Liquid Code in Your Theme
If your theme doesn’t support inventory messaging—or you want full control over how stock information appears—Shopify’s Liquid templating language lets you display variant-level inventory manually. This approach is flexible, but it does require some familiarity with your theme files.
How It Works
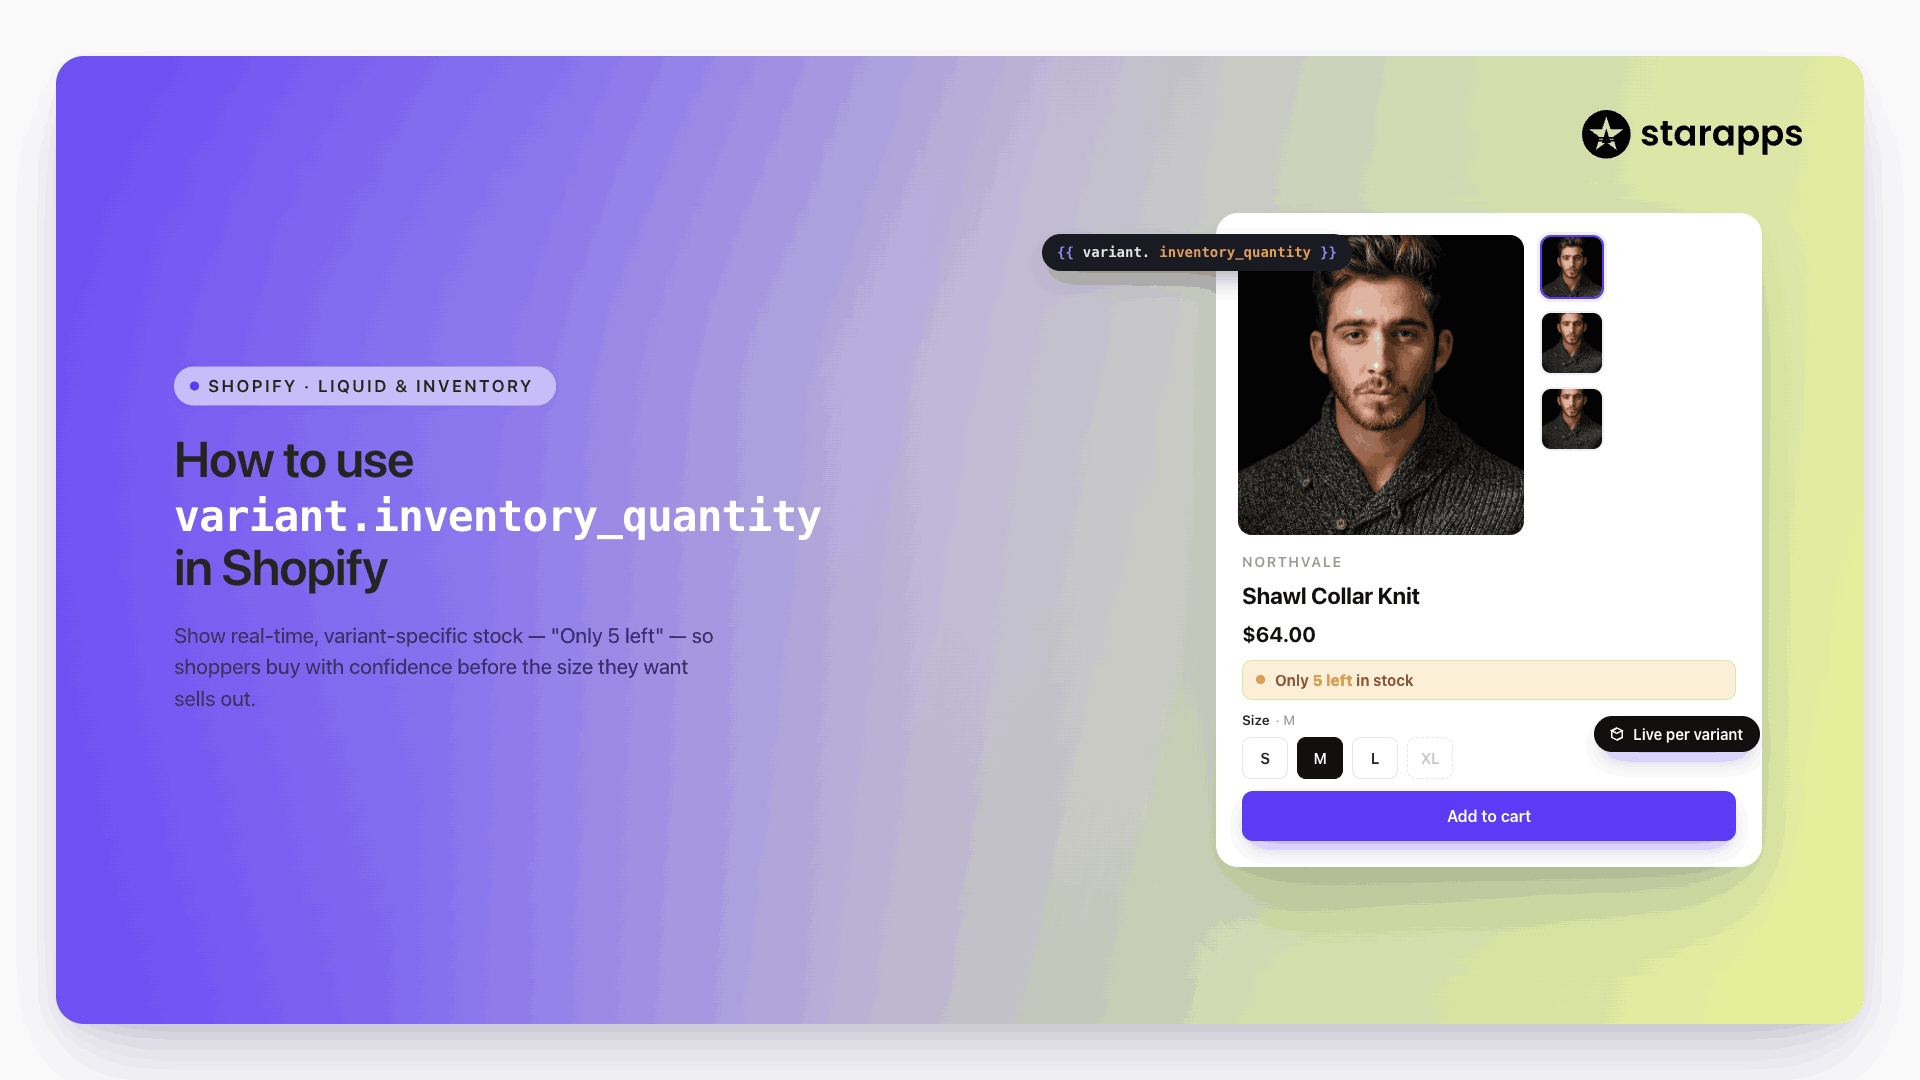
Shopify stores inventory at the variant level, and that data is accessible through the inventory_quantity attribute in Liquid. By inserting a few lines of code, you can show how many units remain for the selected variant.
However, there’s one important limitation:
The current_variant object is only available after a variant has been selected. This means inventory won’t show by default when the page loads; it only appears once the customer picks an option.
To make it fully dynamic, you’ll need to add JavaScript that listens for variant changes and updates the message in real time.
Where to Insert the Code
- Go to Online Store → Themes → Edit Code
- Open your product template file (main-product.liquid, product.liquid, or product-form.liquid, depending on the theme)
- Inside the product form (near the Add to Cart button), insert this snippet:
{% if current_variant.available %}
<p>Only {{ current_variant.inventory_quantity }} left in stock</p>
{% endif %}
This will show a stock message like:
Only 3 left in stock, but only after a variant is selected.
Making It Dynamic (Optional JavaScript)
To update the inventory message instantly as customers click between options (like sizes or colors), you’ll need JavaScript that listens for variant change events and pulls in the correct inventory quantity.
Most Shopify 2.0 themes already have variant change handling built in, so a developer can hook into those events and update the DOM accordingly.
Pros and Cons
Advantages:
- Fully customizable: you decide how, where, and when stock appears
- Doesn’t require any third-party apps
- Works across any theme with theme code access
Limitations:
- Requires editing Liquid + JavaScript
- The inventory message won’t display by default on page load.
- Manual setup needs to be maintained after theme updates or redesigns
Method 3: Use a No-Code Shopify App
If your theme doesn’t support inventory display and you prefer not to edit Liquid or JavaScript, Shopify apps offer a practical alternative. These tools work across all themes, automatically detect the selected variant, and show real-time inventory quantities, without any code.
Why Use an App
Apps built for inventory visibility typically allow you to:
- Display live stock levels for the selected variant
- Trigger messages only when inventory drops below a certain threshold
- Customize the wording, urgency tone, and placement of the message.
- Automatically update the display as customers choose different variants.
This method is ideal for store owners who want a reliable, fast, and flexible solution without developer involvement.
Setup Basics
Most apps designed for this use case follow a similar process:
- Install the app from the Shopify App Store
- Enable inventory display for product variants in the settings.
- Set threshold rules (e.g., only show when inventory is below 10)
- Choose where the inventory message appears on the product page.
- Preview the live result and make styling adjustments if needed.
These apps typically sync directly with Shopify’s real-time inventory, so the displayed quantity always reflects what’s actually available.
Pros and Cons
Advantages:
- No need to edit theme files or write code
- Works on all Shopify themes
- Real-time updates for all variants
- Flexible messaging and styling options (depending on the app)
Limitations:
- May require a monthly subscription
- Behavior and design options are app-dependent
- Adds another layer of dependency to your storefront
Adding variant inventory to your product pages solves a visibility problem, but how you implement it matters just as much. Even minor missteps in display logic or messaging can confuse shoppers or create false urgency. Before you publish your changes, it’s worth knowing what to avoid.
Common Mistakes to Avoid When Displaying Variant Inventory
Displaying inventory quantities can improve clarity and drive conversions, but only when done right. These common mistakes can undermine trust, create shopper confusion, or lead to inconsistent behavior across your product pages.
Showing total product inventory instead of variant-level quantity
One of the most frequent errors is displaying the overall product inventory, regardless of which variant is selected. This misleads customers, especially when some variants are nearly sold out while others are fully stocked.
Leaving the message static (not updating on variant change)
If the inventory message doesn’t change when a shopper switches between variants, it creates a disconnect between what’s displayed and what’s actually in stock. This typically happens when the message is hardcoded or not paired with dynamic JavaScript.
Hardcoding inventory numbers manually
Avoid writing messages like “Only 3 left in stock” directly into your theme or product description. If inventory changes, the message becomes outdated and potentially misleading. Always pull data dynamically from Shopify’s inventory system.
Applying urgency messaging too aggressively
Messages like “Hurry!” or “Only 1 left!” can help conversions—but if used on every product regardless of inventory levels, they start to feel gimmicky. This weakens trust and reduces effectiveness over time.
Not accounting for multi-location inventory
If your store uses multiple fulfilment locations, ensure the displayed quantity accurately reflects the correct location or is aggregated properly. Otherwise, customers may see inaccurate stock levels or buy items that aren’t available for their region.
Skipping mobile or cross-browser testing
Inventory messages may look fine on a desktop but get cut off, overlap, or misalign on mobile. Always test the display across devices and ensure that the inventory message behaves consistently.
Avoiding mistakes is the first step, but getting the inventory display right takes more than just fixing errors. The most effective stores use inventory cues strategically, with thoughtful placement, tone, and thresholds. Below are some best practices to make your display both helpful and high-converting.
Best Practices for Displaying Variant Inventory
Use the tips below to keep your inventory messaging clear, trustworthy, and conversion-friendly:
- Only show quantity below a threshold: Set a minimum display limit like “under 10 units” to avoid clutter and keep urgency cues meaningful.
- Use neutral, factual language: Stick to clear phrases like “Only 4 left in stock.” Avoid overused urgency terms like “Hurry!” unless they match real scarcity.
- Place messages near variant selectors: Keep inventory indicators close to the size, color, or other variant options, not buried elsewhere on the page.
- Ensure real-time syncing: Whether you manage inventory directly in Shopify or through third-party tools, your display logic must always reflect current stock levels.
- Set up variant SKUs and tracking correctly: Each variant should have its own SKU and inventory tracking enabled. Shared SKUs or disabled tracking will lead to inaccurate displays.
- Test what actually works for your products: Run A/B tests to measure the impact of showing vs. hiding inventory, and experiment with different phrasing to see what drives conversions.
While showing inventory can be helpful in many cases, it’s not always the right move. Depending on your product type, fulfillment model, or business strategy, there are times when hiding stock levels is the better choice.
When Not to Show Inventory Quantity
Variant-level inventory display works well for urgency and clarity—but there are cases where it adds noise, exposes internal operations, or creates unnecessary doubt. In these situations, it’s better to keep inventory hidden from the storefront.
- Made-to-order or always-available products: If your product is custom-built, print-on-demand, or backed by guaranteed supply, showing inventory isn’t relevant and can create confusion.
- High-stock items with no urgency: For core products with consistent availability, showing “Only 57 left” adds no value. It can even create the impression of excess or slow-moving stock.
- Highly volatile or externally synced inventory: If you sync stock from multiple systems (e.g., POS, warehouse, drop ship), quantities may fluctuate too rapidly. Public display risks showing inaccurate data.
- B2B or enterprise-facing stores: Large-volume buyers often negotiate or bulk-purchase based on availability. In these cases, inventory visibility may be handled through gated pricing or direct communication, not public display.
- Competitive categories where stock intel is sensitive: If you're in a niche where competitors monitor each other’s stock levels, displaying exact numbers may reveal too much about your sales velocity or fulfillment pace.
Conclusion
Showing stock quantity of any variant plays on the principle of scarcity, encouraging customers to make quicker decisions for fear of missing out. It’s a smart conversion move, especially when done cleanly, with real-time updates tied to the exact variant a shopper selects.
But stock isn’t the only thing influencing the purchase journey. Clear, variant-specific descriptions, like care instructions, size charts, or material details, can be just as important. They help reduce uncertainty, build trust, and prevent returns by making sure the customer knows exactly what they’re choosing.
If you’re ready to improve that part of the experience, try Variant Descriptions King by StarApps Studio. The app lets you:
- Show unique product descriptions for each variant (like fabric, specs, or size guidance)
- Organize long information into tabs or collapsible accordions that adapt to mobile.
- Add those same tabbed sections across your store—from product pages to FAQs, shipping policies, and returns.
The app works with all Shopify themes and helps you turn more product views into confident purchases while reducing returns and support queries along the way.
Want to show the right details for every variant without cluttering your product page? Try Variant Descriptions King and turn product clarity into higher conversions.
FAQs
1. Can Shopify show inventory for each variant automatically?
Only some Shopify 2.0 themes include built-in blocks for showing variant inventory. Most themes don’t support it natively. To display it correctly, you’ll either need to add custom Liquid code or use a third-party app that dynamically updates the stock based on the selected variant.
2. Does showing low inventory really increase sales?
Yes. Scarcity messaging like “Only 3 left” can prompt quicker purchases by triggering FOMO. It’s especially effective during time-sensitive campaigns or when variants sell out often. Just make sure the message is accurate and updated in real time as customers select different options.
3. What happens if I hardcode inventory numbers manually?
Hardcoding stock levels (e.g., typing “Only 4 left” in the description) can quickly become outdated. This creates confusion or trust issues when the actual inventory changes. It’s best to pull live data directly from Shopify so your display stays accurate at all times.
4. Can I hide stock levels for high-inventory or evergreen products?
Absolutely. For items with consistent availability or made-to-order fulfillment, it’s better to skip inventory displays. You can set display thresholds using code or apps—show stock only when it drops below a specific level (e.g., under 10 units).
5. Does display inventory work well on mobile, too?
It depends on your theme or app. Some setups break or misalign on mobile screens. Always test the inventory message placement on mobile devices and ensure it updates dynamically when variant selections change. Responsive formatting matters for mobile conversions.
6. What’s the difference between showing an SKU and showing stock quantity?
A SKU identifies a specific variant for internal tracking and order accuracy, but it doesn’t indicate the quantity in stock. Inventory quantity accurately reflects actual availability, enabling customers to make informed decisions quickly, especially when stock is limited or time-sensitive.
Heading

End-to-end traceability
To ensure regulatory compliance, you must have a complete overview of your products from production to shipping. Book a demo to see how Katana can give you full visibility of your operations.

.png)
.png)