
Learn how to add a category on Shopify. Choose between manual or automated settings and optimize for SEO. Start organizing your store now!
Most Shopify stores don’t lose sales because of pricing or products; they lose them because shoppers can’t find what they’re looking for. In fact, 67% of users abandon purchases due to poor navigation and product discovery, according to Baymard Institute.
That’s where categories matter. Knowing how to add a category in Shopify helps businesses structure products clearly, improve SEO, and guide buyers to purchase more quickly.
This blog breaks down the exact steps, best practices, and common mistakes so your store stays easy to browse and easy to buy from.
Key Takeaways
- Correctly assigning Shopify product categories ensures a clean, organized catalog, improves filtering, and prevents “uncategorized” errors.
- Collections are customer-facing and should have clear names, compelling descriptions, and SEO-friendly URLs to enhance navigation and discoverability.
- Using Shopify’s bulk editor and category-specific metafields saves time, maintains consistency, and improves search and filter accuracy for large catalogs.
- Optimizing collection titles, descriptions, URLs, images, and internal links boosts search ranking, discoverability, and overall customer engagement.
What is a Shopify Category?
In Shopify, a product category is a standardized classification assigned to individual products inside the admin. It’s part of Shopify’s global product taxonomy and helps Shopify understand what a product is, not where it appears on your store.
When you assign a category (for example: Apparel & Accessories → Clothing → T-Shirts), Shopify uses this information to:
- Improve product data consistency
- Suggest relevant metafields (like size, material, or gender)
- Support accurate tax calculations and external sales channels
- Power analytics and reporting
Shopify categories are backend-only. Customers never browse categories directly.
At this point, one key distinction can make or break how your Shopify store is structured, and it’s where most merchants go wrong.
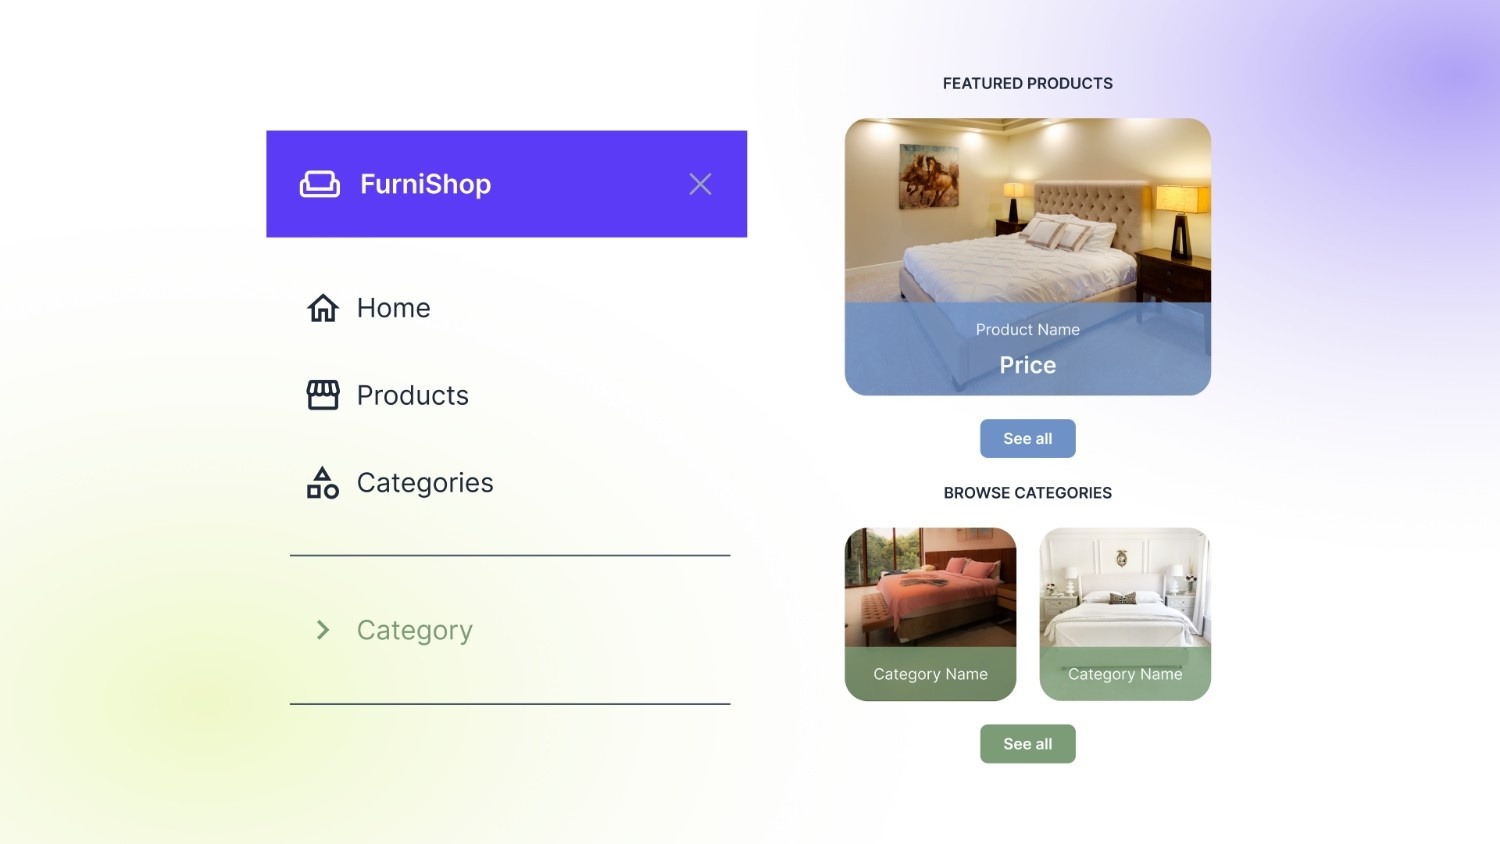
Categories vs. Collections: What’s the Difference?
While both categories and collections help organize products, they serve very different roles inside Shopify. Understanding this difference ensures your store is structured correctly for operations, navigation, and SEO.
Categories help Shopify manage products, while collections help customers find products. That’s why adding the right collections is essential for building clear category pages that drive traffic and conversions.
Knowing the difference is only the first step. What truly matters is how this structure influences customer behavior, search visibility, and long-term store performance.
The Undeniable Importance of Product Categories
Product categories are not just an organizational layer — they directly influence how customers navigate, how search engines interpret your store, and how efficiently your catalog scales.
1. Faster Product Discovery (UX Impact)
Well-structured categories reduce friction. When shoppers can instantly narrow down products by type, they spend less time searching and more time buying. Clear categories shorten browsing paths and prevent decision fatigue, especially in large catalogs.
2. Stronger SEO & Indexable Category Pages
Collections used as category pages create dedicated URLs that search engines can crawl and rank. These pages allow you to target high-intent keywords (e.g., “men’s running shoes”) while distributing internal link equity across your store.
3. Higher Conversion Rates
Categories guide shoppers logically from intent to product. When users land on a relevant category page instead of a generic product grid, they’re more likely to find what they want quickly, increasing add-to-cart actions.
4. Scalable Catalog Management
As your store grows, categories prevent chaos. They make it easier to:
- Launch new product lines
- Run category-specific promotions
- Apply filters, tags, and merchandising rules consistently
Next, let’s walk through how to add product categories in Shopify step by step.
How to Add Product Categories in Shopify Step-by-Step
In Shopify, adding a product category happens at the product level and helps Shopify understand what you’re selling. This step is essential for accurate data, tax logic, and structured catalog management.
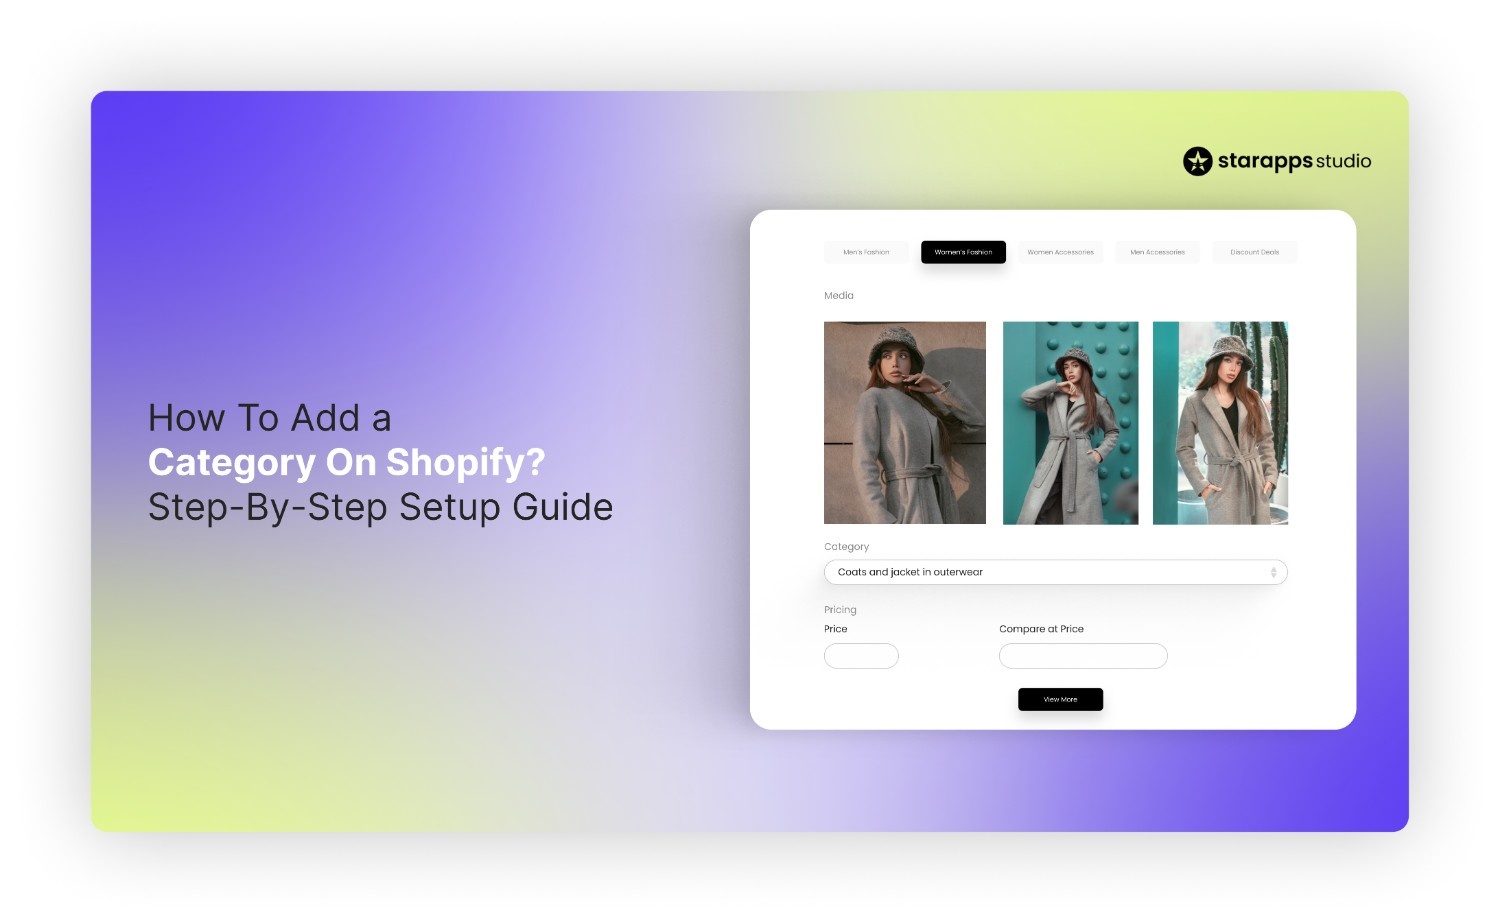
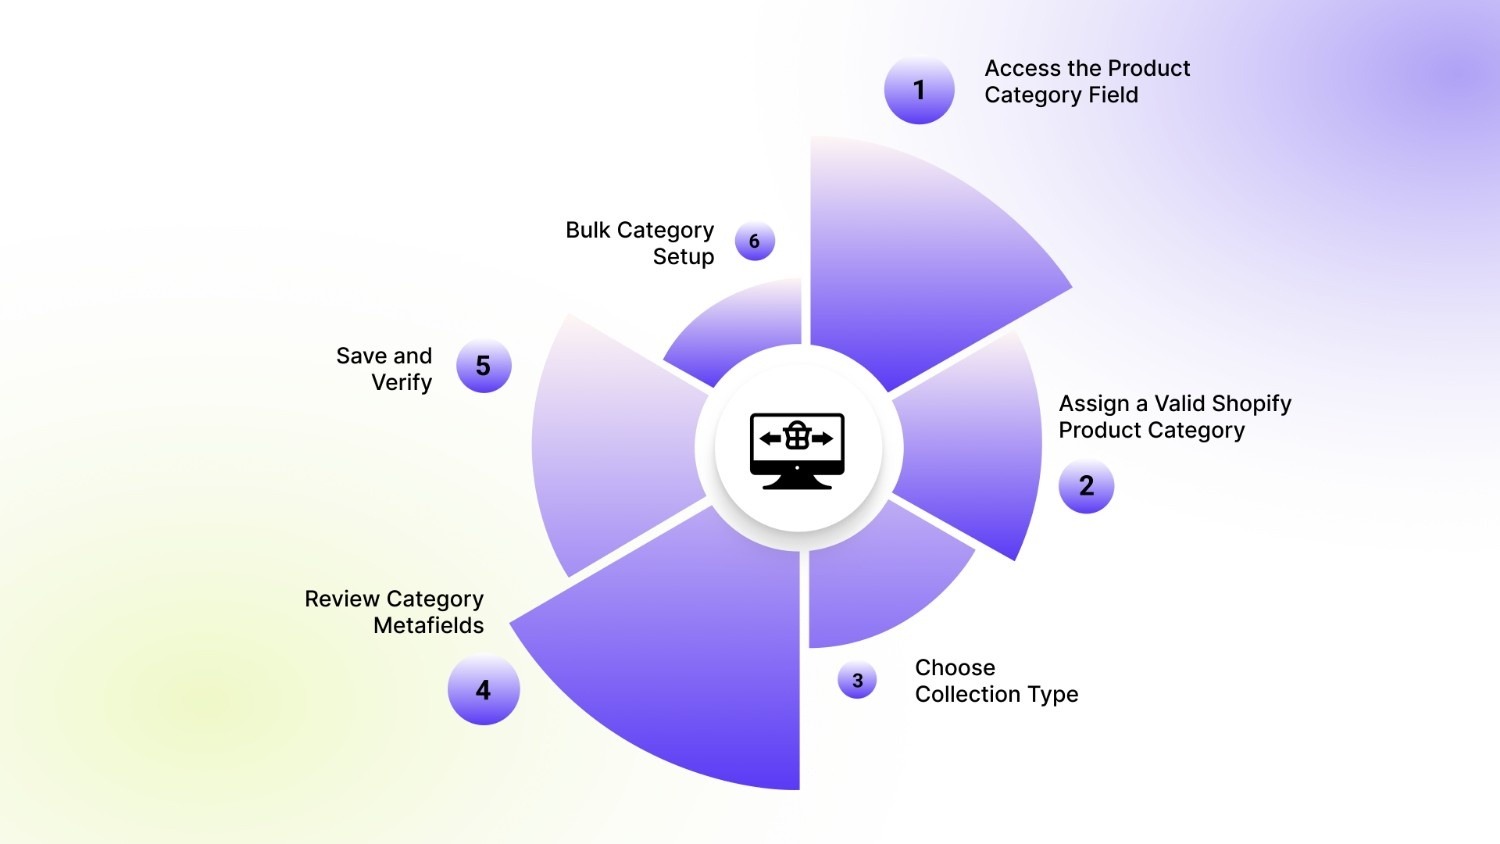
Step 1: Access the Product Category Field
Start by logging into your Shopify Admin dashboard, where all product-level settings are controlled.
From the left sidebar, select Products > Collections to view your entire catalog. Then click the Create collection button (blue, top-right). Further, click on the specific product you want to categorize. This opens the product detail page, which is the single source of truth for that item’s data.
On this page, Shopify stores critical product data such as:
- Variant and inventory details
- Pricing and availability
- Product metafields and attributes
- Product category assignment
Because categories are applied at the product level, any change made here directly affects how the product behaves across reports, tax calculations, and connected sales channels.
Step 2: Assign a Valid Shopify Product Category
On the product details page, locate the Product category field, usually placed near the product organization section. This field is part of Shopify’s global product taxonomy and determines how Shopify classifies this item internally.
Click into the field and start typing the product name or its primary use. Shopify will display a hierarchical list of predefined categories.
(Example: Apparel & Accessories → Clothing → T-Shirts instead of a broad “Clothing” label)
Tips to Avoid “Uncategorized” Products
- Always choose the most specific category path, not a top-level option.
- If Shopify suggests multiple matches, select the one that best describes the product’s primary use, not its material or style.
- For multi-use products, categorize based on how customers would search for it, not internal naming.
- Recheck categories after duplicating products; duplicates often inherit blank or incorrect categories.
- Use the bulk editor to quickly spot and fix products marked as “uncategorized”.
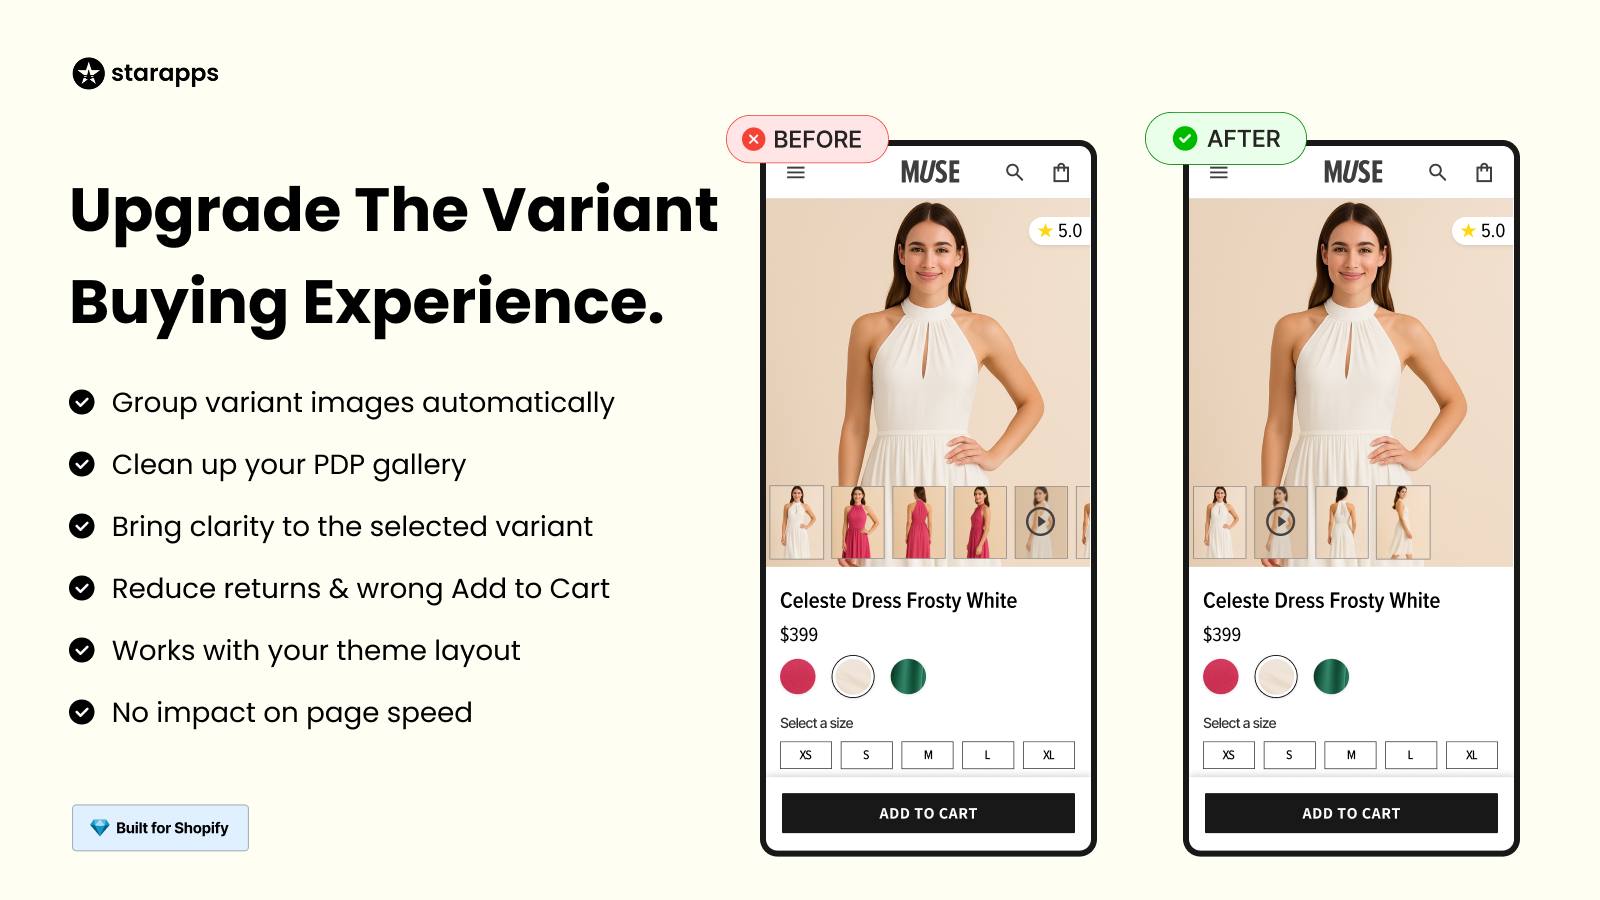
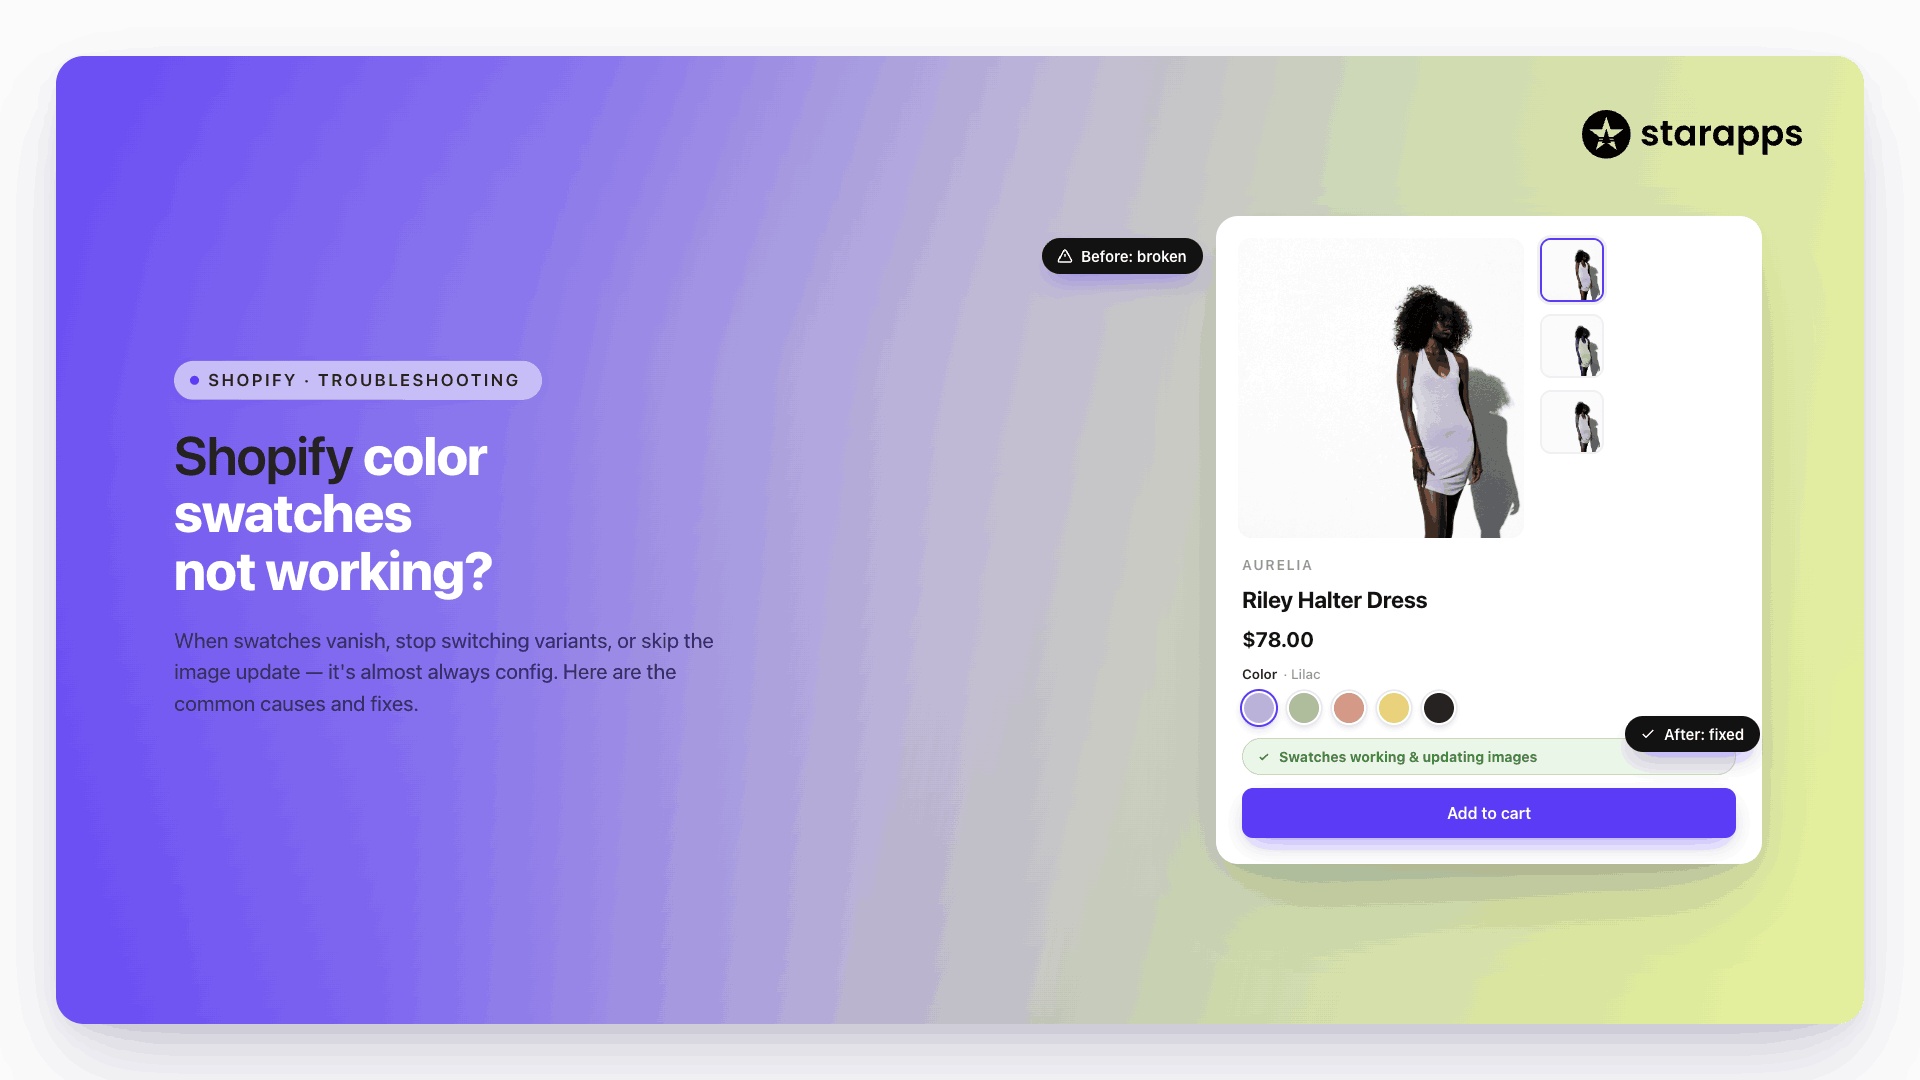
Simplify product organization and ensure every item is properly categorized with StarApps Swatch King, automate variant display, and make browsing seamless for your customers.
Step 3: Choose Collection Type
After assigning the product category, the next decision is how the product will be grouped and displayed on your storefront. In Shopify, this is done through collections, which act as customer-facing categories.
Shopify offers two collection types, and choosing the right one directly affects how easily your catalog scales and stays organized.
Automated collections use conditions such as product category, product type, tags, price, or vendor to automatically include products. These are ideal for growing catalogs because new products that meet the conditions are added instantly, without manual effort.
Manual collections require you to add products one by one. They offer precise control and are best for curated sets like limited editions, seasonal drops, or promotional bundles.
Selecting the right collection type ensures products appear in the right places across navigation menus, filters, and collection pages.
Step 4: Review Category Metafields (Optional but Recommended)
After assigning a product category, Shopify may automatically display category-specific metafields linked to that taxonomy. These fields help standardize how product attributes are stored and used across your store.
Use these metafields to add only what’s relevant to the product, such as:
- Fabric or material type
- Size, dimensions, or weight
- Fit, finish, or technical specifications
If a field doesn’t apply, it’s best to leave it blank. Overfilling irrelevant data can clutter product records and reduce accuracy. When maintained properly, category metafields improve filtering, search precision, and overall data quality across Shopify and connected sales channels.
Step 5: Save and Verify
Once all category details are in place, click Save to apply the changes to the product. After saving, take a moment to verify that the selected category is displayed correctly on the product page and aligns with the item’s actual use and attributes.
To keep your catalog consistent and easy to manage:
- Double-check the category shown under product organization
- Ensure it matches similar products in your store
- Repeat this process across all products to maintain a clean, structured catalog
Step 6: Bulk Category Setup (For Large Catalogs)
When managing a large catalog, assigning categories one product at a time quickly becomes inefficient. Shopify’s bulk editor and CSV import tools are built for this exact scenario, allowing you to apply category data across hundreds or thousands of SKUs in a controlled way.
You can streamline the process by:
- Using the bulk editor to update the Product category field for multiple products simultaneously
- Exporting products via CSV, filling in the correct Shopify taxonomy values, and re-importing the file
- Grouping similar products so the same precise category is applied consistently
Properly assigning categories and collections is just the first step; if you want customers to find your products, you also need to optimize them for search engines.
SEO Strategies for Shopify Categories & Collections
Optimizing your categories and collections improves visibility, ranking, and click-through rates. Here’s how to do it effectively:
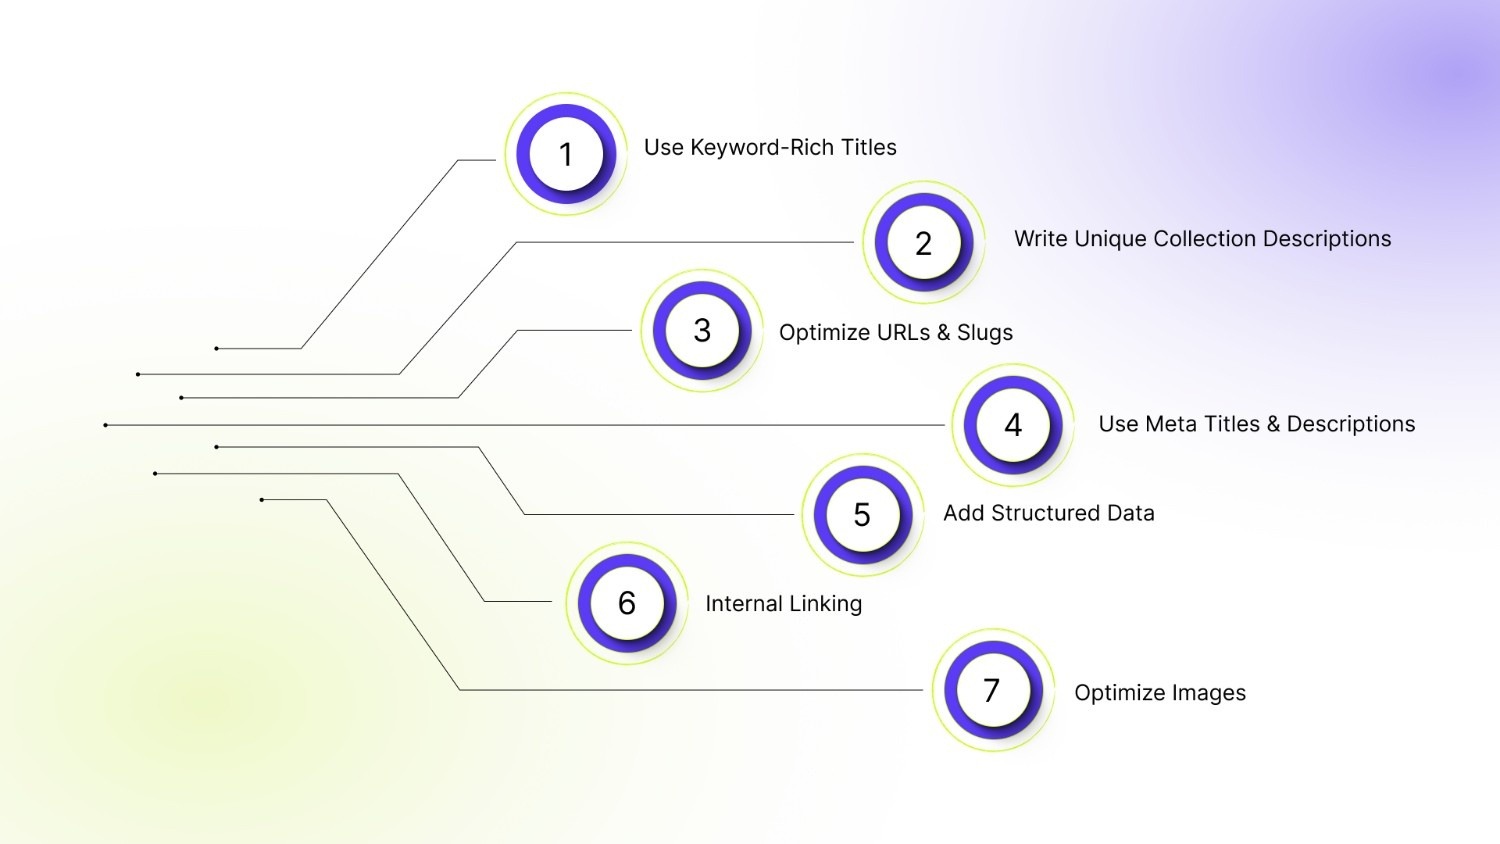
1. Use Keyword-Rich Titles
Your collection titles should include the primary keywords your customers are likely to search for, such as “Men’s Running Shoes”. Keep titles clear and concise, so both users and search engines immediately understand what the collection contains. Avoid vague or generic labels like “Products” or “Collection 1”, as these provide no context and can hurt SEO.
2. Write Unique Collection Descriptions
Craft a 2–4 sentence description that clearly explains what the collection offers and which products it includes. Use secondary keywords naturally (e.g., color, style, use case) and highlight key benefits like durability, style, or performance.
3. Optimize URLs & Slugs
Ensure your collection URLs are short, descriptive, and match the collection name (e.g., /mens-running-shoes). Avoid underscores, special characters, or unnecessary numbers, and keep them consistent with your internal navigation links.
4. Use Meta Titles & Descriptions
Write meta titles under 60 characters and descriptions under 160 characters, including primary keywords along with a clear, benefit-driven hook. Make meta descriptions actionable and engaging to encourage clicks from search results, while accurately representing the collection’s content.
5. Add Structured Data
Use Shopify’s built-in schema markup for products and collections to enable rich snippets in search results, such as ratings, prices, and availability. Properly structured data enhances search visibility, builds trust with shoppers, and can increase click-through rates from Google.
6. Internal Linking
Include links to related collections or products within your collection descriptions. This helps distribute link equity, improves site navigation, and guides both shoppers and search engines to relevant pages. For example: “Check out our Men’s Running Socks collection for matching accessories.”
7. Optimize Images
Use high-quality images for each collection and add descriptive ALT text that naturally includes relevant keywords (e.g., “Red Men’s Running Shoes – Size 10”). Optimized images enhance accessibility, improve SEO, and can drive traffic through image search results.
Now that you understand how to assign categories, create collections, and optimize them for SEO, it’s time to look at practical tips that can save time, improve accuracy, and make your store more scalable.
Pro-Tips for Adding a Category in Shopify
Adding categories might seem straightforward, but small mistakes can lead to disorganized catalogs, misaligned SEO, and poor customer experience. Here’s how to do it efficiently and correctly:
- Plan Your Category Structure: Decide parent and subcategories before adding products to avoid confusion (e.g., Apparel → Men → Running Shoes).
- Use Consistent Names: Keep category and collection names uniform; avoid abbreviations or mixed spellings.
- Assign in Bulk for Large Catalogs: Use Shopify’s bulk editor or CSV import to add categories to many products at once, saving time and reducing mistakes.
- Match Categories with Collections: Make sure internal categories align with the visible collections on your store.
- Fill Only Relevant Metafields: Add category-specific details like size or material, and skip irrelevant fields to keep data clean.
- Check and Update Regularly: Review your categories periodically to fix errors, remove duplicates, and keep the catalog organized.
Having a clean category structure and optimized collections sets the foundation, but the right tools can take your Shopify store to the next level, making setup faster, more accurate, and visually appealing for customers.
Level Up Your Shopify Store with StarApps Studio
StarApps Studio is a suite of Shopify apps designed to help merchants manage product variants, images, and categories effortlessly. Unlike generic tools, StarApps focuses on speed, compatibility, and automation, ensuring your store looks professional and functions flawlessly across all themes.
Key ways Starapps Studio enhances your Shopify store:
- Variant Image Automator: Automatically assigns multiple images to each product variant, keeping galleries organized and improving customer browsing experience.
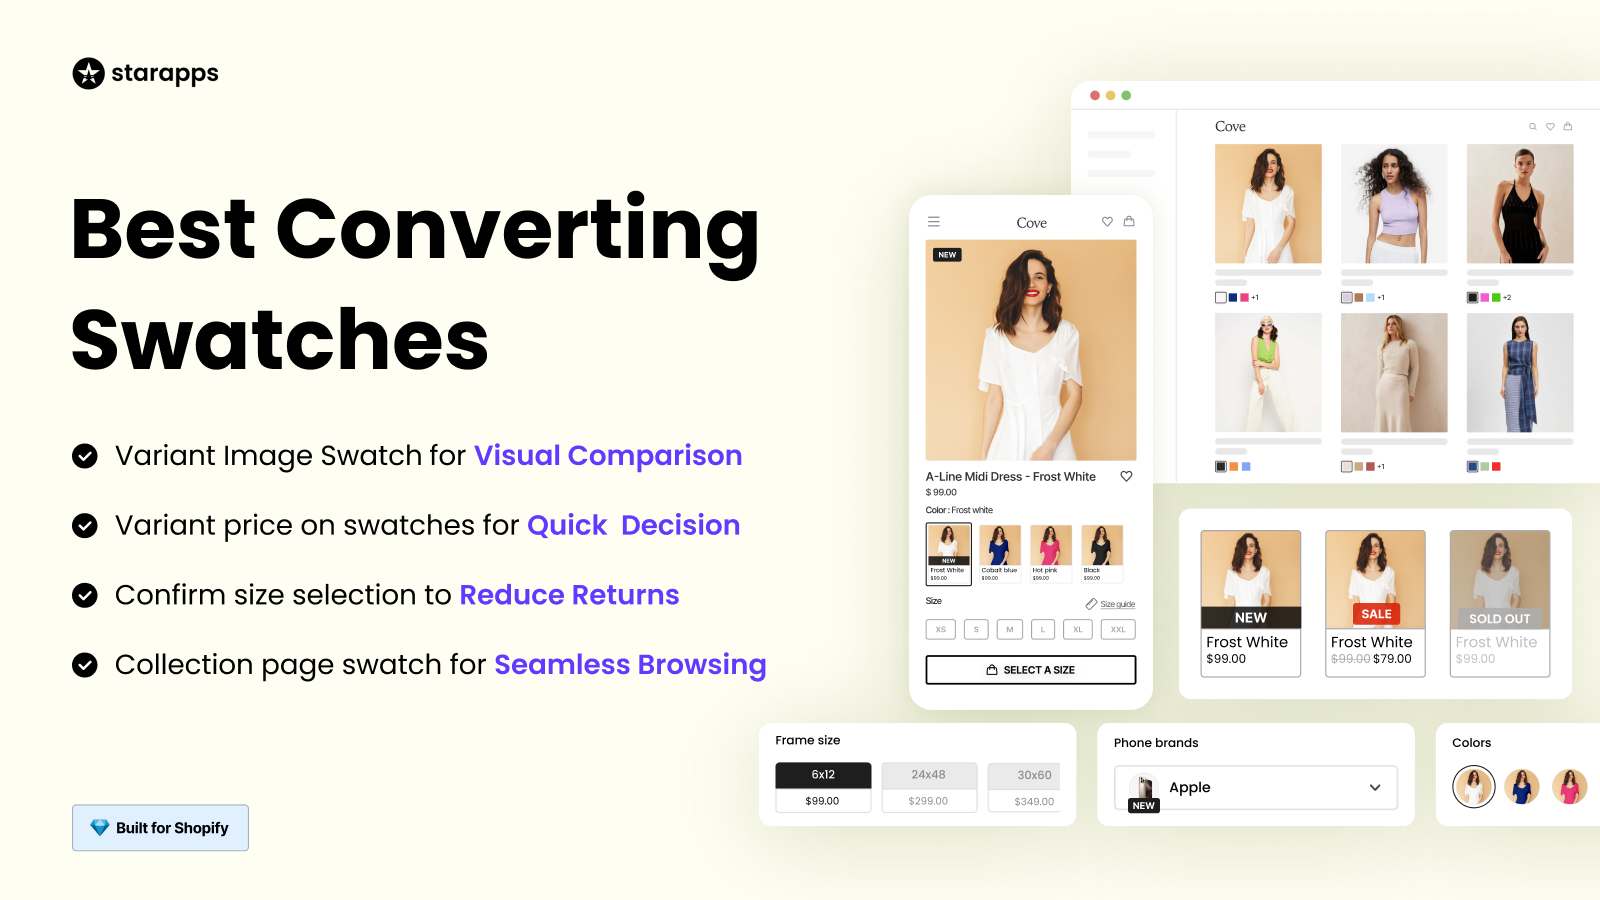
- Color Swatch King: Adds color and image swatches on product and collection pages, helping customers compare variants quickly and reducing decision fatigue.
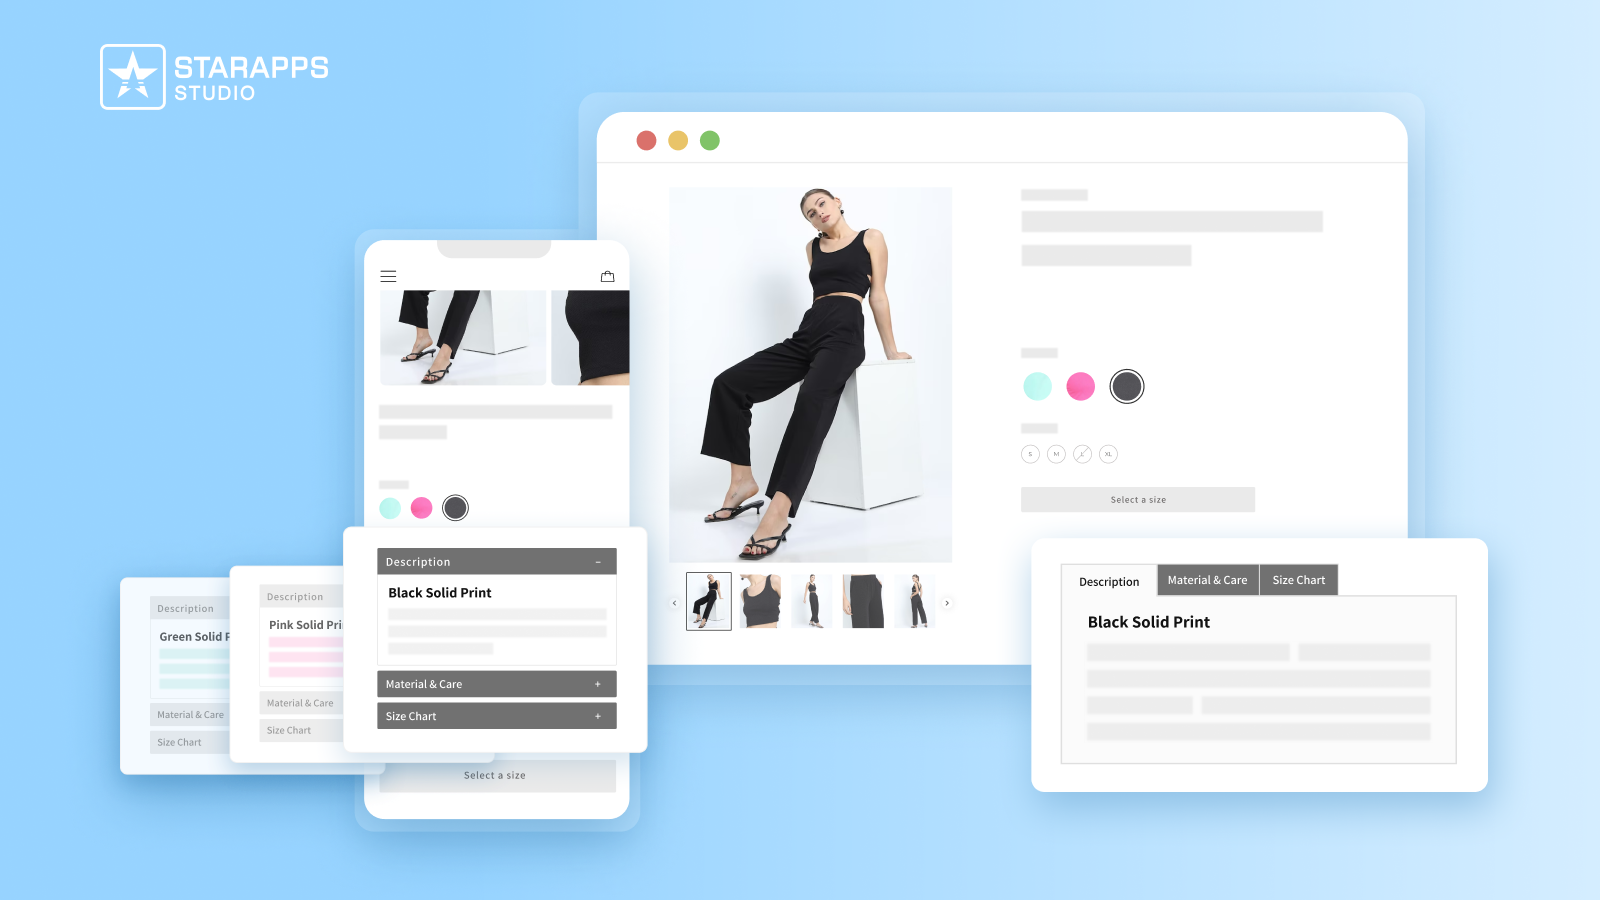
- Variant Descriptions & Title King: Automatically updates variant-specific titles and descriptions, keeping your catalog consistent and reducing manual work.
- Seamless Theme Integration: Works smoothly with any Shopify theme without slowing down page load times, maintaining visual consistency and UX.
Ready to transform your Shopify store?
Explore StarApps Studio today and see how easy it is to organize, optimize, and scale your product catalog with professional-grade tools.
Conclusion
Properly assigning Shopify categories and optimizing collections is essential for a clean, navigable, and SEO-friendly store. A well-structured catalog not only improves customer experience but also enhances search visibility, filtering, and overall store performance.
Utilizing tools like StarApps Studio can further streamline variant and category management, reduce manual errors, and make your storefront visually engaging and conversion-ready.
Start your free trial today to automate category-based variant displays and create a seamless shopping experience for your customers.
FAQs
1. What is the difference between Shopify categories and collections?
Shopify doesn’t use traditional hierarchical categories like some platforms. Instead, it uses collections to group products for customers, while the product category field is part of Shopify’s internal taxonomy used for organization, tax setup, and channel integrations. Collections are what show up on your storefront and help shoppers find products.
2. Do I need a specific Shopify plan to use collections?
Yes, only the Basic plan and above support grouping products into collections that display on your storefront. If you’re on the Starter plan, Shopify won’t let you organize products into collections for customer browsing.
3. How do automated collections work in Shopify?
Automated (smart) collections use conditions like product type, price, vendor, tags, or variant attributes to automatically include matching products. Once set up, new products that meet these rules are added to the collection without manual effort.
4. Can a product belong to more than one collection?
Yes, a single product can be included in multiple collections, allowing you to organize it by themes, use cases, or promotions. For example, a red dress can appear in both “Summer Dresses” and “Red Clothing” collections.
5. What happens if a product has no category assigned?
If you don’t assign a product category, Shopify may save it as “Uncategorized”, which can lead to inconsistent tax calculations, metafield suggestions, or channel sync issues. It’s best practice to assign a specific category or use default suggestions.
Heading

End-to-end traceability
To ensure regulatory compliance, you must have a complete overview of your products from production to shipping. Book a demo to see how Katana can give you full visibility of your operations.

.png)
.png)