

Boost sales with Shopify product page customization. Use visuals, compelling CTAs, and trust signals.
Your product page can make or break a sale. While ads and SEO might bring visitors to your Shopify store, the product page seals or loses the deal.
According to studies, nearly 70% of online shoppers abandon their carts, and one primary reason is a lack of clear, persuasive product information.
Despite Shopify’s powerful platform, many stores still rely on default product templates that fail to showcase their products effectively. Generic layouts, missing details, and poor visuals can leave potential buyers confused or uninterested.
This is where smart customisation comes in. In this blog, we’ll explore how to transform your Shopify product pages into conversion powerhouses using compelling visuals, tailored descriptions, trust-building elements, and layout tweaks that drive better sales.
What Is a Shopify Product Page?
A Shopify product page is the individual page on your Shopify store dedicated to a specific product. It’s where you showcase everything a customer needs to know before making a purchase—think of it as your digital sales pitch.
Purpose in the Buying Process
The product page is more than just a static display; it’s a critical step in the customer journey. It’s where your audience goes from intrigued to ready to buy.
A well-designed product page grabs their attention, builds trust, and makes it easy for them to hit that “Buy Now” button.
This is your chance to show why your product is precisely what they’ve been looking for, and make their buying decision as seamless as possible.
Let’s break down the key elements every Shopify product page should include.
Key Elements of a Basic Shopify Product Page
Your Shopify product page isn’t just a space to list your product. It’s a persuasive touchpoint that drives conversions. Each element must work together to showcase value, eliminate doubt, and inspire trust.
- Product Title
This is your space to tell the product’s story—what it is, why it matters, and how it benefits the customer. Focus on benefits over features, use scannable bullet points, and address common buyer concerns.
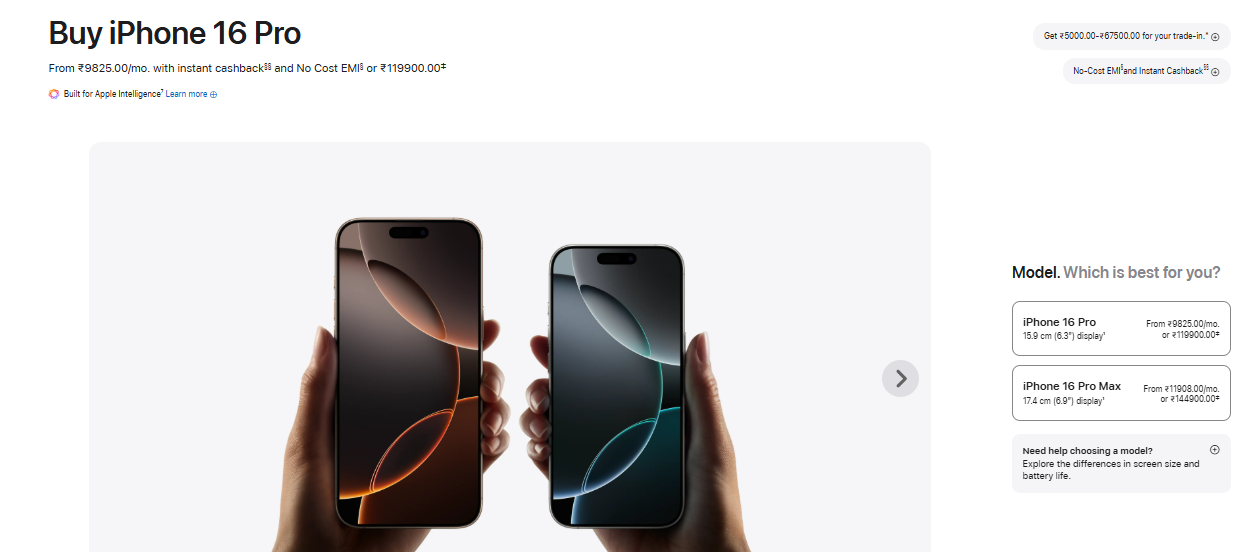
Example: Apple's product titles are concise and direct, like “Buy iPhone 16 Pro" — easy to search and remember.
See their approach here:
- Product Description
A picture may grab attention, but the description closes the deal. Your copy should be benefit-driven, easy to scan, and written in a tone that reflects your brand personality.
Break down the features, explain how the product solves customer problems, and use bullet points for quick readability. Including keywords also helps with SEO, making your products easier to discover.
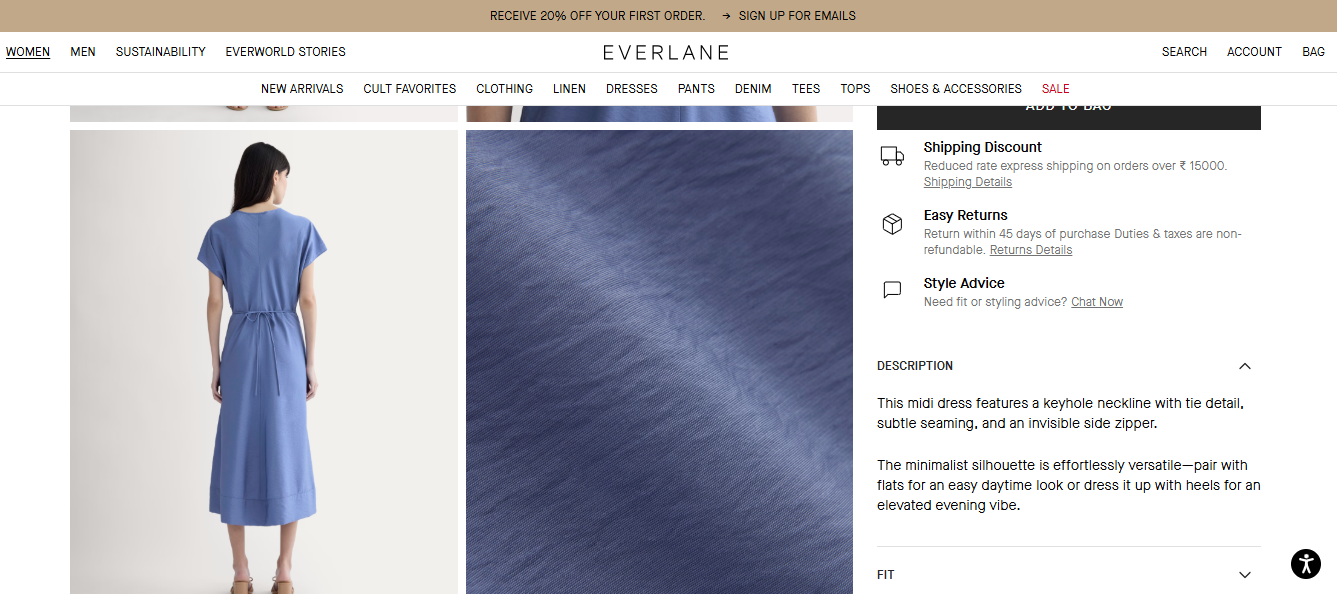
Brands like Everlane keep their descriptions benefit-focused and straightforward, emphasising durability and ethical sourcing in just a few lines.
You can see their approach in action here:
- Pricing
Price isn’t just a number—it’s part of your value communication strategy. Make it clearly visible and consider formatting that includes discounts or urgency-driven messages.
Consider adding urgency-driven messages, like "Limited Time Offer," or showing crossed-out discount prices to highlight the value and encourage quick decision-making.
- Add-to-Cart Button
Your CTA button is where conversions happen, so it needs to be immediate, bold, and action-oriented. Whether it says “Add to Cart,” “Buy Now,” or “Get Yours Today,” the wording should encourage urgency and clarity.
Use contrasting colors to make the button pop and place it above the fold so customers don’t have to scroll to take action.
UX Tip: Many high-converting stores use sticky CTAs on mobile, ensuring the option to purchase is always visible, even while scrolling through the page.
- Product Images
First impressions matter—and in eCommerce, visuals do the talking. Clear, high-resolution product images help customers visualize the product in their lives and make confident buying decisions.
Use multiple angles, close-ups, and if possible, 360-degree views to give a complete look. Shopify's own research shows that product pages with interactive media like 3D and AR can increase conversion rates by up to 250%.
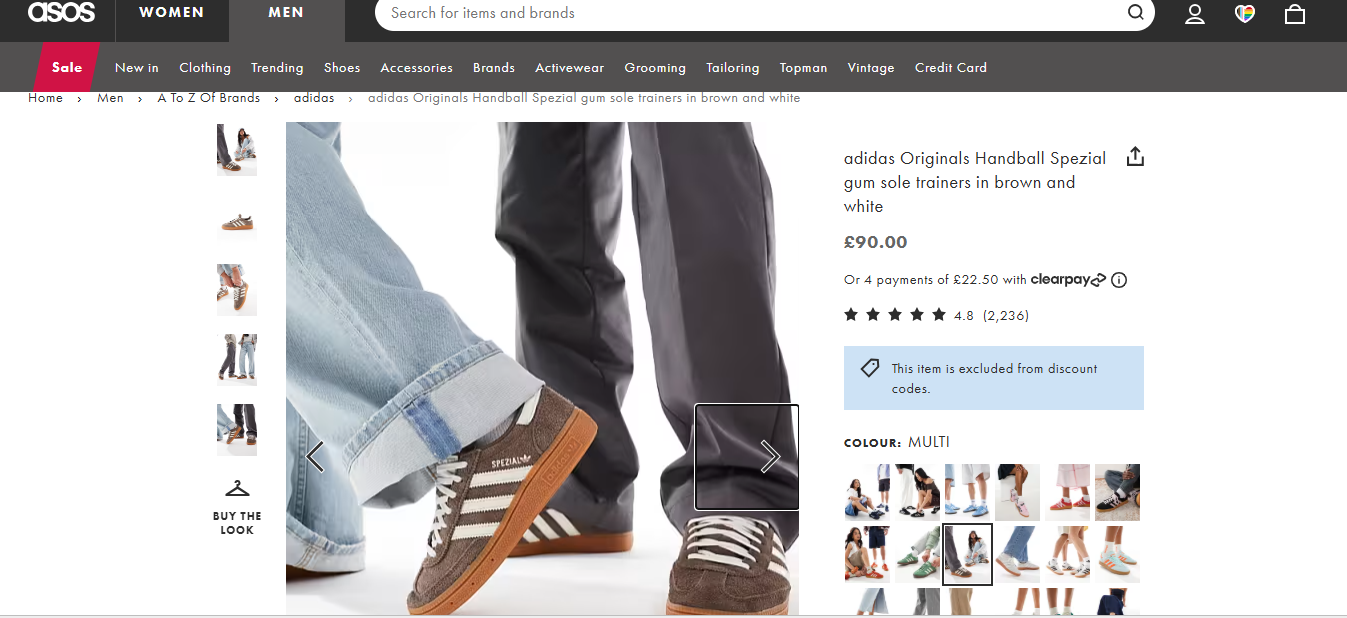
Example: Fashion brand ASOS uses image carousels with multiple views and zoom-in options, helping users inspect the product details like fabric texture and fit, just like in a real store
- Customer Reviews and Social Proof
In an era where people trust other customers more than brands, reviews and ratings are gold. They build trust and provide real-life insights into product quality and user experience.
Displaying average star ratings, customer photos, and verified purchase labels can increase credibility. According to Research, products with reviews have a 270% higher chance of being purchased than those without.
Every element on your product page plays a role in the buyer’s journey, but getting the basics right is just the first step. The real impact comes when you customize these elements to reflect your brand and cater to your audience’s needs.
Let’s explore cutting-edge customization techniques that can transform a standard Shopify product page into a high-converting powerhouse.
4 Easy Ways to Create and Customise High-Converting Shopify Product Pages
Creating a Shopify product page is easy, but customising it to convert better. That’s where the magic happens. Below are four simple yet powerful methods to enhance your product pages visually and functionally, with examples and tools to help you implement them.
Method 1: Using Shopify’s Built-In Product Page Editor
Shopify’s built-in product page editor is an easy and intuitive way to customise your product pages without needing to write any code. If you’re just starting, this is the best option as it lets you quickly adjust your product page’s layout with drag-and-drop simplicity.
How to Do It:
- Access Product Settings:
- From your Shopify admin panel, go to Products > Add Product.
- Here, you’ll add essential product details, including the title, images, description, and pricing.
- Choose Theme Template:
- Scroll down to the Theme Template section and select a template that fits your style and layout preference.
- Customise with the Theme Editor:
- Go to Online Store > Themes and click on the Customise button. This will open the theme editor, where you can adjust the look of your product page.
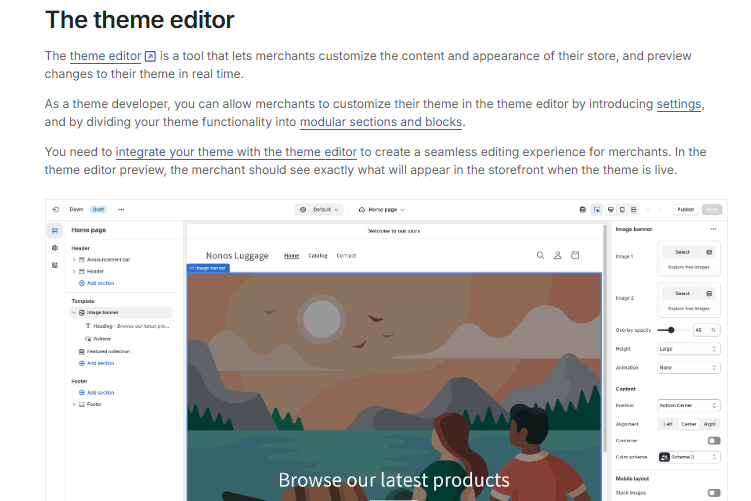
- From the editor, you can add, remove, or rearrange content blocks such as product descriptions, images, or related products.
- Rearrange Content Blocks:
- Drag and drop different sections to customize the layout. For example, you can move the "Add to Cart" button higher on the page or add a section for "Product Recommendations".
- Adjust images, text, and buttons to make sure the page is visually appealing and easy to navigate.
Example in Action:
- Before customisation: The "Add to Cart" button might be placed at the bottom of the page.
- After Customisation: Move the "Add to Cart" button above the fold (the visible area of the page) to make it easier for customers to find, improving conversions.
- Product Recommendations: Add a section showing related or recommended products to keep shoppers engaged and encourage additional purchases.
This method is ideal for beginners and gives you the flexibility to make adjustments without touching a single line of code.
Method 2: Customising with Shopify Themes
Shopify themes provide built-in flexibility to adjust the overall design of your store. You can customise various elements like fonts, colors, layout, and functionality to match your brand’s style, all through Shopify’s Theme Editor.
How to Do It:
- Access Theme Customisation:
- From your Shopify admin, go to Online Store > Themes and click on Customise next to your active theme.
- Adjust Site-Wide Elements:
- In the Theme Editor, you can adjust typography (fonts), color schemes, and the homepage layout to match your brand’s identity.
- Change fonts and colors to fit your brand, making sure your product pages reflect your store’s aesthetic.
- In the Theme Editor, you can adjust typography (fonts), color schemes, and the homepage layout to match your brand’s identity.
- Customise Product Pages:
- Navigate to the Product Page template in the editor to adjust how product pages look.
- You can change how product images, titles, and descriptions appear, as well as tweak buttons like “Add to Cart”.
For example, if you’re selling luxury jewelry, opt for a minimalist theme like “Dawn”. Use elegant fonts and ample white space for a clean, sophisticated look. You could also make product images larger and add promotional banners specific to product pages for limited-time offers.
With this method, you can adjust your product pages' entire look and feel, enhancing your store’s branding and user experience without diving into complex code.
Method 3: Installing Shopify Apps for Advanced Customisation
Want features like variant swatches, size charts, product bundles, or animated galleries? Apps are the easiest way to add these advanced features without writing any code.
Key Apps from StarApps Studio
Rating: 5.0/5
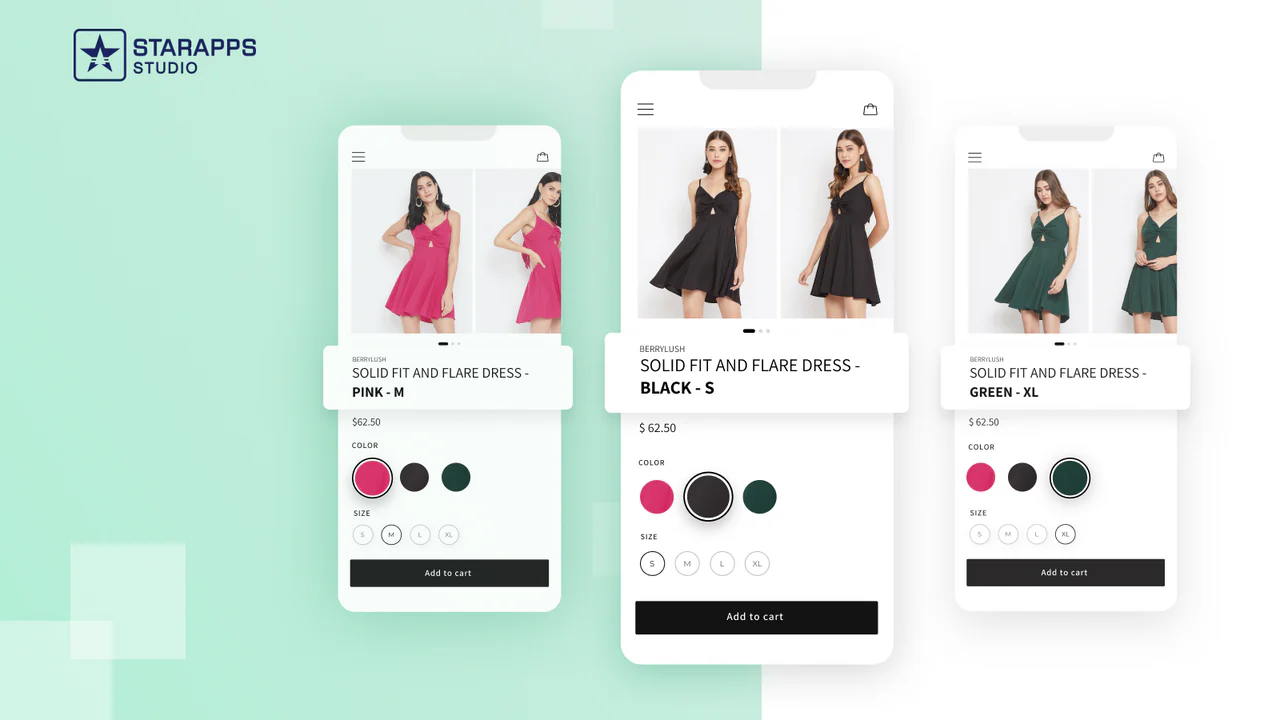
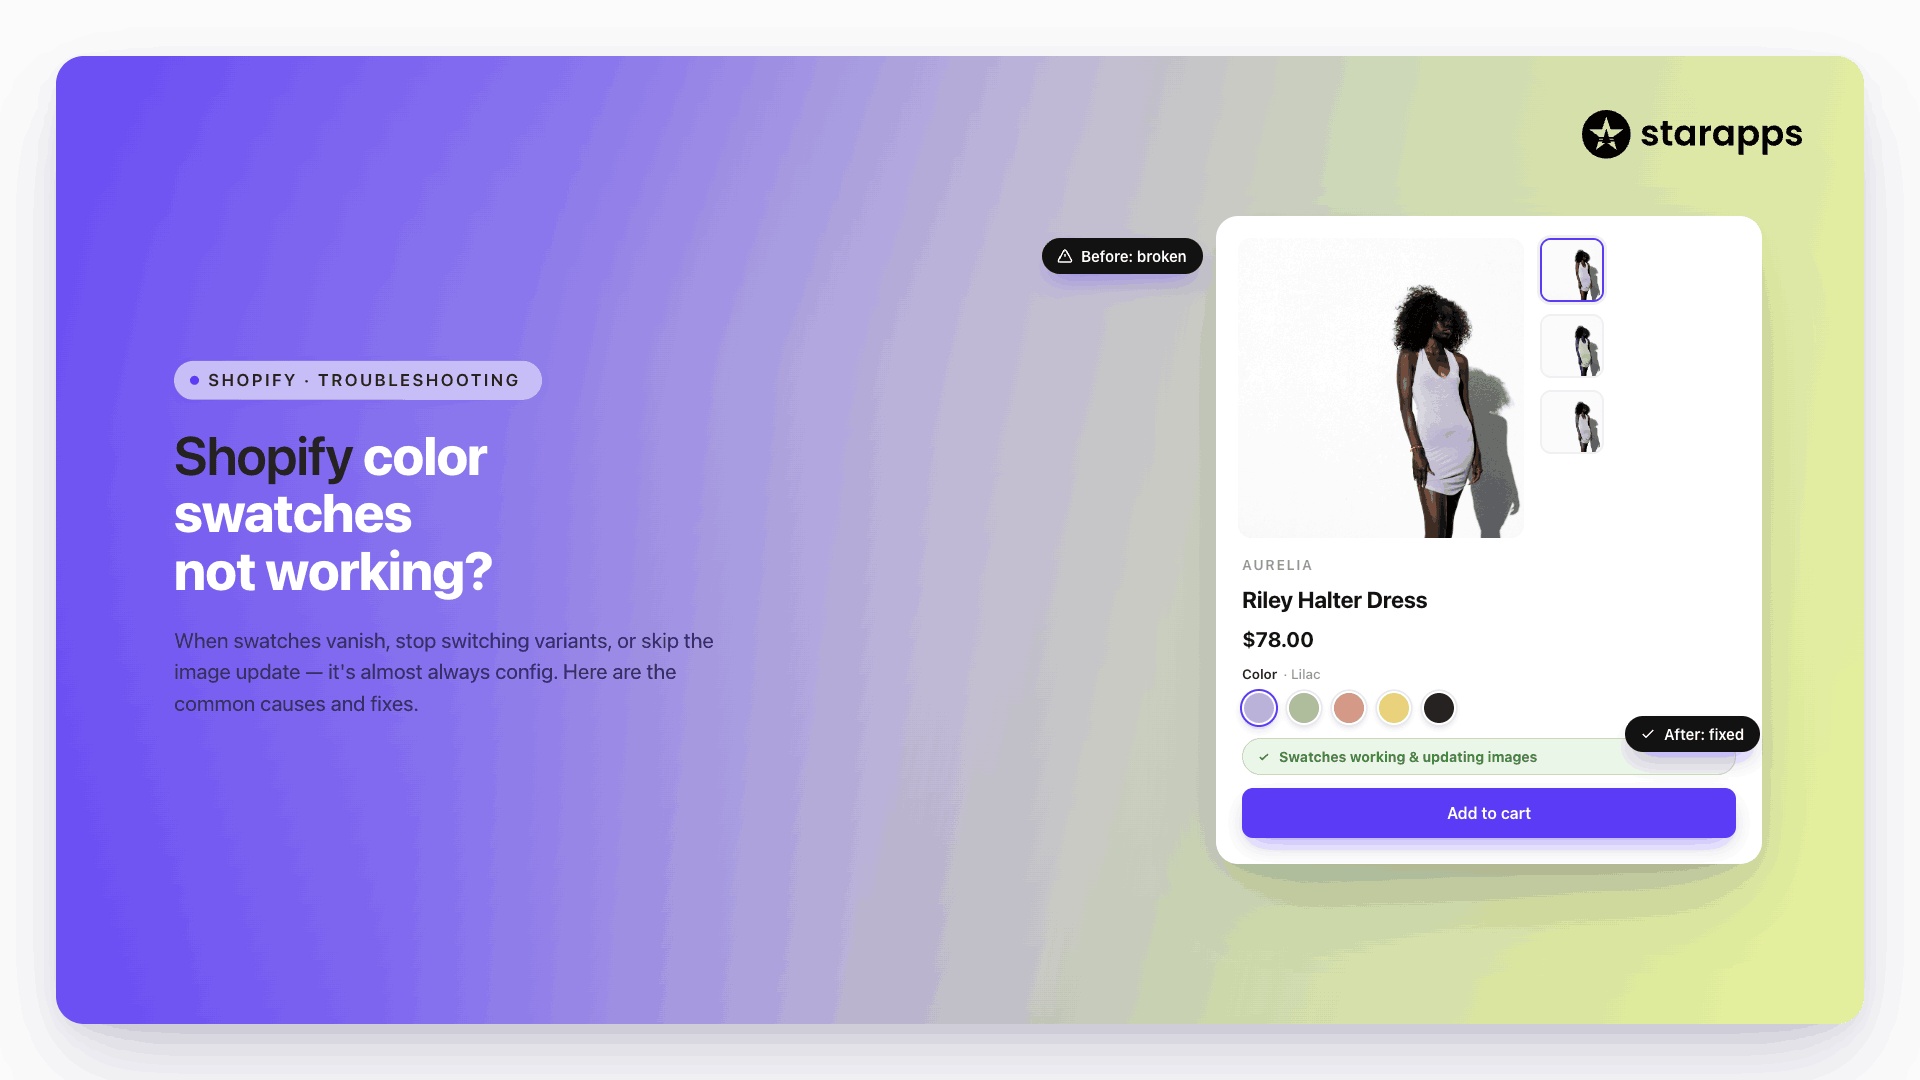
Display color swatches and variant images, replacing the standard dropdowns, making product selection faster and more visually appealing.

Key Features:
- Add variant images for different colors, sizes, etc.
- Replace dropdown menus with clickable swatches.
- Enhance the shopping experience with easy-to-view variant options.
This app is easy to install with no coding required. Simply configure your color variants, and the app will cover the rest. Moreover, this app helps boost conversions by making variant selection faster and more visually engaging. Customers can see exactly what they are buying, reducing hesitation and increasing the likelihood of a purchase.
Rating: 4.9/5
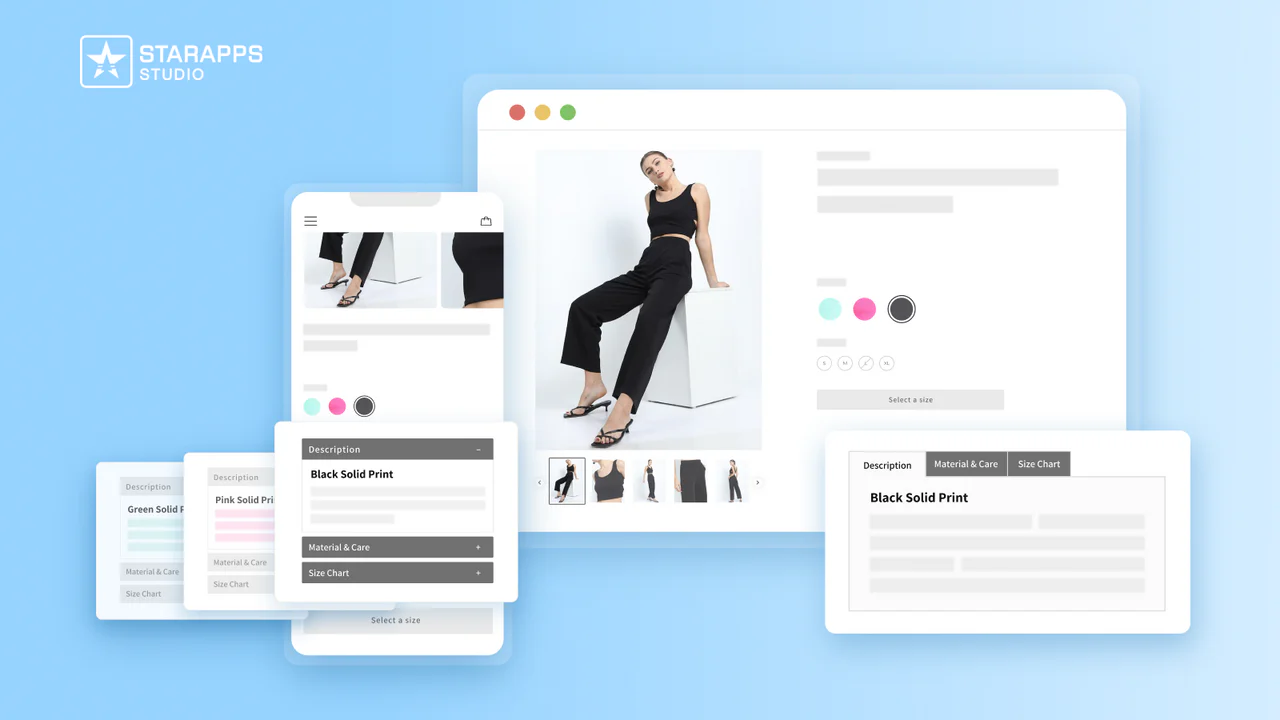
Automatically display multiple images for each product variant, creating a cleaner, more organised gallery that better showcases your products.

Key Features:
- Show multiple images for each variant.
- Organise your product galleries for a cleaner, more professional look.
- Provide customers with a better view of the product, increasing confidence in their purchase decision.
The app is simple to install and, once set up, it automatically displays the correct images for each product variant. Showing multiple images of every variant helps customers better understand what they’re buying—reducing returns and building trust, just like browsing in a physical store.
Rating: 4.5/5
Add specific variant details like color or SKU directly into the product title for more transparency and improved searchability.
Key Features:
- Add variant information such as color or SKU to the product title.
- Improve search visibility and customer clarity.
The app is easy to set up with no coding needed. It automatically adds relevant variant details to your product titles, improving SEO and helping customers find exactly what they’re looking for. This not only boosts discoverability but also enhances the overall shopping experience.
Rating: 4.8/5
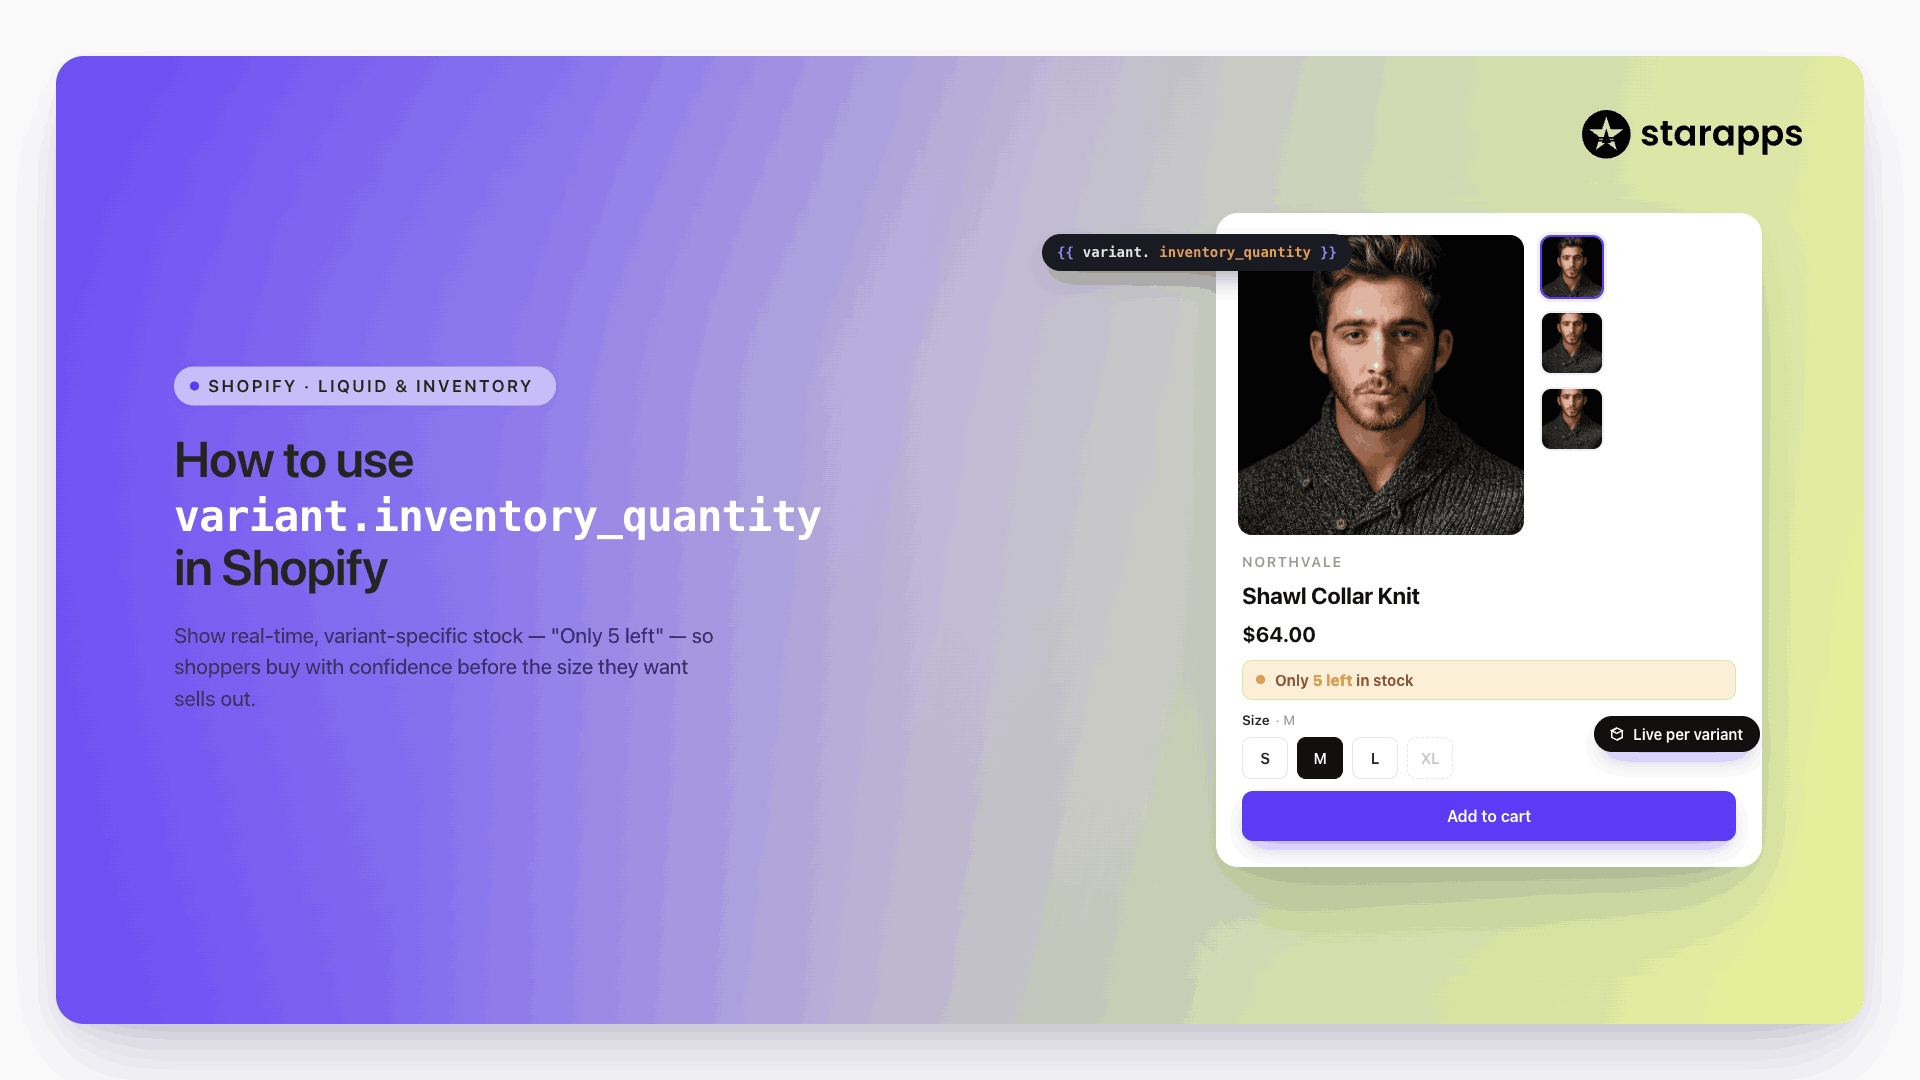
Display unique descriptions for each product variant to reduce customer confusion and hesitation, increasing conversions.
Key Features:
- Add unique descriptions for each variant
- Reduce confusion by clearly outlining the benefits of each variant option
The app is simple to set up. Once you enter descriptions for each variant, it automatically displays the relevant content based on the customer’s selection. This ensures shoppers get the precise information they need, leading to more confident purchas
By integrating apps from StarApps Studio, you can provide a smoother, more engaging shopping experience that resonates with your customers and encourages them to complete their purchases.
Method 4: Adding Custom HTML/CSS for Deep Customisation
For full control over your Shopify product pages, adding Custom HTML and CSS allows you to tailor the design and functionality. This method is perfect for advanced users or developers.
Steps:
- Access the Theme Editor: Go to Online Store → Themes → Actions → Edit Code.
- Edit Product Template: Find the product.liquid template and insert custom HTML for new features (e.g., custom buttons or info).
- Apply Custom CSS: In theme.scss.liquid, add CSS to adjust styles (e.g., button colors, image sizes).
- Preview and Test: Ensure your changes look good and work on all devices.
For example, you might add a custom "Quick View" button using HTML that opens a pop-up window with additional product details, and then use CSS to style the button with your brand's colors and hover effects.
Each method offers flexibility based on your technical skills, but for the most efficient optimisation of your Shopify product page, using third-party apps from StarApps Studio is highly recommended. Their tools, like managing variant images, dynamic descriptions, and SEO-friendly titles, provide a complete no-code solution for store optimisation.
Conclusion
Customising your Shopify product page is essential for boosting conversions by improving user experience, effectively showcasing your products, and building trust with your customers. Continuously testing and refining elements like images, descriptions, and CTAs will help you optimize performance and stay competitive.
For seamless and effective product page optimization, StarApps Studio provides powerful no-code tools to manage variant images, dynamic descriptions, and SEO-friendly titles. These tools make customisation effortless, aligning your pages with your brand and customer expectations.
Explore StarApps Studio today and start enhancing your product pages with ease!
Heading

End-to-end traceability
To ensure regulatory compliance, you must have a complete overview of your products from production to shipping. Book a demo to see how Katana can give you full visibility of your operations.

.png)
.png)